How to debug your plugin code
Table of Contents
Programmers know very well what is a debugger but I wish explain this matter also for level builder that wish learning a new matter that could help them very much to develope their plugins.
Thanks to debugger you can to do a little magic: enter in the program, your plugin or tomb4, and see from inside what it's happening in any instant.
You can stop the program when it should perform a single instruction and check the values of all variables or structures.
You can perform one instruction at once and follow the different computations, while they are changing the values under your eyes.
Fixing and learning
Thanks to above features the debugger is useful not only to fix bugs but also to discover the secrets of tomb raider and its many objects, effects ect.
For instance we already know, from advanced scritping, the usage of log file, to see the different script command performed or the values of trng variables changed by triggers, but using a debugger you have another way to discover the content of variable or fields of any structure: launch the game and stop it in a given moment , and then read all contents you wish.
Manage the crashes
Another important feature of debugger is that it is able to show to you where it happened a crash.
We know that in some circustance, it could happen that tomb4 engine aborts suddenly, and then we'll have only the message about it happened a crash and the creation of a crash report.
But what happens if this crash occurs while we are performing tomb4 from debugger?
In this case the program will not abort, but the debugger will stop the program in that precise instruction that affected the crash, like it was a breapoint.
In this way you'll be able to see where is the problem, what instruction and in what function affected the crash, other to be able to inspect all variables and structure in that precise instant.
The sample sources and level we'll use in this tutorial
To have a source and a level, in common, to analyse I saved to the folder "PLUGIN_SDK_STORE" some subfolders with plugin source, and wads/prj/script files to use for this tutorial.
In folder:
PLUGIN_SDK_STORE\Tutorial Debugger\Plugin_Source_bugged
You find the "PlugIn_trng.sln" file to load from Microsoft Visual Express 10.
This is a plugin project with some bugs to fix. It is an intermediate version of plugin_trng where I met some problem while I was developing the "looking around" feature for Star Wars Robot.
While in the folder:
PLUGIN_SDK_STORE\Tutorial Debugger\Wad_prj_files
You find the wad files to copy to graphics\wads subfolder of your trle folder.
(Note: if you had changed the last "plugin.wad" files, it's better you save to other folder the last plugin wads because these wads, we are using for debugging, are older.)
You find also the "script.txt" and "english.txt" files to copy to "script" subfolder of your trle folder.
Load in ngle the "plugin_trng.prj" file from the "Wad_prj_files" folder, and click on [Exit and Play] to have the final .tr4 file.
But now quit tomb4, because to debug our plugin we'll have to launch the game in another manner...
How to begin a debugging session
Supposing you had already built the script and the .tr4 file, now we see how to launch the debugger for our plugin source.
In main page of Visual Express, click on "Open Project" underlined text and then browse to find the "Plugin_Source_bugged" folder

Chose "PlugIn_trng.sln" file and then click on [Open] button.
note: This operation it's necessary only first time you open a project, then you'll find in main page of visual express a shortcut to load newly that old project.
Set the path for tomb4.exe file and folder
This operation should be performed only once, for plugin project.
If it is first time you load the project from "Plugin_Source_bugged" folder you should set in properties of this source YOUR tomb4 and trle folder you mean using with this plugin.
You should have alrewady done this job for main "plugin_trng" sources, but you have to repeat now also for this project for debugging.
You can see the instruction about how to Set the correct properties for our project
Tomb4 has to run only in Windowed mode
First important fact to remember is that you cann't debug tomb4 when it works in exclusive video mode.
Since there is only one screen, the debugger will be not able to pop up over the tomb4 screen and all system will hang.
For this reason remember to verify that tomb4 settings were with some windowed mode.
About resolution to choose, I suggest a not too wide screen, because with some kind of debuggin we'll need to have in same moment tomb4 window and debugger window opened on the screen, aoviding that one was able to overlap fully the other.
Note: to set the windowed mode, launch tomb4.exe, keeping down the CTRL key and in setup window of tomb4, click on "Windowed Mode" checkbox.
You have to build a [debug] version of the .dll
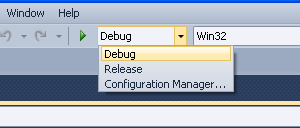
When you build your dll, remember to verify that you are building the "Debug" version of the library.
Only with debug version you'll be able to work in source mode, that is the most nice and understandable debugging.
You have to keep updated the plugin_.dll file in trle folder
Before beginning the debugging, you should always build the project (as [debug] version) and then copy the (just built) plugin...dll from "debug" subfolder of your project folder, to trle folder.
If you forget to update the .dll it could happen that the .dll in trle folder was older respect the sources your are debugging, getting error messages and misalignments.
Set first breakpoint
A breakpoint is a point where the program will be stopped.
When it has been reached the breakpoint the tomb4 game will be frozen and the Windows Express window will be showed in foreground.
To place a breakpoint just you click on the line of source code where you wish place it, and then hit F9 key.
For instance, try to locate the ControlRobotStarWars() procedure.
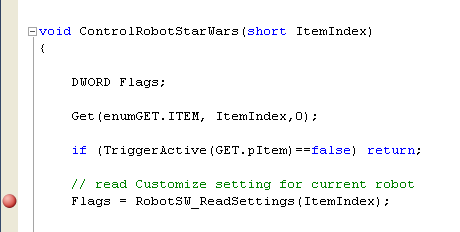
Place the caret over the wished line:
Flags = RobotSW_ReadSettings(ItemIndex);
and hit F9 key. You'll see a red circle at left margin of that line (see above picture)
We set our first breakpoint.
Now, if you have followed all previous rules, we can begin the debugging.
You can use the menu command:
Debug->Start Debugging
... or the keyboard shortcut, hitting the F5 key.
At first debugging you'll receive this warning:

Debugger is warning that in tomb4 exe there are no source availables. Unfortunately this is not a surprise for us.
You can check the voice "Don't show this dialog again" and click on "Yes" button.
Tomb4 game is on air
Now you'll see the common tomb4 screen.
Select the level "Exercise 4: Star Wars Robot"
Apparently all works like usual and indeed there will be no slowdown or interference from debugger until the instruction where we placed the breakpoint will be performed...
If we see newly that breakpoint

We see that it has been placed below the line:
if (TriggerActive(GET.pItem)==false) return;
Since above is a condition "if" until the condition will be false the control will pass to "return" instruction and in this way our breakpoint it will be never reached.
The TriggerActive() function, used in the condition, work in this way:
Until the object (our star wars robot) is untriggered it will return "false", while after the activation in game (triggering) the condition will be true, and the following instruction will be performed: our instruction with the breakpoint.
Therefor, to enable our breakpoint, and stop tomb4 program, just we enable the star wars robot.
So try to reach the dark blue sector to trigger the robot...
The tomb4 will be frozen and debugger window will go foreground

That yellow arrow at left it's very important because shows to you what instruction is going to be performed.
The instruction is that we chose, of course...
More interesting is to see the bottom side of debugger window, where we can see values of variables and others...

In the panel, called "Autos" you can already see some variables and their current value.
Flags has a huge (and weird) value because it has not yet been initialized.
ItemIndex is the index of star wars robot in internal tomb raider format, so we discover that its index is 55
Exploring Structures
When you see a little [+] at left of some variable name, it happens because that is the name of some structure.
Since a structure is a group of variables, you can click on that [+] to open the group and to see all variables and values of that structure.
For instance the
[+] GET.pItem
Is the structure of a moveable item, in our case of our star wars robot.
If we open it with a click on [+] you see this:

We see some variables and their values of StrItemTr4 structure pointed by GET.pItem pointer.
For instance in "SlotID" field we see the value 499, and indeed the slot of star wars robot is 499
The "MeshVisibilityMask" is a huge and misterious number.
This happen because it is a mask of bit. In these cases it's better show the values in hexadecimal format to understand better their meaning.
Juck click with right mouse button and choose the voice "Hexadecimal Display"

Now you can see that the "MeshVisibilityMask" has value 0xFFFFFFFF, since that means: all bit enabled, and so also all meshes visibles.
If you wish do an experiment you can also change the values of variables.
For instance if you perform a double-click (with left mouse button) where there is the "0xffffffff" value and change it with "0xfffffffe" replacing last "f" with "e", you'll remove last bit with value "1" and therefor the mesh 0 will be invisible in game. (then you'll be able to verify this change, but not now: the game is yet frozen...)
We can continue to explore the GET.pItem structure, scrolling down the list to see other fields (or sub-variables of this structure)

In this case we see that the animation of the robot is 752 but this is an absolute value so not very useful.
Then we discover that the room index is 14 (in tomb format, while in ngle it may be was different)
Health (HP / vitality) has a negative number that it means: this object is not killable with common ammos.
How to perform instructions step-by-step
Now we can try to perform the current instruction, using F10 key.
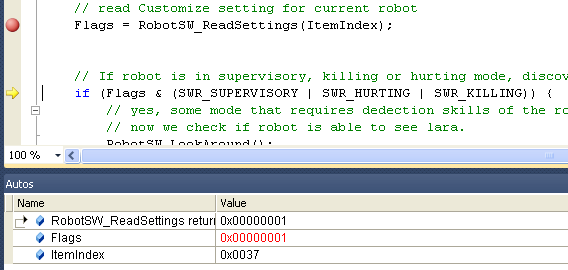
After the f10, we see that the yellow arrow changed its position, moving on next instruction to perform, and in the [Autos] panel, the Flags variable now has value "0x0001"
Since that instruction read the flags from robot settings (in customize command)
The value 0x0001 is that of "SWR_SUPERVISORY" constant.
Now we can hit newly F10 to discover what instruction will be performed.
Indeed now currnet instruction is a condition so it's not sure if the control will enter in the bracket parenthesis { }, or it will skip them, because the condition is false.
The condition test if in Flags variable has been enabled at least one of following flags:
#define SWR_SUPERVISORY 0x0001
#define SWR_HURTING 0x0002
#define SWR_KILLING 0x0004
Anyway, since we saw that in Flags there is the value "0x0001" the condition should be true, and the next instruction to be performed should be within the bracket parenthesis.
Hit f10 and you see that the yellow arrow point to first instruction inside of the brackets. The condition was true, as we supposed...
Now the current instruction is this:
RobotSW_LookAround();
This is a function, so a group of instructions, if you hit f10 (but don't do now!) all instructions of "RobotSW_LookAround()" will be performed and the control (yellow arrow) will pass to:
RobotSW_DetectAndAttack(Flags);
But what's happen if we wish perform the single instructions within the "RobotSW_LookAround()" function?
To "enter" in the function we have to use another keyboard command: F11
Now try to hit F11...
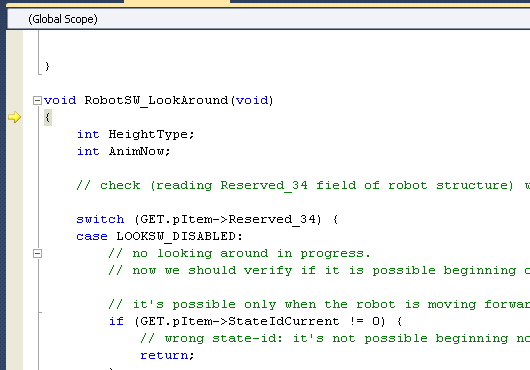
How you can see, now you entered in RobotSW_LookAround() function.
Ok, it's a bit weird that the instruction to be performed now it seems a "{" but just hit F10 key, to move yellow arrow on first real instruction:
switch (GET.pItem->Reserved_34) {
We discover another interesting usage of debugger: in the case you have not very well understood how some instruction works, you can use a breakpoint on that instruction and then using the F10 key to see what's happen, how the values change and how the control jump on what instruction.
In this case the Switch() check the value inside of round parenthesis and then it jumps to the following "case" statement, where there is the same value.
Since we see in "Autos" panel that the "GET.pItem->Reserved_34" has value = 0, hitting F10 you'll see that the control will go inside of "case" instruction:
case LOOKSW_DISABLED:
And this is logic, since the costant "LOOKSW_DISABLED" has value 0, the same value in round parenthesis of previous "switch()" statement.
This is enough for our first experiment, anyway we have to conclude this experiment following right procedure...
How to conclude a debugging session
It's better avoding to use the "Debug->Stop debugging" command, because in this way the programs we are debugging (tomb4+trng+your plugin) will be aborted in irregular way and for this reason they will have not the chances to free the resources of system they had allocated in run-time.
So it's better return the command to tomb4 and then quit tomb4 in standard way, going back to titles and then choosing "Exit"
First we should remember to remove the breakpoints, otherwise the game will be newly stopped not just the control pass newly in that instruction.
When there is only one breakpoint and we remember where we placed it, we can use simply the F9 key on that row. The f9 key place a breakpoint or remove a breakpoint if on that row there was one.
How to manage breakpoints
Another faster way, when there are many breakpoints or in far position in the source, is to use the "Breakpoints" panel.
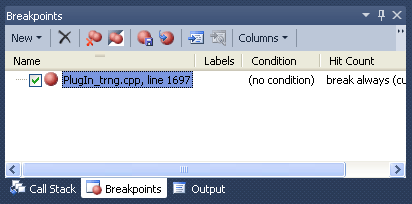
In this panel (you can show it also using ALT F9 shortcut) you can easily remove the selected breakpoint (with that X icon at top) or disable temporarily it unchecking the [ ] little box at its left.
Now we can select the only one breakpoint and then delete it.
We'll see later how use other features about this breakpoint panel.
How to return the control to Tomb4 program
Now we can give newly the control to tomb4.
In this case we don't wish perform a single instruction but own to do run a block or all instructions of plugin/tomb4/trng executables.
To do continue the running of tomb4 we could use the F5 key but it's not advisable because F5 key will be intercepted also from tomb4 engine and it will be showed the "Save the game" panel.
To avoid this problem it's better using the mouse, clicking on the graphic button with that green right arrow (the standard symbol for "play")

Try to click on that button and now look the robot.
We had changed the visibility mesh mask, do you remember?
If you look the robot the change we did has had a bad effect, rather disturbing...
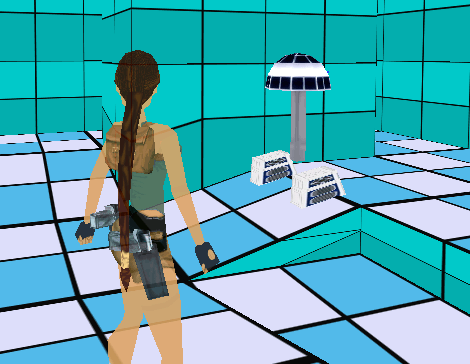
Most used Panels and Features of Microsoft Debugger
Before starting our troubleshooting we have to know better some panel and feature of debugger that we'll use very often.
About panels I remember that you can arrange, changing position and size, all panels.
It's interesting for instance, move a panel from a window container to another. I used this method to have only one but wider window container with all panels I wish, in this way I can resize that only one window container to have wider panels and more descriptive data for each row.
To move a panel outside of its window container just click with left mouse button on bottom label with its name and keep down the left mouse button, dragging it to another window container or outside of all to have that panel like a single indpendent window.
You can also hide some panels that we'll not use very often (or never), of course.
Two panels that we can hide are "modules" and "threades".
They give us technical information useless for our targets.
To hide them just click with right mouse button on its name (in bottom row) and choose "Hide" command.
Panels to show values of variables and structures
Very useful are the panels "Autos", "Locals" and "Watch1".
All these panels will show variables and structures and their values but we should wonder: if each of them show same data, what is the difference between these three panels?
Well, there is a difference, of course...
It depends by the criterions used to choose the variables to show in these panels.
The Autos Panel
"Autos" should mean "automatics", because the variables showed in this panel will be chosen automatically from debugger.
It uses a smart method, trying to show variables you are changing in the code where is the current control (yellow arrow)
Probably "Autos" panel is that we'll use more often, because is comfortable having always the variables we are changing or testing (in a condition instruction) showed into the panel.
The criterion used, it seems work in this way:
It will be showed the variables present in previous line, in current line (with yellow arrow) and in following code line.
In this way we can immediatly seeing how it has been changed a variable of previous line.
What value has now the variable we are going to change in current line.
And what value has the variable in next line, usueful for instance with conditional jumps.
The Locals Panel
In Locals panel the criterion of selection is very precise: all local variables of current function will be showed.
Local variables are those variables that you declare inside of some function.
For instance:
void RobotSW_LookAround(void)
{
int HeightType;
int AnimNow;
// check (reading Reserved_34 field of robot structure) what phase of looking around is performing the robot
switch (GET.pItem->Reserved_34) {
case LOOKSW_DISABLED:
In above extract of RobotSW_LookAround() function, we see two local variables: HeightType ad AnimNow.
In locals panel you'll see these variables when the control (yellow arrow) is inside of RobotSW_LookAround() function.
In same extract you can see also the structure/variable GET.pItem->Reserved_34. This is global, because has not been defined in any function, but outside of all function.
You'll be not able to see the value of "GET.pItem->Reserved_34" variable in Locals panel, since it is not local.
The Watch1 panel
The watch panel is also very useful, because in this case it's you to set the variables to analyse.
For instance if you wish monitor constantly some variable (local or global) just you click on left column (that of "name") and type the name of variable or structure to watch.
For instance while we are debugging the code of Star Wars Robot, we could add in watch these two structures:

We'll have always the chance to see data about Lara and about GET.pCust that, while we are performing code of SW robot, will contain the data of Customize=CUST_STAR_WARS_ROBOT script command.
You can use Watch panel to study all global structures of tomb4/trng world in a given instant, while tomb4 has been frozen from some breakpoint.
The Call Stack Panel
To understand this panel it's necessary explain how a program handle the call to functions.
When we find a code like this:
int AlfaProcedure(void)
{
int i;
i = GetNumber();
i = i +1
return i;
}
When the control reach the instruction "GetNumber()" the control will jump to code owned by GetNumber() function, and when that code has been performed, the control will come back at the next row after the call, in our example, the row "i = i + 1".
To remember the position (address of istruction) where coming back (after having performed the code of GetNumber()), the program will save the return address into the stack. Pratically in this example, the address where there is the instruction "i = i +1".
It's possible that also in GetNumber() code, there was another call to another function, and the stack will store also that return address.
The Call Stack panel, show to you all return addresses and in this way you can discover from where it has been called the code that you are currently debuggin.
For instance if after a breakpoint inside of "GetRelativeAnimation()" function (present in "tgng.cpp" source), we could see these values in Call Stack Panel:
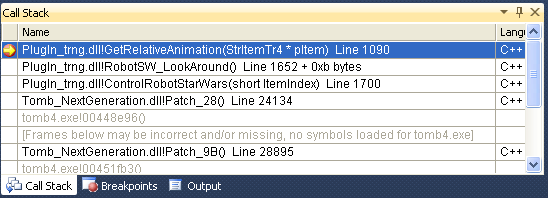
Reading the names, from top to bottom, you find in first position the name of current function, where there is the control.
In our example it is "GetRelativeAnimation()" function, of course.
More interesting are others functions.
In second posiition we find the name of function from where it has been called the "GetRelativeAnimation()" function. Looking the above image we see that it has been called from RobotSW_LookAround() code.
While the RobotSW_LookAround() function, it has been called from ControlRobotStarWars() function, ect.
These info say us the path of nested calling to reach current instruction.
We can understand better this flow, typing it in inverse sorting:
ControlRobotStarWars() -> RobotSW_LookAround() -> GetRelativeAnimation()
The infos of Call Stack panel are especially useful when there has been an error (exception) that stopped suddenly the program.
If you were debugging it, there will be no a crash, as usual, but the tomb4 will be frozen and debugger will show to you the instruction that affected the error.
In this situation, reading the Call Stack panel, you can understand better from where it had been called that code.
The Breakpoints Panel
Everytime you add a breakpoint with F9 key, that breakpoint will be showed also in the list of Breakpoints panel.
You can from here delete easily some breakpoint or disable it.
The difference is that if you disable a breakpoint, unchecking the [] at its left, the program will be non stopped, like it was missing, but you preserve its position in Breakpoints panel to be able to enable it newly in future debugging sessions.
The Conditioned breakpoints
An interesting chance is to transform a common breakpoint in a conditioned breakpoint.
Once you added a common breakpoint with f9 command, you can open the Breakpoints panel, click on the wished breakpoint to select it and then click with right mouse button to have the popup menu and choose "Condition".
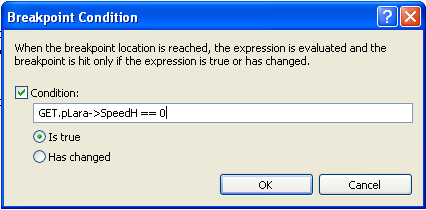
Now you can type a condition with same syntax you use in the code and then click on [Ok]
In above image I used as condition that speed of lara was 0, and therefor the breakpoint will stop the game only when the control reach that position and lara is not moving in that moment.
Then you can see also in breakpoints panel the condition you had set:

Note: the conditioned breakpoint could affect slow-down in game, in many circustances it's better place the breakpoint in some position after already exist a condition, in the original code, to filter the control in that position.
Condition "has changed" mode
In the condition window you can work with "is true" or with "has changed"
If you have a precise idea about the comparation between a variable and a given constant value, you'll use the "is true" mode, and you'll type in the condition some logic operators like "==" (even), "!=" (different), ">" (greater than), "<" (less than) ect.
But there is a particular situation where you don't know in advance the value to compare but only you wish detect when the value is different than current value. In this situation you'll check "has changed" and you'll not use any logical operator, but only a single variable name. The condition will be true when the value in that variable has been changed.
The Output Panel
This panel show debugging messages sent by debugger. Most of them are about loading of system libraries and messages from different threads when they quit.

Also trng and tomb4 send messages to Output panel: all diagnostic messages that you can catch using Tomb4log.exe utility, will be visible also in Output panel
You can print your log messages using the SendToLog() function.
For instance:
SendToLog("The room of robot now is = %d", GET.pItem->RoomIndex);
And in Output panel (and Tomb4Log window if it is present) you'll see something like:
The room of robot now is = 12
Remarks:
- In the text you print with SendToLog() function it's not necessary add the final "\r\n" characters. Only in the middle, printing in same moment two or more rows, you'll have to add the "\r\n" characters to divide the rows.
- If you place a SendToLog() function to print some text in a point of code that it will be performed continuosly, you should have about 30 messages for second, one for each frame. This situation could create a huge log in Output panel.
Differently this problem is less probable using Tomb4Log.exe catcher, because this utility will ignore the message that are the same of previous and in this way the lenght of log will be strongly reduced.
Tips & Tricks
In this chapter there will be a short list of suggestions to avoid some troubles with debugger and how to improve the debugging phase.
How to manage the request for project out of date

If you forget to build newly the project (after some change) before beginning the debugging (with command "Debug->Start debugging (F5)"), you'll receive the dialog at left.
Debugger is asking if you would like re-build the project since the current plugin is out of date.
Well, in this case, it's better you click on [Cancel] button, because also if it seems a good idea build newly the project, really Visual Express is not able to replace the plugin_..dll in trle folder but only that in plugin folder.
For this reason if you chose the [Yes] button, Visual Express will build the project and then the debugger will be launched but the plugin in trle folder is yet out of date respect your sources.
This situation, creates sometimes a corruption in some files used by debugger own to support the source debugging.
Therefor, remember: when you receive this alert: click on [Cancel], then build yourself, with F7 command, the project, and then copy the plugin_.dll from plugin folder to trle folder, and only now you'll be able to launch newly the debugger.
How to solve the problem of defective Breakpoints

Sometimes it could happen a bad matter: the breakpoint that you set with F9 command seem don't work and their layout is weird: instead the common full red circle, they appear like an empty circle.
See picture at left.
If you look carefully you'll see also a very little warning triangle.
Keeping the mouse pointer over that triangle for some moment, it will be showed a tool-tip to inform you about the reason of this problem.
For instance, most frequently the warning will be like the following:

In above case the reason is that, the plugin_dll in trle folder is out of date and therefor the sources built in that version are different than those you are using for debugging.
In this case, please, don't follow the suggestion of above warning, because changing the settings in that way is a foolishness, since we should accept like a rule, that sometimes we will work with out of date sources.
The good solution is simply to quit debugging, buid newly the project and at end, copy the just built plugin_.dll from plugin folder to trle folder.
When the problem is for the missing of debug information
Sometimes, the problem of defective breakpoint has another reason, that it's not easy to explain, since it should be a bug of Microsoft Visual Express.
When the warning (little triangle) inform you that the plugin_.dll has NO debug information, this means that visual express didn't find that little version of sources built in the plugin_.dll
This is very weird...
Anyway here there are some attempts to try to fix this bug:
- Verify if you are working on [Debug] version.
In the top line, immediatly below the menu line, you should see [Debug] [Win32].
In the case you had [Release] [Win32], then the problem is that you are working on release version and it's normal that this version had NO debug information.
So, in this case, to fix the problem just you select the [Debug] version, build newly the project, then go to plugin folder and in the sub-folder named "Debug". From this sub folder copy the plugin_.dll to trle folder.
- Perhaps you forget to copy last debug version to trle folder and in trle folder there is an older release version.
So go to plugin folder and debug subfolder and copy plugin_.dll to trle folder
- Quit Microsoft Visual Express, go to plugin folder and "debug" subfolder, and delete the plugin_.dll file.
Now launch newly Visual Express, reload the project, build it (taking care that it is working on [Debug] version) then copy the plugin_.dll file from debug subfolder of project to trle folder.
- Verify to have set all right properties for current project.
You find the right settings in Set correct properties for your project
How to see all cells of an array in Watch1 panel
From Watch1 panel we can inspect the content of all variables and structures but in some circustances we could have a problem to see all values of some array (vector)
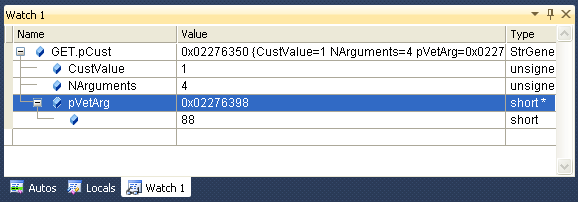
For instance in above image we see an attempt to inspect the contents of GET.pCust variable. It is a pointer to a customize structure.
In spite that the arguments of array "pVetArg" are 4 (like we see reading the content of "NArguments") we are able to see only first item of "pVetArg" vector (its value is 88)
How can we inspect also other items of that vector and why does it happen this problem?
This problem happens when the array has been declared like a pointer to a given type of item.
For instance the above customize structure has been defined in this way:
typedef struct StrGenericCustomize {
WORD CustValue; // CUST_.. value
WORD NArguments; // number of arguments
short *pVetArg; // pointer (dynamically allocaedte to free at begin of next level) with all arguments of this customize
}GenericCustomizeFields;
Since the array is a pointer to "short" numbers, Visual Express is not able to know how many items it should display, since this number could be thousands, millions or billions, and in this doubt it prefers displace only one item: the first of the array.
The matter is different when an array has been defined in this other way:
short VetArg[6];
Because in this situation Visual Express know the amount of items and you'll be able to see the content of all 6 items of VetArg[ ] vector.
How can we inspect also other items of that vector
We can add in Watch1 panel another variable to watch but this time we can type the full path to see the content of a specific item of wished array.
For instance if we wish know the content of item with index [3] we can type this new variable to watch:

This solution has the disvantage that you should add many expression to watch, one of each item of array to watch but it has the advantage to give you the chance to identify in better way a specific item of the array, when you are not interested to all other items of a wide array.
Note: theoratically there could be another way to solve the problem, that to watch the memory zone from where begin the array but unfortunately, in Microsoft Visual express release (that for free) the dump memory window is not present.
A trick to inspect all items of an array
There is a way to force Watch1 panel to show all distinct items for array built as pointer...
Pratically you should say to debugger to see that pointer array like it was a defined size array.
We can realize this target whereby a casting.
In Introduction to C++ language you can read about casting.
With casting we say to visual express to consider a variable like it was of another kind, setting in round parenthesis this new kind.
To realize this trick we have to define a new structure like following:
typedef struct StrArrayShort {
short Items[32];
}ArrayShortFields;
We'll type above text in Structures_Mine.h source, of course.
This StrArrayShort structure contains a defined size array, that kind of array that Watch1 panel is able to show, item by item.
Well, now we do a casting, typing in Watch1 panel this row like variable name:
(StrArrayShort *) GET.pCust->pVetArg
In this way we "said" to visual express to suppose that the "pVetArg" was really a pointer to StrArrayShort structure.
This is final result that we'll see:
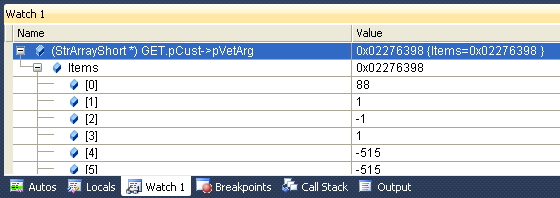
We reached our target: now we can see all items of that vector ot at least, the items we set in our StrArrayShort structure.
In the case you wished using this trick to see an array of "int" (instead of "short") number, you should build a different structures with "int" types, of course:
typedef struct StrArrayInt {
int Items[32];
}ArrayIntFields;
How to avoid hanging of tomb4 program
Sometimes it happens that tomb4 program hanged own because we are debugging it.
This situation could happen when you place a breakpoint where it will be peformed each frame and then you continue to stop/run tomb4.
I mean that when the control reaches the breakpoint it will stop tomb4, but then you use "Continue (F5)" command to do go on newly tomb4.
It's a problem about the way used from tomb4 to put in standby its threads that is not very effective, anyway to avoid this problem we should avoid this situation.
Pratically we should wonder: why do I need to act in that way? Because I'm waiting that some condition is true, so everytime I see (after the breakpoint) that is not yet true I use the "Continue (F5)" command to perform another cycle of game? Well in this case it's better if you use the The Conditioned breakpoints in this way it will stop only when the condition is already that right.
Another trick is to place the breakpoint on some instruction that it will be peformed only when other conditions (typed in plugin code) will be true and not in main cycle, peformed everytime.
Note: this hanging doesn't happen when you perform simply next instruction with F10 or F11 command.
How to set a breakpoint while tomb4 is running
Usually we set a breakpoint before launching tomb4 with "Debug->Start debugging" command, but in some case we need to set a breakpoint when tomb4 is already running.
This operation is a bit dangerous, because, in spite it should be possible, there is the usual problem about thread management in tomb4 (see previous chapter) and it could happen that tomb4 and debugger hanged.
In this situation there is an easy trick to avoid this risk...
If the point where you are going to set the breakpoint is in the game code, i.e. in some function called during game time (the most, like all Control() Collision() or Initialize() procedures of moveables), just you enter in inventory with escape and, while the game is showing inventory, you click on Visual Express and then place the breakpoint.
Then you'll click newly on tomb4 to do run newly, and only now you quit inventory. Just tomb4 will quit inventory, your breakpoint will be performed but in this way you avoid the hanging risk.
Note: in the case you mean place a breakpoint in inventory code, you should do the opposite, of course, and so, quit inventory, place the breakpoint, click on tomb4, and only now enter in inventory enabling the breakpoint
How to know the value of registers
 If you are managing assembly code, like that you can see in tomb4 application, you'll discover this boring limitation of visual express version: the register panel has been removed like that for memory dumping.
These two limitations could suggesting to use another debugger when you are working mainly on assembly code, for instance Olly debugger, well known in trle comunity.
Anyway you can see disassembled code also with Visual Express debugger of course, and in this case the value of registers will be showed automatically in Autos panel, everytime the control is near to those registers.
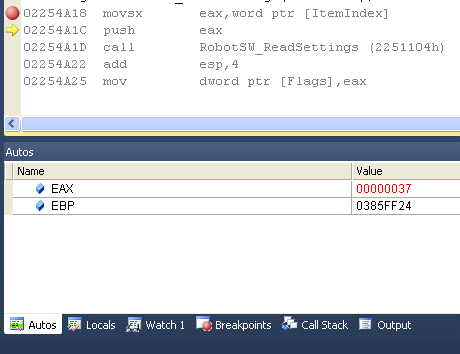
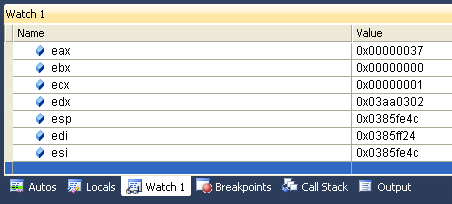
If you wish see in same moment all registers, like it happens with registers panel, just you add in Watch1 panel all register names, getting a result very alike than the missing register panel.
How to inspect structures pointed by registers
 We had already seen that with Watch1 (and autos and locals panels) we can inspect easily all fields of any structure.
Anyway in that case we had a defined variable in our Plugin code, but if we wish (studying assembly code) to inspect a structure whom address is stored in some register?
In this case we'll use the (already seen) trick of casting.
Pratically we can set in Watch1 the register with structure address but, to see the group of fields of that structure we'll have to cast this value with that of structure it is pointing.
For instance if suppose that in ecx register there was the address of a StrItemTr4 structure (main structure of moveable items) we can watch the content typing in Watch1 panel the casting of ecx register with that structure:
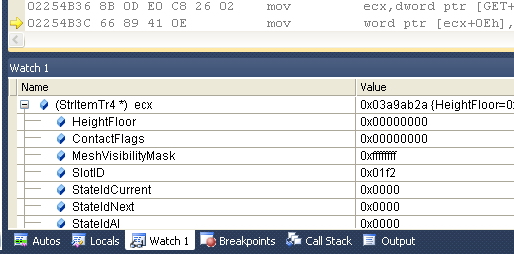
You can use this chance for any other structure kind, of course.
Note: I discover only now, that there is a boring limitation about this feature. It seems that the casting with some structure worked only when the control is within some code memory managed from our sources, while when we are performing code in tomb4 application (that is without sources) the Visual Express debugger shows an error message: "Bad casting"
I suppose it depended own by the missing of sources for tomb4 executable, like if the usage of some casting can work only with structures linked with that zone of code.
It is a weird situation, I'm enough sure that it should be possible around this problem but now I've not the time to perform many studies about this bug.
How to simulate the Dump Memory panel
 The Visual Express release is the free version of Microsoft Visual C++, and it has some limitation respect the professional (for money) version.
One of them is the missing of a dump memory panel to watch the content of wide zones of memory like hexadecimal (or decimal, or float ect) numbers.
In spite it's not so often useful this dumping since we should read the memory contents from the variables allocated in those addresses whereby watch1 panel, in some circustance we could need to reproduce a dumping of memory.
There are some tricks we can use to reach (about) this target.
The "casting" trick to have dumping of memory
It's true: we had already described this trick about the way to inspect the items of pointer arrays.
The trick is the same but for another target.
We'll have to create a group of structures for different kinds of values: int, short, word, DWORD, float ect. and then we'll cast the memory we wish inspect with these structures.
For instance if we created also a structure to dump floating point values (very used in low-level code to manage directx objects), like this:
typedef struct StrDumpFloats {
float Items[256];
}DumpFloatsFields;
We can cast the memory zone with "(StrDumpFloats *)" prefix in Watch1 panel.
We already saw this trick but now there are some differences.
Other that we defined a structure with a larger number of items (256 in above example).
We can use the chance to use a constant hexadecimal address instead by using a variable hosting that address.
The usage of constants it's necessary when we have not in any pointer variable that address but we discovered, studying tomb4 executable, that in some zone there are interesting data.
For instance from address 0x4A7250 there are a serie of float numbers used to compute rations for 2d graphic and other matter.
We have not a dump memory panel, but we can type in Watch1 panel this text like variable name:
(StrDumpFloats *) 0x4A7250
And in this way we'll be able to see all float values "decoded" and labeled with index to locate their relative position respect to base of that memory:
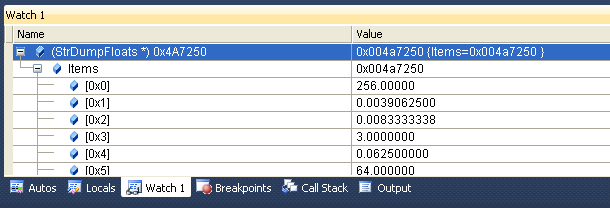
For some types we neither need to create specific structures.
For instance if we believe that from some memory zone there are texts (strings) we can dump these values simply using the casting (char *)
Example:
If we wish see the text stored in 0x4A9EE4 address of tomb4 program, we can doing the cast:
(char *) 0x4A9EE4
And we'll see the testual format of those numbers:
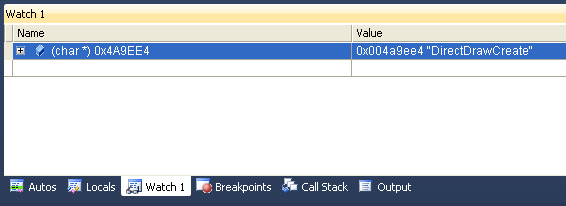
In above image we see that there are texts and they were to store the string "DirectDrawCreate", the name of a directx function.
How to dump multiple types with same casting
Above examples to dump a memory zone work enough fine, anyway the original Dump Memory panel had another skill: that to change easily the type to data to show.
In that way, when we were not sure about the kind of data stored in that memory, we can select from a menu to show all: bytes, words, or floats or texts ect.
Also using our trick of casting we could create this feature but using a more advanced structure type.
If we define in "Structures_mine.h" source this structure:
typedef struct StrDumpMany {
union {
float Floats[256];
int Ints[256];
DWORD Dwords[256];
short Shorts[512];
WORD Words[512];
BYTE Bytes[1024];
char Chars[1024];
};
}DumpManyFields;
We can use a single casting to access to many different types:
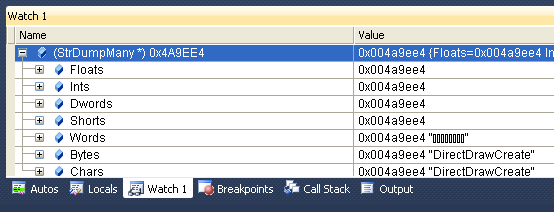
We used newly same constant address of previous example: 0x4A9EE4
But in this case we casted it using "(StrDumpMany *)"
Now you can already seeing the Chars[] and Bytes[] showed as texts, so we discover immediatly that those values are characters used for texts.
Anyway in other situation we could try to expand (clicking on [+] symbols) the Floats or Ints and to see immediatly if those number are reasonable with that criterion of interpretation.
About the above structure it used "union" tag, you can have a description about it works reading Basic of C++ language help
Troubleshooting Plan
Now we begin to talk about how to discover the bugs using debugger.
We need of a plan, or strategy to look for bugs and choosing how to use breakpoints and log files to discover where is the problem.
First step to discover what is not working is to figure how it should work.
In this tutorial we'll use some real bugs whose, while I'm writing these rows, I don't know yet the reason.
As described at begin, you have to work on bugged sources of plugin_trng to have in this tutorial same result than me. (See The sample sources and level we'll use in this tutorial chapter).
How the code should work
I was working about the detection skills of Star Wars Robot.
The robot is able to turn its head at left or right and also to move up the head at three heights: lower (default position), middle and highest.
The code should work in this way:
- RobotSW_LookAround() function.
Everytime the robot is at center of current sector and it is moving forward (No other animations or AI features) on flat floor (no slopes) the code should verify if at left of the robot there is a free space (in closet sector at left).
- IsMissingWall() function
The code will compare the height of the closet sector (at left) with heigth of robot, and when this height of the floor is not so height to forbid the view to the robot, the code will return "true" and set in HeightType variable what kind of height it will be necessary to look over that wall
- If required height is that robot is able to reach with lower head, it will be forced immediatly the animation to look at left
- If required height is bigger than standard (lower) heigth, it will be forced an animation to move the head up, to reach middle or heighest head, and then it will be forced the right animation to look at left using that height of the head
- RobotSW_DetectAndAttack(), FindHeadFacing() and CheckDirection() functions
While the robot is turning the head, the code should verify if, from that position and with that turning of head, the robot is able to see lara.
- When it's not possible looking at left, it will be peformed all above computations also for right direction
It will be not possible if in closet sector there is a full wall, or a wall higher than highest head of robot.
- If it's not possible looking at left or right the robot will continue to move forward avoiding any turning of the head
How the code is really working now...
Now we see how the code is working, because we'll see there are many differences respect what we aspected to get...
The Robot look always at left, never at right
In whole its path the robot never try to look at right, in spite in many circustances it should doing that
The Robot look at left also when there is a too high wall
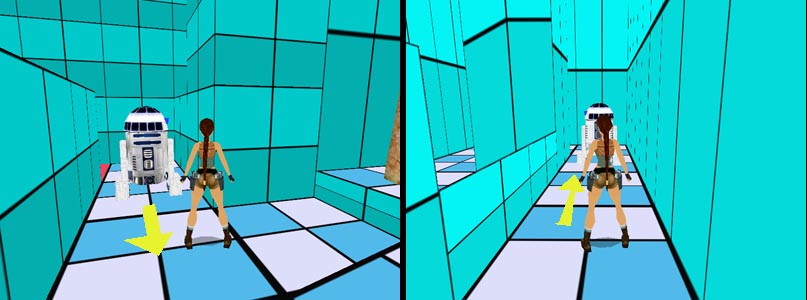
In above image you see two screenshots where the robot is looking at its left (yellow arrow show its current direction) in spite those wall were too high.
The Robot while is turning its head is not able to detect Lara
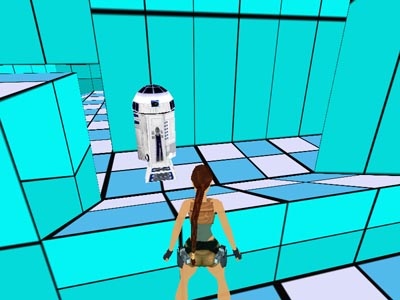
In above image you see the robot is looking at its left and, in spite lara is in front its head, the earthquake to signal the detection has not been engaged.
How to prepare the game to get easy debugging
Since our first bug is about the test of free space at left (or right), we should place our first breakpoint in this point of the code:

Above picture shows the code inside of RobotSW_LookAround() function.
That's right point, since if we placed it above, we'll have had a lot of stop and go, when the robot is not yet at center of the sector and with right state-id, while if we placed it below in the code, we'll have lost the chance to discover what happens where there is the computation about free space at left, i.e. the zone where probably there is own the bug we are looking for.
In this situation we have already the game beginning in right position because looking the starting position of the robot
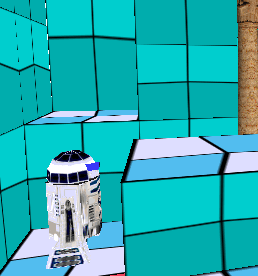
We see that it has at its left a wall not so heigh, where it should be able to look over, setting highest head.
This means that our breakpoint will be called immediatly when we triggered the robot in game, and we'll be able to analyse own one of the situations where the bug occurs.
Anyway, in other situation we could have this situation:
The bug will happen only after many seconds from the beginning of the level, when the robot reach a given position.
In this situation it should be better that avoiding to have many stop and go, with break each cycle and continue the game also to avoid the problem already described (see How to avoid hanging of tomb4 program )
In this situation the easiest way to "prepare" the game is to play the game with no breakpoint, wait that the robot (or other moveable) was in right position (better, a bit first of that) and now we save the game.
Then we'll launch the debugger (and we place the breakpoint) and then in game, we'll load that savegame, getting to be immediatly in right position to enable the breakpoint when you are near to the inception of the bug.
Let's go: fix the first bug
Before launching debugger, you have to be sure to have an updated plugin_.dll in trle folder with a fresh building of the project.
So, build the project (F7 key) and then copy plugin_trng.dll from "debug" folder to trle folder.
Now, once we set the breakpoint, we can launch the debugger with "Debug->Start debugger" or clicking on "Play" icon.
Once in game, move Lara over the blue sector to trigger the robot.
Tomb4 will be frozen and debugger will pop up:

Now we wish see what happen inside of IsMissingWall() function, for this reason we hit F11 (next inside)
We are inside of IsMissingWall() now.
Hit F10 to move over:
GetIncrements(LookDirection, &IncX, &IncZ, 1024);
This time we don't want enter within the GetIncrements() because this is a safe function, so we'll use F10 key, to perform whole GetIncrements() funcion and see immediatly the result.
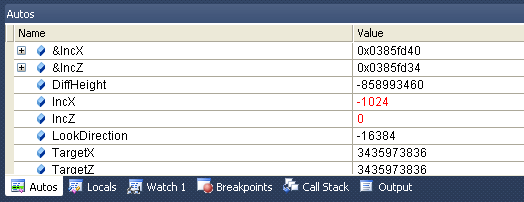
Looking in Autos panel we see the values returned by GetIncrements() function to IncX and IncZ variables.
To understand if the value (IncX= -1024) is right, we should keep in mind the axis about ngle reference, and the beginning (and current) position of the robot:
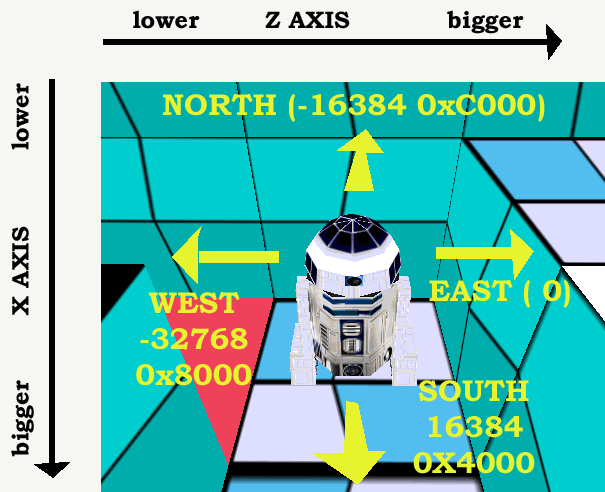
So we discovered the first bug: IncX with negative value will move at north (in ngle view), while we had to check at east.
What is the reason of this error?
Because I passed as argument to IsMissingWall() function the RELATIVE orienting, to get "at its left", but then I used that relative orienting like it was an absolute direction and -16384 means "at north"
Pratically the code checked the wall at north of the robot instead by east.
To convert the relative facing (-90 degrees to get: "look at its left") in absolute direction, we have to add the facing of the robot to the relative facing (-16384) and then use this new absolute direction to call GetIncrements().
Now we can remove the breakpoints, set command "Continue (F5)" to give again the control to tomb4, and then quit the game.
We cann't continue our debugging without fixing this first bug.
When tomb4 quits, and debugger has been quit, too, we can go to change our source.
The first fixing
Now we change this row:
GetIncrements(LookDirection, &IncX, &IncZ, 1024);
with this:
GetIncrements(pItem->OrientationH + LookDirection, &IncX, &IncZ, 1024);
We have added to robot orientation the LookDirection, getting the new absolute direction where compute the increments.
Indeed if you perform this computation, since currently robot has South facing (16384) when we'll add the relative -16384 to look 90 degrees at its left, we'll get:
16384+ -16384 = 0
Since 0 it means: EAST, it works in this way.
Testing newly the detection skills
Since we have just fixed a bug and changed the project, it's necessary now performing another test from scratch because all infos we had about bugs now could change.
In this new testing it's not ncessary using debugger: we can simply built our project, copy new plugin_dll in trle folder and launch directly the tomb4.exe to try in game what's changed after our fixing.

There are good news...
Robot is looking at left in correct way.
In spite from above pictures is not so clear, you can see while robot is looking at its left when there are not too high walls in that direction.
In particular way, in A picture you can see that it's moved up the head before looking at its left, to be able to pass over that wall with height of 1024 units (one sector).
Other bugs to fix
Anyway our troubleshooting is not yet completed...
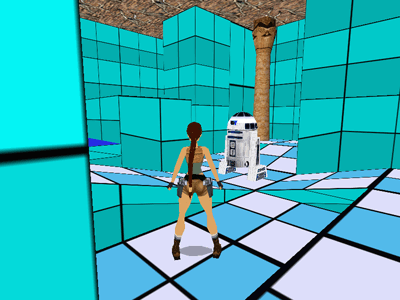
There are other bugs to fix.
Above picture show the robot passing in that crossing without looking at left, and neither at right.
More, the robot continues to ignore the chance to look at its right.
Now we have to do another debugging session.
To fix that bug at crossing, we should prepare the game in right position.
This means we should play (normally) the game, trigger the robot and wait until it is going to enter in that crossing and save the game just a moment before of that.
Pratically you should save the game a moment before of above image.
Then we'll quit the game, we'll place a breakpoint in same position of first debugging:

and we will launch from Visual Express the debugging with "Debug->Start debugging" command.
Now, we can load directly the savegame we saved, in this way when our breakpoint will be reached we know to be already in right position to analyse.
Surprise: that sector has been skipped
Once we loaded the savegame we see that robot pass over that sector without having the breakpoint we placed.
Only some moment later there is the breakpoint, but when the robot was in another position, over the slope entering in other room.
Ok, it's happen.
A bug it's own when the code works in different manner that we are especting...
Now it's not useful debugging from this situation because robot is not where we wished.
We should wonder why the breakpoint has not been engaged when the robot was at center of that (crossing) sector.
To discover this mistery we have to use another method, since the breakpoint method didn't work...
How to fix bugs using log messages
We'll add a little log at begin of RobotSW_LookAround() function, to see some critical variables that could affect that side of code.
If we read the code at begin of this function:
void RobotSW_LookAround(void)
{
int HeightType;
int AnimNow;
// check (reading Reserved_34 field of robot structure) what phase of looking around is performing the robot
switch (GET.pItem->Reserved_34) {
case LOOKSW_DISABLED:
// no looking around in progress.
// now we should verify if it is possible beginning own now, the looking around...
// it's possible only when the robot is moving forward with lowerd head and flat feet (stateid = 0)
if (GET.pItem->StateIdCurrent != 0) {
// wrong state-id: it's not possible beginning now the looking around phase
return;
}
// the looking around could begin only when the robot it's near at middle of sector
// discover infos about floor of current position of robot
CheckFloor(GET.pItem->CordX, GET.pItem->CordY, GET.pItem->CordZ, GET.pItem->Room);
if (GetDistanceXZ(GET.pItem->CordX, GET.pItem->CordZ,
FLOOR.SectorCoords.MiddleX, FLOOR.SectorCoords.MiddleZ) > 16) {
// the robot is not centered with sector: no possible now beginning looking around
return;
}
// it should be possible, but now it's necessary verifing if there are coorridors (free spaces)
// at left or rigth where to look
if (IsMissingWall(GET.pItem, -16384, &HeightType)==true) {
We understand that values like "GET.pItem->Reserved_34" or "GET.pItem->StateIdCurrent" could have forbidden to the code to reach our previous breakpoint.
Indeed, if "GET.pItem->Reserved_34" is different than "LOOKSW_DISABLE" (value=0), the code inside of "case LOOKSW_DISABLED:" section it will be not performed.
But also "GET.pItem->StateIdCurren" variable, if it is different than 0, will force control to quit current function:
// it's possible only when the robot is moving forward with lowerd head and flat feet (stateid = 0)
if (GET.pItem->StateIdCurrent != 0) {
// wrong state-id: it's not possible beginning now the looking around phase
return;
}
So now, we'll add a code to have a log to show these two values.
Quit debugger with right procedure (How to conclude a debugging session )
And now type this row at begin of RobotSW_LookAround() function:
void RobotSW_LookAround(void)
{
int HeightType;
int AnimNow;
// for #debug#
SendToLog("Reserved34=%d StateId=%d", GET.pItem->Reserved_34, GET.pItem->StateIdCurrent);
With this SendToLog() instruction we'll have the chance to see how those two values change while the game is playing.
In this situation we will not use debugger but only common execution of the game, beginning from our savegame.
We should also launch Tomb4log.exe utility to see in real-time the values changing and it will be necessary place that little log window over the tomb raider window to look in same moment the robot and the log window to see what are the values own while the robot is at center of crossing sector.
A little trick to stop scrolling of messages in log window is to move the mouse pointer over the log window when you wish stop the updating.
So we'll keep outside of log window the mouse when the robot is not yet in right position, while when it is own at middle of the sector we'll move the mouse pointer over the log window, to have the time to read the right values.
Now build the plugin and copy plugin_dll file to trle folder. Launch tomb4_log.exe utility and launch also tomb4.exe.
Move the log window over the tomb raider screen, and now load the savegame.
Moving the mouse over the log window when the robot is at center of crossing sector you should get this output in log window:

So we discover that the problem is that "StateId=1"
We can try to look around only with stateid==0 because that is state id to signal that robot is moving forward without other complications.
What means this stateid = 1?
This is the description of StateId 1 (you find it in exercise 4 of main help)
Robot is moving forward, turning its feet to change from slope to flat floor or viceversa. In this phase it cann't turn on itself and neither shooting or looking around moving the head.
Anyway also in this situation it will be able to detect lara but only if she is in front of it, since it is not able to turn the head to control other directions
So we discovered the reason it didn't look around: its feet were not yet flat and the Stateid 1 was yet in progress when the robot was at center of the crossing sector.
Since it had just left that declivity its feet were yet a bit turned.
This is a bad matter because in this way the robot will be not able to look around everytime it is in first sector after a declivity.
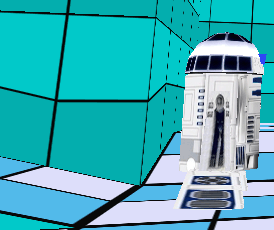
Looking above image we have a confirm of this problem: the robot has just left the declivity bit its feet are yet a bit turned in spite it is already at middle of next flat sector.
In this situation the bug is that the animation to turn the feet is too slow respect the speed movement of the robot.
We could change the code to accept also state-id 1 to look around, since the turning of the feet should be completed when the robot is at center of a flat sector and in game there will be no problem to get faster this flat position in this situation.
Second fixing: the new code
Now we change the code in RobotSW_LookAround() function to accept also stateid 1 to look around.
In this new situation we have also to verify that the currnet sector was flat because the stateid 1 happens very often own over slopes but we have not animation where the robot look around and has feet different than flat.
So we'll change this code:
void RobotSW_LookAround(void)
{
int HeightType;
int AnimNow;
// for #debug#
SendToLog("Reserved34=%d StateId=%d", GET.pItem->Reserved_34, GET.pItem->StateIdCurrent);
// check (reading Reserved_34 field of robot structure) what phase of looking around is performing the robot
switch (GET.pItem->Reserved_34) {
case LOOKSW_DISABLED:
// no looking around in progress.
// now we should verify if it is possible beginning own now, the looking around...
// it's possible only when the robot is moving forward with lowerd head and flat feet (stateid = 0)
if (GET.pItem->StateIdCurrent != 0) {
// wrong state-id: it's not possible beginning now the looking around phase
return;
}
// the looking around could begin only when the robot it's near at middle of sector
// discover infos about floor of current position of robot
CheckFloor(GET.pItem->CordX, GET.pItem->CordY, GET.pItem->CordZ, GET.pItem->Room);
if (GetDistanceXZ(GET.pItem->CordX, GET.pItem->CordZ,
FLOOR.SectorCoords.MiddleX, FLOOR.SectorCoords.MiddleZ) > 16) {
// the robot is not centered with sector: no possible now beginning looking around
return;
}
// it should be possible, but now it's necessary verifing if there are coorridors (free spaces)
// at left or rigth where to look
if (IsMissingWall(GET.pItem, -16384, &HeightType)==true) {
In this way (removing also the row to display the log):
void RobotSW_LookAround(void)
{
int HeightType;
int AnimNow;
// check (reading Reserved_34 field of robot structure) what phase of looking around is performing the robot
switch (GET.pItem->Reserved_34) {
case LOOKSW_DISABLED:
// no looking around in progress.
// now we should verify if it is possible beginning own now, the looking around...
// it's possible only when the robot is moving forward with lowerd head and flat feet (stateid = 0)
if (GET.pItem->StateIdCurrent != 0 && GET.pItem->StateIdCurrent != 1) {
// wrong state-id: it's not possible beginning now the looking around phase
return;
}
// the looking around could begin only when the robot it's near at middle of sector
// discover infos about floor of current position of robot
CheckFloor(GET.pItem->CordX, GET.pItem->CordY, GET.pItem->CordZ, GET.pItem->Room);
if (FLOOR.SlopeType != enumSLOPE.FLAT) {
// only from flat sectors we can look around
return;
}
if (GetDistanceXZ(GET.pItem->CordX, GET.pItem->CordZ,
FLOOR.SectorCoords.MiddleX, FLOOR.SectorCoords.MiddleZ) > 16) {
// the robot is not centered with sector: no possible now beginning looking around
return;
}
// it should be possible, but now it's necessary verifing if there are coorridors (free spaces)
// at left or rigth where to look
if (IsMissingWall(GET.pItem, -16384, &HeightType)==true) {
We have changed the condition about state-id in this way:
if (GET.pItem->StateIdCurrent != 0 && GET.pItem->StateIdCurrent != 1) {
// wrong state-id: it's not possible beginning now the looking around phase
return;
}
In this way the skipping (return) of the function will happen only when state-id is different than 0 and also than 1.
And we added a condition to verify that robot is over a flat sector:
if (FLOOR.SlopeType != enumSLOPE.FLAT) {
// only from flat sectors we can look around
return;
}
Now we build the project, update dll in trle folder and trying in game, loading from our savegame.
Fixed bug on the crossing
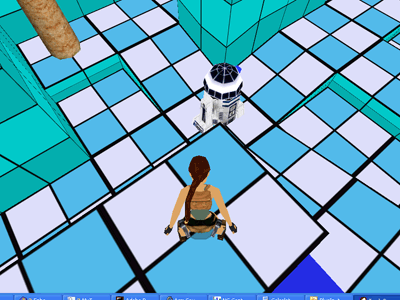
We fixed also this problem. Now the robot look at left while it's in the crossing sector.
What is the problem with right?
However, we have other bugs to fix, of course.
It's a bug that the robot, in some circustances, doesn't look at its right.
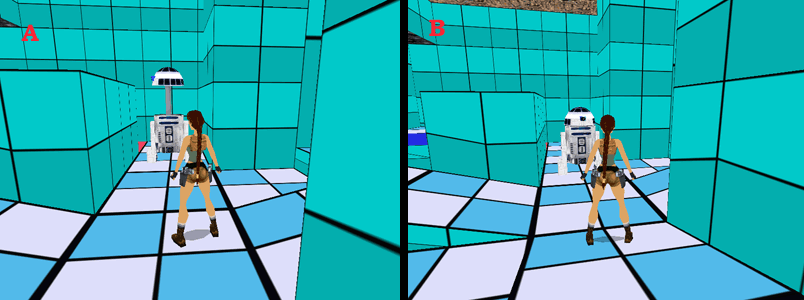
In above A image the robot (just triggered) is looking at its right with highest head, ok it's good.
But in B picture robot looks only at left but not at right. Why?
In this situation we should read the code understand where it should happen this check to look at rigth and place a breakpoint to understand what's happen.
The critical code should be this:
// it was not possible looking at left
// now we perform same computation for right direction
if (IsMissingWall(GET.pItem, 16384, &HeightType)==true) {
Above rows are always from RobotSW_LookAround() function, of course.
That IsMissingWall() with 16384 as parameter means own: "look at right" but reading also the comment lines we understand the problem with no need to place a breakpoint.
The comment says that the control about right direction it will happen only when it was not possible look at left...
This means that, when it was possible looking at left, this code will be never performed.
Indeed following the movement of the robot, we discover that the problem with omitting of looking at right it happened always when the robot, from same sector, had already looked at left, while when at left it was not possible looking, the looking at right worked fine.
Also in previous immage we have a confirm of this theory:

In A picture the looking at right worked, and in that sector the robot had no chance to look at left, because the wall at left was too high.
While in B picture the robot didn't look at right but just a moment first, it had looked at left.
The new code to look at right after looking at left
Once we discovered the problem, the solution is to change the code where the "looking at left" operation has been just completed.
In that position of the source we'll have to add a new code to perform a compute also to see if it is possible looking at right.
case LOOKSW_AT_LEFT:
case LOOKSW_AT_RIGTH:
// robot is turning head at left or right
// now verify if it has been completed.
// since at end of turning animation there will be one of following animations:
// animation 0 (after turning with lower head)
// animation 10 (after turning with middle head)
// animation 13 (after turning with highest head)
// just check if it has been reached one of above animations
AnimNow = GetRelativeAnimation(GET.pItem);
switch (AnimNow) {
case 0:
// completed with lower head
// we cam immediatly close the "looking around phase" and come back to common movements
GET.pItem->Reserved_34 = LOOKSW_DISABLED;
break;
case 10:
// completed with midle head.
// before complete we have to move down the head
// we use animation 11 (from middle height to lower head)
ForceAnimationForItem(GET.pItem, 11, -1);
// since the next animation, after animation 11 is own the animation 0 to move forward
// we can already disable "looking around"
GET.pItem->Reserved_34 = LOOKSW_DISABLED;
break;
case 13:
// completed with higher head
// before complete we have to move down the head to lower position with animation 22
ForceAnimationForItem(GET.pItem, 22, -1);
// since the next animation, after animation 11 is own the animation 0 to move forward
// we can already disable "looking around"
GET.pItem->Reserved_34 = LOOKSW_DISABLED;
break;
Above code is that manages when the looking at left has been completed.
When it detects the final animation of looking it sets as special state about looking the "LOOKSW_DISABLED" value in Reserved_34
We have also to manage a further complication: when the looking at left was with high head, it will be forced the animation to move down the head, and for this reason we cann't force immediatly the looking at right.
To handle these complication we need of another LOOKSW_ value that it should meaning: "We have just completed looking at left, now it's necessary verify also the chance to look at right"
So we add in "Constants_mine.h" file another constant:
// constant for looking around phase of star wars robot
#define LOOKSW_DISABLED 0
#define LOOKSW_UP_AND_RIGHT 1
#define LOOKSW_UP_AND_LEFT 2
#define LOOKSW_AT_RIGTH 3
#define LOOKSW_AT_LEFT 4
#define LOOKSW_ENDED_LEFT_TRY_RIGHT 5
Now we change the code in this way:
case LOOKSW_AT_LEFT:
case LOOKSW_AT_RIGTH:
// robot is turning head at left or right
// now verify if it has been completed.
// since at end of turning animation there will be one of following animations:
// animation 0 (after turning with lower head)
// animation 10 (after turning with middle head)
// animation 13 (after turning with highest head)
// just check if it has been reached one of above animations
AnimNow = GetRelativeAnimation(GET.pItem);
// save the current status to remember if it was at left or at right
OldStatus = GET.pItem->Reserved_34;
switch (AnimNow) {
case 0:
// completed with lower head
// we cam immediatly close the "looking around phase" and come back to common movements
GET.pItem->Reserved_34 = LOOKSW_DISABLED;
break;
case 10:
// completed with midle head.
// before complete we have to move down the head
// we use animation 11 (from middle height to lower head)
ForceAnimationForItem(GET.pItem, 11, -1);
// since the next animation, after animation 11 is own the animation 0 to move forward
// we can already disable "looking around"
GET.pItem->Reserved_34 = LOOKSW_DISABLED;
break;
case 13:
// completed with higher head
// before complete we have to move down the head to lower position with animation 22
ForceAnimationForItem(GET.pItem, 22, -1);
// since the next animation, after animation 11 is own the animation 0 to move forward
// we can already disable "looking around"
GET.pItem->Reserved_34 = LOOKSW_DISABLED;
break;
}
// verify if we are in the situation where check also at right setting LOOKSW_ENDED_LEFT_TRY_RIGHT value
if (OldStatus == LOOKSW_AT_LEFT && GET.pItem->Reserved_34 == LOOKSW_DISABLED) {
// it was looking at left but it has been completed.
// now we have to remember to look at right but only when the animation of robot will be newly that for moving forward
// since now there could be an animation to move down the head.
GET.pItem->Reserved_34 = LOOKSW_ENDED_LEFT_TRY_RIGHT;
}
break;
We have added an instruction to save the current status:
// save the current status to remember if it was at left or at right
OldStatus = GET.pItem->Reserved_34;
Then, at end of "switch (AnimNow) {" we check if it's the moment to set new operation: LOOKSW_ENDED_LEFT_TRY_RIGHT
// verify if we are in the situation where check also at right setting LOOKSW_ENDED_LEFT_TRY_RIGHT value
if (OldStatus == LOOKSW_AT_LEFT && GET.pItem->Reserved_34 == LOOKSW_DISABLED) {
// it was looking at left but it has been completed.
// now we have to remember to look at right but only when the animation of robot will be newly that for moving forward
// since now there could be an animation to move down the head.
GET.pItem->Reserved_34 = LOOKSW_ENDED_LEFT_TRY_RIGHT;
}
Now we have to handle this LOOKSW_ENDED_LEFT_TRY_RIGHT status, adding a new "case LOOKSW_ENDED_LEFT_TRY_RIGHT:" to the main switch: "switch (GET.pItem->Reserved_34)":
case LOOKSW_ENDED_LEFT_TRY_RIGHT:
// when there is this status we'll have to check if it is possible looking at right
// but we have to wait that the head was newly in lower (standard) position.
// so, just the state-id was newly 0 and we are sure that all other conditions are correct
// since this status happens only AFTER we have looked at left and therefore all conditions to look around were correct
if (GET.pItem->StateIdCurrent != 0) return;
// now we'll do the control at right but we have to remove the LOOKSW_ENDED_LEFT_TRY_RIGHT status because once we checked
// if there is no chance to look at right we have alredy completed that control
GET.pItem->Reserved_34 = LOOKSW_DISABLED;
// now we copy same code of "case LOOKSW_DISABLED:" but only the part to check at right:
// now we perform same computation for right direction
if (IsMissingWall(GET.pItem, 16384, &HeightType)==true) {
// it's possible look at right.
// now discover what kind of head height we should use:
switch (HeightType) {
case 0:
// just lower head. We can begin immediatly to look at right
ForceAnimationForItem(GET.pItem, 8, -1);
// set new "looking around" phase:
GET.pItem->Reserved_34 = LOOKSW_AT_RIGTH;
break;
case 1:
// required middle height of head
// since robot now has lower head, we have to change height from lower to middle with
// animation 9
ForceAnimationForItem(GET.pItem, 9, -1);
// set "looking around" phase to remember that when head will be at middle height the
// robot should turn to look at right.
GET.pItem->Reserved_34 = LOOKSW_UP_AND_RIGHT;
break;
case 2:
// required highest head.
// force animation 12
ForceAnimationForItem(GET.pItem, 12, -1);
// set "looking around" phase to remember that when head will be at highest head the
// robot should turn to look at right.
GET.pItem->Reserved_34 = LOOKSW_UP_AND_RIGHT;
break;
}
}
break;
Fixed also the bug about "looking at right"
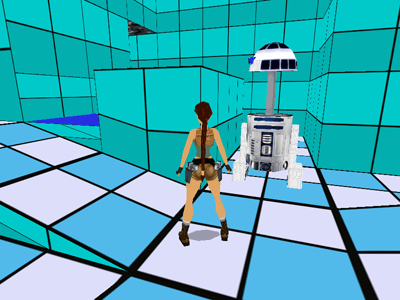
Once built the code and updated the plugin_.dll in trle folder we try in game.
The fixing seems is working fine.
After all these changes it's better the final code for RobotSW_LookAround() function:
void RobotSW_LookAround(void)
{
int HeightType;
int AnimNow;
int OldStatus;
// check (reading Reserved_34 field of robot structure) what phase of looking around is performing the robot
switch (GET.pItem->Reserved_34) {
case LOOKSW_ENDED_LEFT_TRY_RIGHT:
// when there is this status we'll have to check if it is possible looking at right
// but we have to wait that the head was newly in lower (standard) position.
// so, just the state-id was newly 0 and we are sure that all other conditions are correct
// since this status happens only AFTER we have looked at left and therefore all conditions to look around were correct
if (GET.pItem->StateIdCurrent != 0) return;
// now we'll do the control at right but we have to remove the LOOKSW_ENDED_LEFT_TRY_RIGHT status because once we checked
// if there is no chance to look at right we have alredy completed that control
GET.pItem->Reserved_34 = LOOKSW_DISABLED;
// now we copy same code of "case LOOKSW_DISABLED:" but only the part to check at right:
// now we perform same computation for right direction
if (IsMissingWall(GET.pItem, 16384, &HeightType)==true) {
// it's possible look at right.
// now discover what kind of head height we should use:
switch (HeightType) {
case 0:
// just lower head. We can begin immediatly to look at right
ForceAnimationForItem(GET.pItem, 8, -1);
// set new "looking around" phase:
GET.pItem->Reserved_34 = LOOKSW_AT_RIGTH;
break;
case 1:
// required middle height of head
// since robot now has lower head, we have to change height from lower to middle with
// animation 9
ForceAnimationForItem(GET.pItem, 9, -1);
// set "looking around" phase to remember that when head will be at middle height the
// robot should turn to look at right.
GET.pItem->Reserved_34 = LOOKSW_UP_AND_RIGHT;
break;
case 2:
// required highest head.
// force animation 12
ForceAnimationForItem(GET.pItem, 12, -1);
// set "looking around" phase to remember that when head will be at highest head the
// robot should turn to look at right.
GET.pItem->Reserved_34 = LOOKSW_UP_AND_RIGHT;
break;
}
}
break;
case LOOKSW_DISABLED:
// no looking around in progress.
// now we should verify if it is possible beginning own now, the looking around...
// it's possible only when the robot is moving forward with lowerd head and flat feet (stateid = 0)
if (GET.pItem->StateIdCurrent != 0 && GET.pItem->StateIdCurrent != 1) {
// wrong state-id: it's not possible beginning now the looking around phase
return;
}
// the looking around could begin only when the robot it's near at middle of sector
// discover infos about floor of current position of robot
CheckFloor(GET.pItem->CordX, GET.pItem->CordY, GET.pItem->CordZ, GET.pItem->Room);
if (FLOOR.SlopeType != enumSLOPE.FLAT) {
// only from flat sectors we can look around
return;
}
if (GetDistanceXZ(GET.pItem->CordX, GET.pItem->CordZ,
FLOOR.SectorCoords.MiddleX, FLOOR.SectorCoords.MiddleZ) > 16) {
// the robot is not centered with sector: no possible now beginning looking around
return;
}
// it should be possible, but now it's necessary verifing if there are coorridors (free spaces)
// at left or rigth where to look
if (IsMissingWall(GET.pItem, -16384, &HeightType)==true) {
// it's possible look at left.
// now discover what kind of head height we should use:
switch (HeightType) {
case 0:
// just lower head. We can begin immediatly to look at left
ForceAnimationForItem(GET.pItem, 7, -1);
// set new "looking around" phase:
GET.pItem->Reserved_34 = LOOKSW_AT_LEFT;
break;
case 1:
// required middle height of head
// since robot now has lower head, we have to change height from lower to middle with
// animation 9
ForceAnimationForItem(GET.pItem, 9, -1);
// set "looking around" phase to remember that when head will be at middle height the
// robot should turn to look at left.
GET.pItem->Reserved_34 = LOOKSW_UP_AND_LEFT;
break;
case 2:
// required highest head.
// force animation 12
ForceAnimationForItem(GET.pItem, 12, -1);
// set "looking around" phase to remember that when head will be at highest head the
// robot should turn to look at left.
GET.pItem->Reserved_34 = LOOKSW_UP_AND_LEFT;
break;
}
return;
}
// it was not possible looking at left
// now we perform same computation for right direction
if (IsMissingWall(GET.pItem, 16384, &HeightType)==true) {
// it's possible look at right.
// now discover what kind of head height we should use:
switch (HeightType) {
case 0:
// just lower head. We can begin immediatly to look at right
ForceAnimationForItem(GET.pItem, 8, -1);
// set new "looking around" phase:
GET.pItem->Reserved_34 = LOOKSW_AT_RIGTH;
break;
case 1:
// required middle height of head
// since robot now has lower head, we have to change height from lower to middle with
// animation 9
ForceAnimationForItem(GET.pItem, 9, -1);
// set "looking around" phase to remember that when head will be at middle height the
// robot should turn to look at right.
GET.pItem->Reserved_34 = LOOKSW_UP_AND_RIGHT;
break;
case 2:
// required highest head.
// force animation 12
ForceAnimationForItem(GET.pItem, 12, -1);
// set "looking around" phase to remember that when head will be at highest head the
// robot should turn to look at right.
GET.pItem->Reserved_34 = LOOKSW_UP_AND_RIGHT;
break;
}
return;
}
break;
case LOOKSW_UP_AND_LEFT:
// we had set to move up the head and then to look at left.
// now we should verify if the move up movenent has been completed
// since when the move up with animations 9 or 10, will be completed when the next animation
// has been started, just checking if current animation if the current animation is:
// animation 10 (fixed with head at middle height)
// or
// animation 13 (fixed with highest head)
AnimNow = GetRelativeAnimation(GET.pItem);
if (AnimNow == 10) {
// completed: the head is at middle height. now force animation to look at left
// with middle height head (animation 20)
ForceAnimationForItem(GET.pItem, 20, -1);
// set new phase
GET.pItem->Reserved_34 = LOOKSW_AT_LEFT;
return;
}
if (AnimNow == 13) {
// completed. the head is fixed at highest position.
// now force animation to do look at left with highest head (animation 14)
ForceAnimationForItem(GET.pItem, 14, -1);
// se new phase
GET.pItem->Reserved_34 = LOOKSW_AT_LEFT;
return;
}
break;
case LOOKSW_UP_AND_RIGHT:
// we had set to move up the head and then to look at right
// now we should verify if the move up movenent has been completed
// since when the move up with animations 9 or 10, will be completed when the next animation
// has been started, just checking if current animation is:
// animation 10 (fixed with head at middle height)
// or
// animation 13 (fixed with highest head)
AnimNow = GetRelativeAnimation(GET.pItem);
if (AnimNow == 10) {
// completed: the head is at middle height. now force animation to look at right
// with middle height head (animation 21)
ForceAnimationForItem(GET.pItem, 21, -1);
// set new phase
GET.pItem->Reserved_34 = LOOKSW_AT_RIGTH;
return;
}
if (AnimNow == 13) {
// completed. the head is fixed at highest position.
// now force animation to do look at right with highest head (animation 15)
ForceAnimationForItem(GET.pItem, 15, -1);
// set new phase
GET.pItem->Reserved_34 = LOOKSW_AT_RIGTH;
return;
}
break;
case LOOKSW_AT_LEFT:
case LOOKSW_AT_RIGTH:
// robot is turning head at left or right
// now verify if it has been completed.
// since at end of turning animation there will be one of following animations:
// animation 0 (after turning with lower head)
// animation 10 (after turning with middle head)
// animation 13 (after turning with highest head)
// just check if it has been reached one of above animations
AnimNow = GetRelativeAnimation(GET.pItem);
// save the current status to remember if it was at left or at right
OldStatus = GET.pItem->Reserved_34;
switch (AnimNow) {
case 0:
// completed with lower head
// we cam immediatly close the "looking around phase" and come back to common movements
GET.pItem->Reserved_34 = LOOKSW_DISABLED;
break;
case 10:
// completed with midle head.
// before complete we have to move down the head
// we use animation 11 (from middle height to lower head)
ForceAnimationForItem(GET.pItem, 11, -1);
// since the next animation, after animation 11 is own the animation 0 to move forward
// we can already disable "looking around"
GET.pItem->Reserved_34 = LOOKSW_DISABLED;
break;
case 13:
// completed with higher head
// before complete we have to move down the head to lower position with animation 22
ForceAnimationForItem(GET.pItem, 22, -1);
// since the next animation, after animation 11 is own the animation 0 to move forward
// we can already disable "looking around"
GET.pItem->Reserved_34 = LOOKSW_DISABLED;
break;
}
// verify if we are in the situation where check also at right setting LOOKSW_ENDED_LEFT_TRY_RIGHT value
if (OldStatus == LOOKSW_AT_LEFT && GET.pItem->Reserved_34 == LOOKSW_DISABLED) {
// it was looking at left but it has been completed.
// now we have to remember to look at right but only when the animation of robot will be newly that for moving forward
// since now there could be an animation to move down the head.
GET.pItem->Reserved_34 = LOOKSW_ENDED_LEFT_TRY_RIGHT;
}
break;
}
}
Another bug to fix: it works only at first round
Following carefully the path of the robot we discover a weird bug:
While at first trip of all level the robot look at left and right in correct way, after it is beginning newly same path, the looking around stops to work and robot never look around.
In weird situations like this it's not easy understand where we should place a breakpoint, so we'll use the method of log messages.
We'll show a log messages at begin of RobotSW_LookAround() function, displaying most important data that could affect this bug.
So we'll add this row at top of RobotSW_LookAround() function:
void RobotSW_LookAround(void)
{
int HeightType;
int AnimNow;
int OldStatus;
// only for #debug#
SendToLog("Reserved34=%d StateId=%d Animation=%d",
GET.pItem->Reserved_34, GET.pItem->StateIdCurrent, GetRelativeAnimation(GET.pItem));
With above log we'll be able to monitor the Looking status, the state-id and current animation of robot.
We have already seen as working with log files (see How to fix bugs using log messages )
In this situation we'll have to trigger the robot and follow it for all path, verifiying values of log in first round, when it works fine, and comparing them with values of second round, where it stops to work.
After having followed the robot for all round and at begin of second, I discovered something...
While at first round, we have in log values like these:
6859: Reserved34=0 StateId=0 Animation=0
6859: Reserved34=2 StateId=3 Animation=12
7859: Reserved34=2 StateId=4 Animation=13
7891: Reserved34=4 StateId=2 Animation=14
9922: Reserved34=4 StateId=4 Animation=13
9969: Reserved34=5 StateId=3 Animation=22
10922: Reserved34=5 StateId=0 Animation=0
10969: Reserved34=3 StateId=2 Animation=8
13000: Reserved34=3 StateId=0 Animation=0
13031: Reserved34=0 StateId=0 Animation=0
14031: Reserved34=1 StateId=3 Animation=12
15031: Reserved34=1 StateId=4 Animation=13
15062: Reserved34=3 StateId=2 Animation=15
17094: Reserved34=3 StateId=4 Animation=13
17125: Reserved34=0 StateId=3 Animation=22
18094: Reserved34=0 StateId=0 Animation=0
19156: Reserved34=4 StateId=2 Animation=7
21156: Reserved34=4 StateId=0 Animation=0
21203: Reserved34=5 StateId=0 Animation=0
21234: Reserved34=1 StateId=3 Animation=12
22234: Reserved34=1 StateId=4 Animation=13
22266: Reserved34=3 StateId=2 Animation=15
24297: Reserved34=3 StateId=4 Animation=13
24328: Reserved34=0 StateId=3 Animation=22
25297: Reserved34=0 StateId=0 Animation=0
In second round the Reserved34 value becomes "2" and it remains fixed in that way, while in first round it changed coming back to basic value "0":
The log in second round is like this:
94578: Reserved34=0 StateId=0 Animation=0
95578: Reserved34=2 StateId=5 Animation=17
96578: Reserved34=2 StateId=0 Animation=0
101906: Reserved34=2 StateId=5 Animation=16
102906: Reserved34=2 StateId=0 Animation=0
103172: Reserved34=2 StateId=1 Animation=3
104172: Reserved34=2 StateId=1 Animation=4
104250: Reserved34=2 StateId=1 Animation=6
105281: Reserved34=2 StateId=0 Animation=0
108250: Reserved34=2 StateId=5 Animation=18
110250: Reserved34=2 StateId=0 Animation=0
113687: Reserved34=2 StateId=1 Animation=1
114672: Reserved34=2 StateId=1 Animation=2
114750: Reserved34=2 StateId=1 Animation=5
115781: Reserved34=2 StateId=0 Animation=0
116641: Reserved34=2 StateId=5 Animation=16
117641: Reserved34=2 StateId=0 Animation=0
It's not normal remaining always on value "2", but what is the looking status "2"?
It is the constant:
#define LOOKSW_UP_AND_LEFT 2
So it is "LOOKSW_UP_AND_LEFT" but why in second round it doesn't change ever more?
We have to discover another important info: when does it happens this problem in game?
We see from the log, that the problem begin with these data:
95578: Reserved34=2 StateId=5 Animation=17
Looking the whole log file (you can show it with menu command "Show->Last tomb.log" from tomb4log.exe window) we discover that the Animation 17 it has been performed for first time and own after that animation born the problem.
The animation 17 does steering the robot to turn at right when it doesn't find a free way forward or at left.
Really it's not normal that there was that animation while status of looking is LOOKSW_UP_AND_LEFT, because the two situation are uncompatibles.
Since the animation 17 has been performed only at beginning of this bug, we could place a breakpoint own in the point of the source where this animation will be performed first time.
It happens in this point of RobotSW_MoveAndSteer() function:
if (TestOk==false) {
// try to turn at right (at its east)
TestOk = IsFreeWay(ItemIndex, 16384 , GET.pItem->SpeedH, 511, TopSideY);
if (TestOk == true) {
ForceAnimationForItem(GET.pItem, 17, -1);
}
}
So we'll place our breakpoint on row:
ForceAnimationForItem(GET.pItem, 17, -1);
And now we have only to launch debugging with "Debug->Start Debugging" command and wait for our breakpoint...
Some problems with 17?

Ok finally the breakpoint has been reached.
Now we continue with F10 key to follow the execution of the code, hoping in some intuition...
It's better also inspecting some critical variable to understand the problem.
Exploring the GET.pItem structure (of the robot) we can find in Autos panel, we could see what is in this moment the value of "looking status" in the "Reserved34" field:
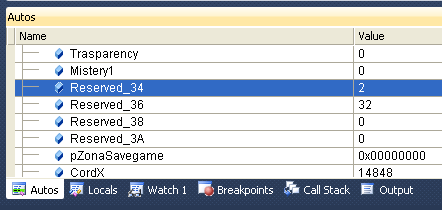
And we have another surprise: the Reserverd34 is already = 2 i.e. the constant "LOOKSW_UP_AND_LEFT" but it's not possible that, while we are in looking phase, the robot can change direction.
If we see better the code calling the RobotSW_MoveAndSteer() function:
// if robot is moving: detect obstacles and if it is necessary change direction
if (GET.pItem->SpeedH > 0) {
RobotSW_MoveAndSteer(ItemIndex);
}
We see that it should be called only when the robot is moving (condition SpeedH >0) but when the robot is looking around it should be still.
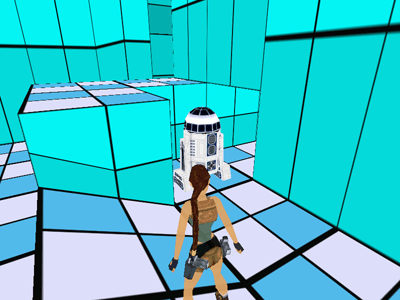
If we look the zone of the level where this problem occurs we see that the robot has to steer at its right but at its left it could look.
Perhaps it's this double chance to affect the bug.
Probably it happens this:
- The robot is moving forward, state id =0 and speedh > 0
- First there is the code of RobotSW_LookAround() function and this discover that is possible looking at left but only moving up the head. For this reason the RobotSW_LookAround() function, sets Reserved32=LOOKSW_UP_AND_LEFT
- Then it will be performed the RobotSW_MoveAndSteer() function
It will discover that the robot is not able to move forward and neither at left, so set the animation to turn at right (animation 17)
- In following frames, the RobotSW_LookAround() is waiting that animation it had set to move up the head was completed but this it doesn't happen because the animation has been changed to do steering the robot at right.
The bug is that, when the RobotSW_LookAround() function set the animation 12, this animation has "Speed"=0 but in the structure of robot it reamins the Speed = 32.
It happens because the ForceAnimationForItem() function, set the animation, the first frame and the state-id, but it doesn't set the speed. That operation will be performed in next frame by AnimateItem() function.
So we could try to fix the bug, setting speedh = 0 in robot's structure immediatly after having set animation to look around: to move up the head or to turn immediatly the head, since for both of them it's foreseen an horizontal speed.
Since there are different points where we use ForceAnimationForItem() we could create a container function where we can set also set immediately the speed, since this function could be useful also for other targets in the future.
A container function is simply a function that call another function performing a little setting everytime.
We could call this function: SetAnimationAndSpeed():
void SetAnimationAndSpeed(StrItemTr4 *pItem, int NAnimation, int NextStateId, short HSpeed)
{
ForceAnimationForItem(pItem, NAnimation, NextStateId);
pItem->SpeedH = HSpeed;
}
As you can see, this function accept same paraemters of ForceAnimationForItem() with only exception to have the extra parameter "HSpeed".
Now we should replace the ForceAnimationForItem() function with SetAnimationAndSpeed() function, inside of the code present in RobotSW_LookAround() function, letting same parameters but adding "0" as HSpeed to force everytime speed 0 immediatly.
For instance when we find (inside of RobotSW_LookAround() function) a row like this:
ForceAnimationForItem(GET.pItem, 15, -1);
We should replace it with:
SetAnimationAndSpeed(GET.pItem, 15, -1,0);
Keeping same parameter, more the final "0" to set speed = 0.
Now we build the project, update the plugin_.dll in trle folder, and try in game what happens...
From a bug to another...

Probably the previous bug has been fixed but we are not sure, since the robot is neither gone to that zone of the level, because first of that side there has been another bug.
Looking above picture you see the robot that look at right (A picture and first it had looked at left), then it move forward ignoring the wall (B Picture), enters in the wall, disappearing, and then comes out from the wall (C picture).
As I said, probably the previous bug has been fixed, since the robot look at left and right also when it is going to steer, but in this case it doesn't steer (at left) and move forward.
Why does it happens?
In this case there is no need of breakpoints or log method, since looking carefully the game screen we discover an interesting evidence...
One more Step
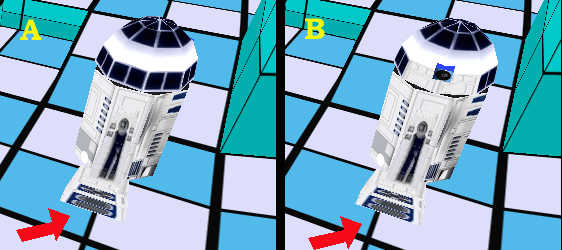
In A picture the robot is looking at left. Do you see the position of its foot respect crossed rows of that sector?
Well, in B picture, over same sector, the robot is looking at rigth, but if you look carefully you see that its position changed (look the red arrow), it is a bit beyond previous position, like it did one more step forward.
Since we know the animations and stateid of the robot it's easy understanding what's happened and also because the robot entered in the wall (previous picture).
Here we can remember the working mode of robot about moving and looking around:
- If the robot is in the middle of current sector:
- Check if it's possible looking at left
- If it is possible: set animation to look at left.
If the left wall is low, it will be set immediatly the animation to turn the head, otherwise it will be set, first the animation to move up the head and then that to turn the head at left
- When the animation "looking at left" has been completed, it comes back to standard animation 0:
"Flat feet, down fixed head. The robot moves forward"
- Now it will be checked also the chance to look at right.
- If it's possible it will be force animation to look at right
- At end of right looking animation, it will be forced newly (as next animation of animation data) the animation 0:
"Flat feet, down fixed head. The robot moves forward"
Where is the problem!?
It happens because after looking at left, when the "looking at left" animation has been completed (3 point), then it will be set (as next animation in animation record), the animation 0 , and this animation move the robot forward (4 point).
Immediatly, at next frame, it will be checked also the looking at right (5 point), but now for one frame the robot moved forward and so when we'll check "looking at right" it is in a different poisition respect when it was looking at left.
More, also at end of "looking at right" it will be immediatly force the animation 0 to move forward (7 point) and the robot will be moved forward anothe time.
Since the control to detect collisions it will happen ONLY when the robot is at center of the sector, that little step forward, after the looking at left, but also after the looking at right, moved the robot outside of center of the sector, and when at end of "looking at right" animation, it has been set newly the animation 0 to move forward, the robot will move forward with no check about collisions, entering in the wall.
In this situation the bug is not in the source code of our pluing but in animation of star wars robot...
Improve the animations of Star Wars Robot
As we saw, the problem was that using as next animation of looking at left/right the animation 0 (move forward) was an error, since it's not sure that at end of looking the robot should immedialty move forward.
If it was looking at left, perhaps it will have also to look at right before moving forward.
If it was with a wall in front, it will have to steer, with turning body animation.
To fix this error just we change the field "Next Animation" in animation editor of wad merger program.
We have to replace all "0" next animation with another animation where the robot is still.
The right animation is animation 19: the robot has standard head (no moved up, to turned, not turned feet and no moving...)
You should perform this replace with all animations where there was "animation 0" as next animation, and the animation was one of those about turning head left/right or moving down the head (after having looked at left/right).
Since, the animations to change are:
Animation7  Lower head moves at left and back to forward

Animation8  Lower head moves at right and back to forward

Animation11 Move down head, from middle height to standard

Animation22 Move down head, from highest position to standard
Update our code for new animation data
After the change about Animation data we have to build newly the plugin.tr4 file but it's not enough...
Since now the next animation, for animations about "looking around". it has been changed, we have to change also the code to manage this new situation.
Now indeed, it happens that after all "looking around" animations, the animation 0, to move forward the robot, will be NOT set automatically, it should be us, to force in some moment the animation 0 to do newly moving forward the robot after having looked around.
The good moment to force the animation 0 it will be after checking (or having performed) the "looking at rigt", while after the "looking at left" we don't do, because we changed the animations own to keep still the robot while we pass between "look at left" and "look at right" phases.
Since we know that animation 19 (set after some "looking around") means: "robot is still and wating to look newly around or ... to move newly forward", we can add this code to RobotSW_LookAround() function:
if (GET.pItem->Reserved_34 == LOOKSW_DISABLED) {
// it's not possible looking at right.
// so, now we set newly the animation 0 to move forward the robot
ForceAnimationForItem(GET.pItem, 0,-1);
}
break;
We placed this code at end of management of:
case LOOKSW_ENDED_LEFT_TRY_RIGHT:
When indeed, at end of this case, the looking status (stored in Reserved34) is yet even LOOKSW_DISABLED, this means that it was not possible looking at right, and so we'll do move newly the robot forward.
But there are other point of the code where we should do the same.
In the cases:
case LOOKSW_AT_LEFT:
case LOOKSW_AT_RIGTH:
And in paritcular way, when we are in LOOKSW_AT_RIGTH case, if we completed the looking at right, now it's the moment to do move the robot forward:
if (OldStatus == LOOKSW_AT_RIGTH && GET.pItem->Reserved_34 == LOOKSW_DISABLED) {
// it was looking at right but now we completed the operation
// set newly the movement forward for robot
ForceAnimationForItem(GET.pItem,0,-1);
}
We'll place above code, at end of code for LOOKSW_AT_LEFT / LOOKSW_AT_RIGTH section.
Above code should be read in this way:
If the current operation was "LOOKS_AT_RIGHT" but not it has been completed (now reserved34 is LOOKS_DISABLED" then we to do move newly the robot forward
There is another change we have to do:
At begin of section:
case LOOKSW_ENDED_LEFT_TRY_RIGHT:
// when there is this status we'll have to check if it is possible looking at right
// but we have to wait that the head was newly in lower (standard) position.
// so, just the state-id was newly 0 and we are sure that all other conditions are correct
// since this status happens only AFTER we have looked at left and therefore all conditions to look around were correct
if (GET.pItem->StateIdCurrent != 0) return;
We check if StateIdCurrent was 0, because in previous version after the looking there was animation 0 with stateid 0, but now at end of looking we'll have the stateid=6 (and animation 19), so we'll have to change above code in this way:
case LOOKSW_ENDED_LEFT_TRY_RIGHT:
// when there is this status we'll have to check if it is possible looking at right
// but we have to wait that the previous looking at left has been completed.
// so, since after the looking at left there will be animation 19 with stateid = 6
// we now verify if the robot has right stateid to begin a new "looking" operation
if (GET.pItem->StateIdCurrent != 6) return;
Another code to change is this:
switch (AnimNow) {
case 0:
// completed with lower head
// we cam immediatly close the "looking around phase" and come back to common movements
GET.pItem->Reserved_34 = LOOKSW_DISABLED;
break;
We are in case sections:
case LOOKSW_AT_LEFT:
case LOOKSW_AT_RIGTH:
And we are verifying if the operation has been complete.
But while with old code at end of looking left/right (with lower head) there was the animation 0, now there will be the animation 19, so we'll have to change above code with:
switch (AnimNow) {
case 19:
// completed with lower head
// we cam immediatly close the "looking around phase" and come back to common movements
GET.pItem->Reserved_34 = LOOKSW_DISABLED;
ForceAnimationForItem(GET.pItem,0,-1);
break;
We used the case 19, because it's that now the final animation, and we added the code to do move newly forward the robot.
After all these changes it's better showing whole new code...
The new code after changing of animation data
void RobotSW_LookAround(void)
{
int HeightType;
int AnimNow;
int OldStatus;
// only for #debug#
SendToLog("Reserved34=%d StateId=%d Animation=%d",
GET.pItem->Reserved_34, GET.pItem->StateIdCurrent, GetRelativeAnimation(GET.pItem));
// check (reading Reserved_34 field of robot structure) what phase of looking around is performing the robot
switch (GET.pItem->Reserved_34) {
case LOOKSW_ENDED_LEFT_TRY_RIGHT:
// when there is this status we'll have to check if it is possible looking at right
// but we have to wait that the previous looking at left has been completed.
// so, since after the looking at left there will be animation 19 with stateid = 6
// we now verify if the robot has right stateid to begin a new "looking" operation
if (GET.pItem->StateIdCurrent != 6) return;
// now we'll do the control at right but we have to remove the LOOKSW_ENDED_LEFT_TRY_RIGHT status because once we checked
// if there is no chance to look at right we have alredy completed that control
GET.pItem->Reserved_34 = LOOKSW_DISABLED;
// now we copy same code of "case LOOKSW_DISABLED:" but only the part to check at right:
// now we perform same computation for right direction
if (IsMissingWall(GET.pItem, 16384, &HeightType)==true) {
// it's possible look at right.
// now discover what kind of head height we should use:
switch (HeightType) {
case 0:
// just lower head. We can begin immediatly to look at right
SetAnimationAndSpeed(GET.pItem, 8, -1,0);
// set new "looking around" phase:
GET.pItem->Reserved_34 = LOOKSW_AT_RIGTH;
break;
case 1:
// required middle height of head
// since robot now has lower head, we have to change height from lower to middle with
// animation 9
SetAnimationAndSpeed(GET.pItem, 9, -1,0);
// set "looking around" phase to remember that when head will be at middle height the
// robot should turn to look at right.
GET.pItem->Reserved_34 = LOOKSW_UP_AND_RIGHT;
break;
case 2:
// required highest head.
// force animation 12
SetAnimationAndSpeed(GET.pItem, 12, -1,0);
// set "looking around" phase to remember that when head will be at highest head the
// robot should turn to look at right.
GET.pItem->Reserved_34 = LOOKSW_UP_AND_RIGHT;
break;
}
}
if (GET.pItem->Reserved_34 == LOOKSW_DISABLED) {
// it's not possible looking at right.
// so, now we set newly the animation 0 to move forward the robot
ForceAnimationForItem(GET.pItem, 0,-1);
}
break;
case LOOKSW_DISABLED:
// no looking around in progress.
// now we should verify if it is possible beginning own now, the looking around...
// it's possible only when the robot is moving forward with lowerd head and flat feet (stateid = 0)
if (GET.pItem->StateIdCurrent != 0 && GET.pItem->StateIdCurrent != 1) {
// wrong state-id: it's not possible beginning now the looking around phase
return;
}
// the looking around could begin only when the robot it's near at middle of sector
// discover infos about floor of current position of robot
CheckFloor(GET.pItem->CordX, GET.pItem->CordY, GET.pItem->CordZ, GET.pItem->Room);
if (FLOOR.SlopeType != enumSLOPE.FLAT) {
// only from flat sectors we can look around
return;
}
if (GetDistanceXZ(GET.pItem->CordX, GET.pItem->CordZ,
FLOOR.SectorCoords.MiddleX, FLOOR.SectorCoords.MiddleZ) > 16) {
// the robot is not centered with sector: no possible now beginning looking around
return;
}
// it should be possible, but now it's necessary verifing if there are coorridors (free spaces)
// at left or rigth where to look
if (IsMissingWall(GET.pItem, -16384, &HeightType)==true) {
// it's possible look at left.
// now discover what kind of head height we should use:
switch (HeightType) {
case 0:
// just lower head. We can begin immediatly to look at left
SetAnimationAndSpeed(GET.pItem, 7, -1,0);
// set new "looking around" phase:
GET.pItem->Reserved_34 = LOOKSW_AT_LEFT;
break;
case 1:
// required middle height of head
// since robot now has lower head, we have to change height from lower to middle with
// animation 9
SetAnimationAndSpeed(GET.pItem, 9, -1,0);
// set "looking around" phase to remember that when head will be at middle height the
// robot should turn to look at left.
GET.pItem->Reserved_34 = LOOKSW_UP_AND_LEFT;
break;
case 2:
// required highest head.
// force animation 12
SetAnimationAndSpeed(GET.pItem, 12, -1,0);
// set "looking around" phase to remember that when head will be at highest head the
// robot should turn to look at left.
GET.pItem->Reserved_34 = LOOKSW_UP_AND_LEFT;
break;
}
return;
}
// it was not possible looking at left
// now we perform same computation for right direction
if (IsMissingWall(GET.pItem, 16384, &HeightType)==true) {
// it's possible look at right.
// now discover what kind of head height we should use:
switch (HeightType) {
case 0:
// just lower head. We can begin immediatly to look at right
SetAnimationAndSpeed(GET.pItem, 8, -1,0);
// set new "looking around" phase:
GET.pItem->Reserved_34 = LOOKSW_AT_RIGTH;
break;
case 1:
// required middle height of head
// since robot now has lower head, we have to change height from lower to middle with
// animation 9
SetAnimationAndSpeed(GET.pItem, 9, -1,0);
// set "looking around" phase to remember that when head will be at middle height the
// robot should turn to look at right.
GET.pItem->Reserved_34 = LOOKSW_UP_AND_RIGHT;
break;
case 2:
// required highest head.
// force animation 12
SetAnimationAndSpeed(GET.pItem, 12, -1,0);
// set "looking around" phase to remember that when head will be at highest head the
// robot should turn to look at right.
GET.pItem->Reserved_34 = LOOKSW_UP_AND_RIGHT;
break;
}
return;
}
break;
case LOOKSW_UP_AND_LEFT:
// we had set to move up the head and then to look at left.
// now we should verify if the move up movenent has been completed
// since when the move up with animations 9 or 10, will be completed when the next animation
// has been started, just checking if current animation if the current animation is:
// animation 10 (fixed with head at middle height)
// or
// animation 13 (fixed with highest head)
AnimNow = GetRelativeAnimation(GET.pItem);
if (AnimNow == 10) {
// completed: the head is at middle height. now force animation to look at left
// with middle height head (animation 20)
SetAnimationAndSpeed(GET.pItem, 20, -1,0);
// set new phase
GET.pItem->Reserved_34 = LOOKSW_AT_LEFT;
return;
}
if (AnimNow == 13) {
// completed. the head is fixed at highest position.
// now force animation to do look at left with highest head (animation 14)
SetAnimationAndSpeed(GET.pItem, 14, -1,0);
// se new phase
GET.pItem->Reserved_34 = LOOKSW_AT_LEFT;
return;
}
break;
case LOOKSW_UP_AND_RIGHT:
// we had set to move up the head and then to look at right
// now we should verify if the move up movenent has been completed
// since when the move up with animations 9 or 10, will be completed when the next animation
// has been started, just checking if current animation is:
// animation 10 (fixed with head at middle height)
// or
// animation 13 (fixed with highest head)
AnimNow = GetRelativeAnimation(GET.pItem);
if (AnimNow == 10) {
// completed: the head is at middle height. now force animation to look at right
// with middle height head (animation 21)
SetAnimationAndSpeed(GET.pItem, 21, -1,0);
// set new phase
GET.pItem->Reserved_34 = LOOKSW_AT_RIGTH;
return;
}
if (AnimNow == 13) {
// completed. the head is fixed at highest position.
// now force animation to do look at right with highest head (animation 15)
SetAnimationAndSpeed(GET.pItem, 15, -1,0);
// se new phase
GET.pItem->Reserved_34 = LOOKSW_AT_RIGTH;
return;
}
break;
case LOOKSW_AT_LEFT:
case LOOKSW_AT_RIGTH:
// robot is turning head at left or right
// now verify if it has been completed.
// since at end of turning animation there will be one of following animations:
// animation 0 (after turning with lower head)
// animation 10 (after turning with middle head)
// animation 13 (after turning with highest head)
// just check if it has been reached one of above animations
AnimNow = GetRelativeAnimation(GET.pItem);
// save the current status to remember if it was at left or at right
OldStatus = GET.pItem->Reserved_34;
switch (AnimNow) {
case 19:
// completed with lower head
// we cam immediatly close the "looking around phase" and come back to common movements
GET.pItem->Reserved_34 = LOOKSW_DISABLED;
ForceAnimationForItem(GET.pItem,0,-1);
break;
case 10:
// completed with midle head.
// before complete we have to move down the head
// we use animation 11 (from middle height to lower head)
SetAnimationAndSpeed(GET.pItem, 11, -1,0);
// since the next animation, after animation 11 is own the animation 0 to move forward
// we can already disable "looking around"
GET.pItem->Reserved_34 = LOOKSW_DISABLED;
break;
case 13:
// completed with higher head
// before complete we have to move down the head to lower position with animation 22
SetAnimationAndSpeed(GET.pItem, 22, -1,0);
// since the next animation, after animation 11 is own the animation 0 to move forward
// we can already disable "looking around"
GET.pItem->Reserved_34 = LOOKSW_DISABLED;
break;
}
// verify if we are in the situation where check also at right setting LOOKSW_ENDED_LEFT_TRY_RIGHT value
if (OldStatus == LOOKSW_AT_LEFT && GET.pItem->Reserved_34 == LOOKSW_DISABLED) {
// it was looking at left but it has been completed.
// now we have to remember to look at right but only when the animation of robot will be newly that for moving forward
// since now there could be an animation to move down the head.
GET.pItem->Reserved_34 = LOOKSW_ENDED_LEFT_TRY_RIGHT;
}
if (OldStatus == LOOKSW_AT_RIGTH && GET.pItem->Reserved_34 == LOOKSW_DISABLED) {
// it was looking at right but now we completed the operation
// set newly the movement forward for robot
ForceAnimationForItem(GET.pItem,0,-1);
}
break;
}
}
We have yet let the code to display to log the critical variables because we are yet working on looking around and these data could be yet useful.
Now we build the project and update the plugin_.dll to trle folder and verify what happens in game.
It's better let enabled the tomb4log.exe window to monitor what happens....
Another problem after last changes
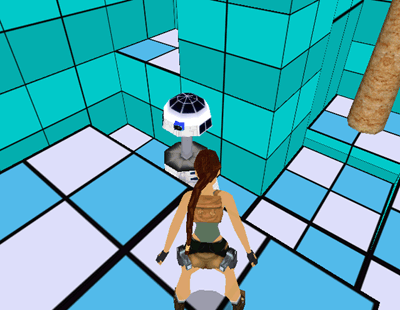
We have another problem...
Immediatly after having looked at right, with highest head (see above picture) the robot moves down the head immediatly by jerk, like if the animation to move down the head, from highest to lower, it was removed, passing immediatly to animation 0 to move forward with lower head.
Perhaps we forgot some other code to change...
Indeed if we look the code inside LOOKSW_AT_LEFT/RIGHT sections, we find this wrong code (and comment):
case 13:
// completed with higher head
// before complete we have to move down the head to lower position with animation 22
SetAnimationAndSpeed(GET.pItem, 22, -1,0);
// since the next animation, after animation 11 is own the animation 0 to move forward
// we can already disable "looking around"
GET.pItem->Reserved_34 = LOOKSW_DISABLED;
break;
The comment should help us it's this:
// since the next animation, after animation 11 is own the animation 0 to move forward
// we can already disable "looking around"
Because not it's not true that at end of animation 11 there will be nextanimation 0. Now there will be animation 19 and so we should avoid to disable the looking around status with "GET.pItem->Reserved_34 = LOOKSW_DISABLED;", because we need to keep the control of the operation "moving down the head" to remember to set the animation 0 only when that animation 22 it has been completed.
So we'll change the above code, but also that to move head from middle hight to lower, because it has same error, in this way:
case 10:
// completed with midle head.
// before complete we have to move down the head
// we use animation 11 (from middle height to lower head)
SetAnimationAndSpeed(GET.pItem, 11, -1,0);
break;
case 13:
// completed with higher head
// before complete we have to move down the head to lower position with animation 22
SetAnimationAndSpeed(GET.pItem, 22, -1,0);
break;
We have simply removed the bad comment and the instruction:
GET.pItem->Reserved_34 = LOOKSW_DISABLED;
In this way the status will remain that current (LOOKSW_AT_LEFT or LOOKSW_AT_RIGTH) and the operation will be completed only when, at end of moving down the head, it will be forced (as nextanimation) the animation 19.
Since we had already managed that animation in the code:
switch (AnimNow) {
case 19:
// completed with lower head
// we cam immediatly close the "looking around phase" and come back to common movements
GET.pItem->Reserved_34 = LOOKSW_DISABLED;
ForceAnimationForItem(GET.pItem,0,-1);
break;
It should work but we have to remove the line:
ForceAnimationForItem(GET.pItem,0,-1);
Because we'll set the moving forward with animation 0 ONLY after having checked to look at right.
So the code of case 19: will become:
case 19:
// completed with lower head
// we cam immediatly close the "looking around phase" and come back to common movements
GET.pItem->Reserved_34 = LOOKSW_DISABLED;
break;
And now it should work...
Build and update .dll and try
There are good news and also less good...
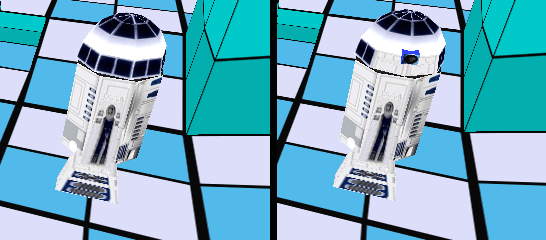
Ok, using new animations we fixed that bug. Looking above image you can see that position of robot doesn't change after looking left, it is the same while it is looking at right.
Anyway there are bad news, too...
We thought that the disappearing in the wall it affected by that little step forward that moved robot far from middle of the center.
It was a reasonable theory, anyway also if we now have fixed the problem of forward step, the robot continues to go throught the wall, ignoring the collision.
In this situation we have to use breakpoints and also improve our log.
Since the movement in this first line is on X axis, we'll add to our log message also the X coordinate of the robot, to detect in real time if it is changing and when.
Why robot crashed into wall?
I'm sure that it's the looking around performed in that sector before it should turning at left, that affects this problem.
Indeed, in previous testing, when the looking around worked only at left, the robot avoided the obstacles rightly.
Like other times, we have to choose where place the breakpoint, and then prepare the game, saving the right position we have a moment before of the bug, into savegame.
Since the bug happened after robot completed the looking around phase, we could place the brekapoint in this position of RobotSW_LookAround() function:
if (OldStatus == LOOKSW_AT_RIGTH && GET.pItem->Reserved_34 == LOOKSW_DISABLED) {
// it was looking at right but now we completed the operation
// set newly the movement forward for robot
ForceAnimationForItem(GET.pItem,0,-1);
}
Above code is at end of sections:
case LOOKSW_AT_LEFT:
case LOOKSW_AT_RIGTH:
We'll place the breakpoint with F10 , over:
ForceAnimationForItem(GET.pItem,0,-1);
Because it is the time when looking around has been completed and the animation to move forward robot has been just set.
About the moment in game, we should save the game when the robot just came in last sector first of the wall:
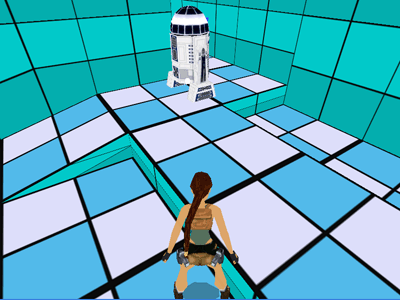
Once you saved the game in above position we can begin our debugging session
Quit tomb4, and launch debugger from Visual Express.
Now in tomb4 go to Load Game and load the level from our savegame.
Now wait a moment that the breakpoint was engaged.

We reached the breakpoint.
Now we continue to hit F10 to perform all instructions step by step until going out from current function and coming back to caller function: ControlRobotStarWars() function.

Now we are very intereted to reach the RobotSW_MoveAndSteer() function, because it is there where it should happen the bug. Since it is the RobotSW_MoveAndSteer() function to change the direction of the robot when there is an obstacle.
So we hit newly F10 key.
And we have the surprise: the controll skips RobotSW_MoveAndSteer() because the previous condition was false:
if (GET.pItem->SpeedH > 0) {
RobotSW_MoveAndSteer(ItemIndex);
}
SpeedH of robot is yet 0, like we can see from Autos panel.
For this reason the robot has not the chance to discover that there is a wall in front of it: the function that should discover this situation it has been skipped.
But for what reason SpeedH is 0?
We have already set Animation 0 to move forward, and that animation has set Speed = 32.
The reason is the same we explained when we create the container function SetAnimationAndSpeed().
There is a delay between the moment we set an animation with ForceAnimationForItem() function and the moment when the speed will be updated. It will happen only after AnimateItem() function.
But for our targets we need to have immediatly the right speed updated, so we can use SetAnimationAndSpeed() also to force animation 0, and in this case we'll give as Speed the value 32.
Now quit debugging session in right way, and replace all AnimationForceItem() function to set animation 0, with:
SetAnimationAndSpeed(GET.pItem, 0, -1, 32);
In this way we'll set immedialy the speed 32.
Now build the project and update plugin_.dll to trle folder and try newly what happens in game.
Fixed the wall bug
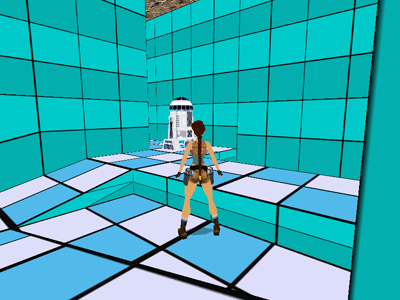
It works! Now the robot works fine: looks at left, looks at right and then steer to move at left.
Detection on head turning
We have yet a bug to fix.
In spite there is a function (FindHeadFacing()) to get from the turning of the head the direction where robot is looking, it seems that it didn't work.
Indeed when the robot is turning the head and from this position it should see Lara, in the reality the detection doesn't happen.
Currently the robot detects lara only she in front of its body with robot facing instead by using the facing of the head.
To fix this bug we'll place a breakpoint in this position :
RobotFacing = FindHeadFacing(GET.pItem);
Above instruction is inside the code of RobotSW_DetectAndAttack() function.
While to prepare the game for debugging, we should save the game when lara and the robot are in this position:
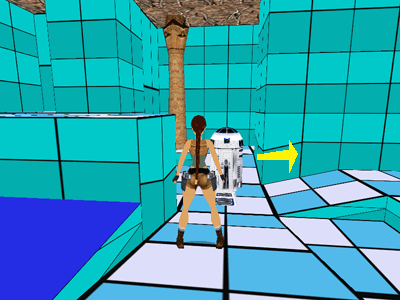
Please, note that robot is moving following the yellow arrow and it's turning the head at its right of about 90 degrees.
Lara has to be in front of the head like you see in above picture.
In this situation the robot should detect lara it doesn't happen. Now we'll discover the reason...
Now quit tomb4, and launch debugger.
In game load the savegame and then the controll we'll reach immediatly the breakpoint:
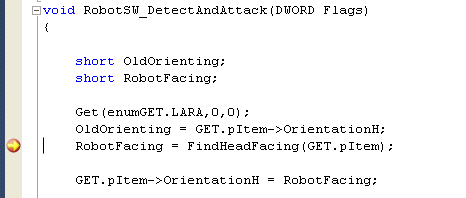
Now we have to use F11 key because we wish inspect the code inside of FindHeadFacing() function.
We are inside of FindHeadFacing() function. Now hit F10 until to reach the
switch (Anim) {
Instruction.
The FindHeadFacing() function use the current animation and frame to discover what are the degrees of the head in that moment.
Looking the Autos panel we see a weirdness: the value for Anim variable is 752 but the robot has not a so wide number of animations.
We have already discovered the bug: the code used the absolute animation value while we need of relative animation number.
Since the code has this absurd value, not "case:" of current switch will be enabled, anyway we can verify this situation hitting F10 once yet.
Indeed, all switch() has been skipped and no change has been done on original robot facing.
This mistake is very common: you use directly the number you find in AnimationNow field of moveable but that value has no meaning if you don't convert it to relative index number.
So now we fix this bug in this way:
Anim= GetRelativeAnimation(pItem);
We added the GetRelativeAnimation() function to get the relative number of animation.
Now we build project, update plugin_.dll and try in game...
It works but ...
When you try the game from position of savegame, it works...
When the robot is looking at its left, it detects lara thanks to the tuning of the head.
Anyway in another position, when the robot needs to move the head in highest position it seems didn't work.
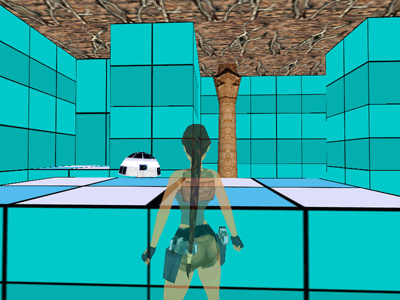
In above picture you see a position we can reach at beginning of the level. The robot moves in highest position the head and then turns it at left, while Lara is closet to blue sector where she triggered the robot.
In this situation the robot should detect lara but it doesn't.
Try to save the game in above situation and then place a breakpoint in same position of previous debugging

Now launch debugger and from tomb raider, load the savegame.
When the breakpoint has been reached, enter in FindHeadFacing() function using F11 key.
Now, keeping visible Autos panel, perform all instructions with F10 key.
When I reached the "return RobotFacing;" instruction the RobotFacing has value 0x7000. You could have a value a bit different anyway it should be in the range 0x6000 - 0x7400 to get that robot was able to detect lara.
Now hit f10 newly to came back to calling code

When the control is over istruction:
if (CheckDirection(GET.pItem, -700, GET.LaraIndex, -730, 0x2000, 0x2000)==true) {
Now use F11 key to enter in the code of CheckDirection() function.
Indeed, in spite the CheckDirection() function is safe we wish understand what of many factors affact the failure of detection.
Now, once inside of CheckDirection() function, hit F10 key on each instruction taking care about the moment when a "return" instruction will be performed.
When the function fails, some "return false" function will be called and in according with what of them will be, we'll discover what is the problem.
The quit with "return false;" happens in this block of code:
Orient = mGetAngle(Alfa, pSourceItem->CordY+OffSourceY, Beta, pTarget->CordY+OffTargetY);
if (Orient > 4096 || Orient < -4096) Orient += (short) 32767;
LOF.OrientingV = Orient;
if (AbsDiffO(Orient, pSourceItem->OrientationV) > MyTolleranza) return false;
I know it is a bit complicated to see but above code check the different height of object and lara and when the vertical angle is too wide it will return false.
So we discovered that the problem is about the heigth of the robot.
Now we look newly the parameters used to call the CheckDirection() function:
if (CheckDirection(GET.pItem, -700, GET.LaraIndex, -730, 0x2000, 0x2000)==true) {
Those "-700" and "-730" are the "OffSourceY" and "OffTargetY" parameters.
They used to move up the coordinate of source point (OffSourceY) or target point (OffTargetY).
Since the coordinate of eyes of enemies (or of our robot) are not in the feet position where there is the basic coordinate of the enemy, it's useful move upper that original coordinate of source object to place the start point of view where there will be the eyes.
In this case we understand the bug.
That value (-700) has been typed only to reproduce (about) the height of the robot's cam when it has lower head, but now we have to change this OffSourceY parameter in according with current head, following this image:
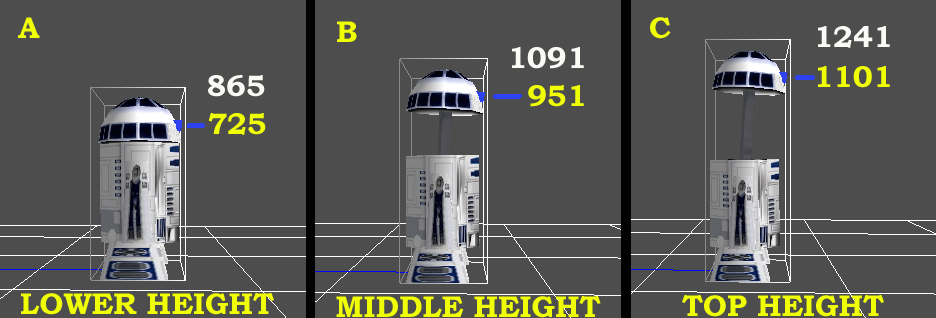
To have a different value in according with current animation, we'll have to use a variable.
So we'll define a local variable inside of RobotSW_DetectAndAttack() from where we call CheckDirection() function.
We could name this variable "HeadHeight
int HeadHeight;
int Anim;
We created also another local variable "Anim" to store the current relative animation of the robot.
And then we'll replace this code:
if (CheckDirection(GET.pItem, -700, GET.LaraIndex, -730, 0x2000, 0x2000)==true) {
with this code:
Anim=GetRelativeAnimation(GET.pItem);
switch (Anim) {
case 13:
case 14:
case 15:
// with animations 13, 14 or 15 the robot has highest head
HeadHeight = -1101;
break;
case 10:
case 20:
case 21:
// with animation 10, 20 or 21 the robot has middle height
HeadHeight = -951;
break;
default:
// with all other animation we'll use height for lower head
HeadHeight= -725;
break;
}
if (CheckDirection(GET.pItem, HeadHeight, GET.LaraIndex, -730, 0x2000, 0x2000)==true) {
We replace the constant "-700" with the variable "HeadHeight" where we set a different value in according with current animation.
Now we build the project, update plugin_.dll and try in game if now it works.
Almost right but it needs yet some improvement
From our testing position now it works and lara has been detected, anyway performing tests form many different positions of the level we find another situation where there is failure in the detection:
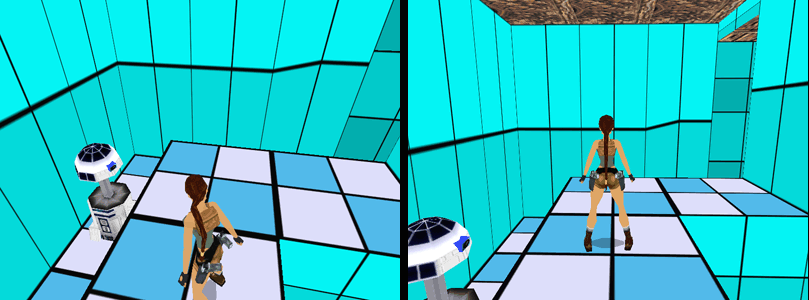
In above picture you see two screenshots where the robot should detect lara but it doesn't.
I believe to know the reason.
In our previous fixing we replace a constant value about OffSourceY with a variable to change in according with height of the head, but in the CheckDirection() parameters there is yet another constant value:
if (CheckDirection(GET.pItem, HeadHeight, GET.LaraIndex, -730, 0x2000, 0x2000)==true) {
That "-730" is OffTargetY and it used to set as target point the face of Lara, moving the positon 730 game units higher than her coordinates (placed on the feet, as usual).
When lara is in stand-up position over a floor higher than robot cam, since the target points currently is closet to eyes of lara, since lara is very closet to the robot the line between the cam of the robot and the lara's eyes has a vertical angle too wide.
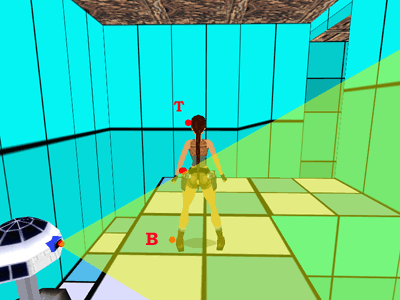
The weirdness is that the feet of lara in above position are inside of vertical angle of the robot's cam. (See above picture)
Theoaratically a way to solve the problem was to call two times the CheckDirection() function: once using Lara's eyes as target point and when the return is false, try another time using as target point the feet of Lara.
But this method is too expensive of cpu time because since the CheckDirection() function perform a lot of computation to check point by point the obstacles of geometry but also collision box of moveables and statics, so it's better using a simple trick to call only once the CheckDirection() but setting a different OffTargetY in according with relative position between lara and the robot's cam.
When the Y coordinate of source point is in the range between TopY and BottomY of Lara ("T" and "B" in above picture), we'll use as Y coordinate of target point the same value of Y coordinate of source point.
In this way there will be a vertical angle by 0 degrees.
While when the Y coordinate of source point is outside of TopY-BottomY range of Lara, we'll use the limit (TopY or BottomY) more closer to Y coordinate of source point.
This is the new code of RobotSW_DetectAndAttack() function:
void RobotSW_DetectAndAttack(DWORD Flags)
{
short OldOrienting;
short RobotFacing;
int HeadHeight;
int Anim;
int YPosCamOfRobot;
int YPosTarget;
int TopY;
int BottomY;
Get(enumGET.LARA,0,0);
OldOrienting = GET.pItem->OrientationH;
RobotFacing = FindHeadFacing(GET.pItem);
GET.pItem->OrientationH = RobotFacing;
Anim=GetRelativeAnimation(GET.pItem);
switch (Anim) {
case 13:
case 14:
case 15:
// with animations 13, 14 or 15 the robot has highest head
HeadHeight = -1101;
break;
case 10:
case 20:
case 21:
// with animation 10, 20 or 21 the robot has middle height
HeadHeight = -951;
break;
default:
// with all other animation we'll use height for lower head
HeadHeight= -725;
break;
}
YPosTarget = -730;
// verify if distance between lara and the robot is less than two sectors
if (GetMaxDistance(&GET.pItem->CordX, &GET.pLara->CordX, true) <= 2048) {
// compute the Y position of the robot's cam:
YPosCamOfRobot = GET.pItem->CordY + HeadHeight;
// compare the Y position of robot's cam with range of lara in vertical from feet Y (bottomY) to eyes (topY)
TopY = GET.pLara->CordY -730;
BottomY = GET.pLara->CordY;
if (YPosCamOfRobot <= BottomY && YPosCamOfRobot >= TopY) {
// YPosCamOfRobot is inside the range about heigth of lara
// compute the YPosTarget (vertical offset for target) to get
// the same Y coordinate of source point
YPosTarget = YPosCamOfRobot - BottomY;
}else {
// YPosCamOfRobot is outside of range
// choose the value between topy and bottomy more near to YPosCamOfRobot
if (AbsDiffY(YPosCamOfRobot, TopY) < AbsDiffY(YPosCamOfRobot, BottomY)) {
// use topY (eyes)
YPosTarget = -730;
}else {
// use bottomY (feet) but a bit over
YPosTarget = -128;
}
}
}
if (CheckDirection(GET.pItem, HeadHeight, GET.LaraIndex, YPosTarget, 0x2000, 0x2000)==true) {
// robot detects lara:
// if survillance mode perform the triggergroup with id stored in customize command
if (Flags & SWR_SUPERVISORY) {
PerformTriggerGroup(GET.pCust->pVetArg[3]);
}
}
// restore original orienting of robot
GET.pItem->OrientationH = OldOrienting;
}
Build the source, update .dll and try in game...
Detection is working fine
We can perform many tests in different positions but it seems it worked fine.
Anyway in detection code there is a ingenuousness: we assign as topy offset for lara the value -730 to compute her higher position but really Lara could have different height in according with her current animation.
For instance if she is on all four, the topy point will be lower that when she is in stand-up position.
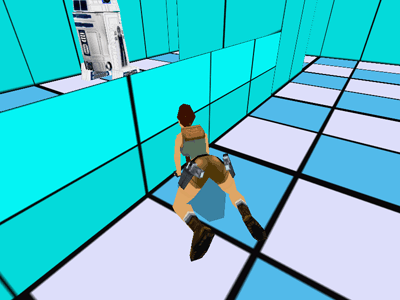
In above picture the robot detects Lara but she is fully hidden behind that low wall.
It's an error that robot was able to see lara in above position and it happens own because the code will use height for stand-up position (-730) in spite she is on all four.
So we have to improve our code, to get the TopY position in according with current position of Lara.
We can solve this problem using the collision box of lara in current moment and using only the higher position insteady by using the constant "-730".S
So we create another local variable to host the (-) height of Lara and then we'll use that variable insteady by "-730" value.
Final code for RobotSW_DetectAndAttack() function
void RobotSW_DetectAndAttack(DWORD Flags)
{
short OldOrienting;
short RobotFacing;
int HeadHeight;
int Anim;
int YPosCamOfRobot;
int YPosTarget;
int TopY;
int BottomY;
int MinTopY;
StrBoxCollisione *pColl;
Get(enumGET.LARA,0,0);
OldOrienting = GET.pItem->OrientationH;
RobotFacing = FindHeadFacing(GET.pItem);
GET.pItem->OrientationH = RobotFacing;
Anim=GetRelativeAnimation(GET.pItem);
switch (Anim) {
case 13:
case 14:
case 15:
// with animations 13, 14 or 15 the robot has highest head
HeadHeight = -1101;
break;
case 10:
case 20:
case 21:
// with animation 10, 20 or 21 the robot has middle height
HeadHeight = -951;
break;
default:
// with all other animation we'll use height for lower head
HeadHeight= -725;
break;
}
YPosTarget = -730;
// verify if distance between lara and the robot is less than two sectors
if (GetMaxDistance(&GET.pItem->CordX, &GET.pLara->CordX, true) <= 2048) {
// compute the Y position of the robot's cam:
YPosCamOfRobot = GET.pItem->CordY + HeadHeight;
// we discover the height of lara with current animation
pColl = GetBestFrame(GET.pLara);
MinTopY = pColl->MinY;
// compare the Y position of robot's cam with range of lara in vertical from feet Y (bottomY) to eyes (topY)
TopY = GET.pLara->CordY + MinTopY; // MinTopY is already a negative value, so we'll use "+" sign
BottomY = GET.pLara->CordY;
if (YPosCamOfRobot <= BottomY && YPosCamOfRobot >= TopY) {
// YPosCamOfRobot is inside the range about heigth of lara
// compute the YPosTarget (vertical offset for target) to get
// the same Y coordinate of source point
YPosTarget = YPosCamOfRobot - BottomY;
}else {
// YPosCamOfRobot is outside of range
// choose the value between topy and bottomy more near to YPosCamOfRobot
if (AbsDiffY(YPosCamOfRobot, TopY) < AbsDiffY(YPosCamOfRobot, BottomY)) {
// use topY (eyes)
YPosTarget = MinTopY;
}else {
// use bottomY (feet) but a bit over
YPosTarget = -256;
}
}
}
if (CheckDirection(GET.pItem, HeadHeight, GET.LaraIndex, YPosTarget, 0x2000, 0x2000)==true) {
// robot detects lara:
// if survillance mode perform the triggergroup with id stored in customize command
if (Flags & SWR_SUPERVISORY) {
PerformTriggerGroup(GET.pCust->pVetArg[3]);
}
}
// restore original orienting of robot
GET.pItem->OrientationH = OldOrienting;
}
Since the GetBestFrame() function returns a pointer, we declare this local variable to host the returned value:
StrBoxCollisione *pColl;
Then we got the highest point with this code:
// we discover the height of lara with current animation
pColl = GetBestFrame(GET.pLara);
MinTopY = pColl->MinY;
And finally we used the "MinTopY" value instead by "-730" constant:
// YPosCamOfRobot is outside of range
// choose the value between topy and bottomy more near to YPosCamOfRobot
if (AbsDiffY(YPosCamOfRobot, TopY) < AbsDiffY(YPosCamOfRobot, BottomY)) {
// use topY (eyes)
YPosTarget = MinTopY;
}else {
// use bottomY (feet) but a bit over
YPosTarget = -256;
}
Fixed all bugs
Once tried last changes now it seems that all bugs have been fixed.
About this tutorial I have to say that some bugs were really complicated because the management of three differen kind of animations to look around (three different heights of head) and mixing this with the movement it's a complicated matter in particular way to follow the logic of differen phases using the LOOKSW_ status, changin in progress.
There are yet other improvements for Star Wars Robot but the improvements are not bugs to fix so the tutorial ends now.
Table of Contents
Fixing and learning
Manage the crashes
The sample sources and level we'll use in this tutorial
How to begin a debugging session
Set the path for tomb4.exe file and folder
Tomb4 has to run only in Windowed mode
You have to build a [debug] version of the .dll
You have to keep updated the plugin_.dll file in trle folder
Set first breakpoint
Tomb4 game is on air
Exploring Structures
How to perform instructions step-by-step
How to conclude a debugging session
How to manage breakpoints
How to return the control to Tomb4 program
Most used Panels and Features of Microsoft Debugger
Panels to show values of variables and structures
The Autos Panel
The Locals Panel
The Watch1 panel
The Call Stack Panel
The Breakpoints Panel
The Conditioned breakpoints
Condition "has changed" mode
The Output Panel
Tips & Tricks
How to manage the request for project out of date
How to solve the problem of defective Breakpoints
When the problem is for the missing of debug information
How to see all cells of an array in Watch1 panel
How can we inspect also other items of that vector
A trick to inspect all items of an array
How to avoid hanging of tomb4 program
How to set a breakpoint while tomb4 is running
How to know the value of registers
How to inspect structures pointed by registers
How to simulate the Dump Memory panel
The "casting" trick to have dumping of memory
How to dump multiple types with same casting
Troubleshooting Plan
How the code should work
How the code is really working now...
The Robot look always at left, never at right
The Robot look at left also when there is a too high wall
The Robot while is turning its head is not able to detect Lara
How to prepare the game to get easy debugging
Let's go: fix the first bug
The first fixing
Testing newly the detection skills
Other bugs to fix
Surprise: that sector has been skipped
How to fix bugs using log messages
Second fixing: the new code
Fixed bug on the crossing
What is the problem with right?
The new code to look at right after looking at left
Fixed also the bug about "looking at right"
Another bug to fix: it works only at first round
Some problems with 17?
From a bug to another...
One more Step
Improve the animations of Star Wars Robot
Update our code for new animation data
The new code after changing of animation data
Another problem after last changes
There are good news and also less good...
Why robot crashed into wall?
Fixed the wall bug
Detection on head turning
It works but ...
Almost right but it needs yet some improvement
Detection is working fine
Final code for RobotSW_DetectAndAttack() function
Fixed all bugs


 If you are managing assembly code, like that you can see in tomb4 application, you'll discover this boring limitation of visual express version: the register panel has been removed like that for memory dumping.

 We had already seen that with Watch1 (and autos and locals panels) we can inspect easily all fields of any structure.
 The Visual Express release is the free version of Microsoft Visual C++, and it has some limitation respect the professional (for money) version.


