Trng Plugin SDK 2


Summary

Introduction
Olly Debugger, What Else?
The Trng Patcher utility
          Menu Trng Patcher: Settings->Change settings
          Menu Trng Patcher: File->Load command
          Menu Trng Patcher: Assembly->Convert from Olly assembly to in-line assembly for Visual C
                    About conversion of Olly code
                    Limits and skills of olly code conversion
                    The importance of moderation in importing tomb4 code in our dll
          Menu Trng Patcher: Assembly->Convert from olly asm to compact assembly for reference
          Menu Trng Patcher: Assembly->Create dynamic patch generator
          Menu Trng Patcher: Debugging->Run Olly Debugger
          Menu Trng Patcher: Debugging->Import in olly tomb4 udd file all known symbols
          Adding source line of C++ plugin code
          Debugging with Olly or with Visual C Debugger?
          Menu Trng Patcher: Debugging->Edit Known Symbols
          Menu Trng Patcher: Debugging->Decode text crash report
                    How to simulate a crash
          Menu TrngPatcher: Debugging->Analyse memory crash report
          Menu TrngPatcher: Debugging->Analyse db_patches.bin report
          Menu TrngPatcher: Tools->Check for further conflicts with given offset zone
                    How to avoid conflicts
          Menu TrngPatcher: Tools->Get assignment of free memory range
          Menu TrngPatcher: Tools->Rename Plugin VC2010 project
          Menu Trng Patcher: Tools->Fix Visual C++ 2010 errorLNK 1207
          Menu TrngPatcher: Tools->Fix VC6.0 error Auto Member List
          Menu TrngPatcher: Tools->Replace NewLine chars with '>' char (and the opposite command)
          Menu TrngPatcher: Updates->Check for On-line Updates
          Menu TrngPatcher: Help
Table of free memory tomb4 zones
Callbacks to numerical TRNG Patches
          Different CBT_ types used for callbacks to trng numerical patches
                    CBT_FIRST for numerical trng patches
                    Stack (ESP) variation calling your CBT_FIRST or CBT_AFTER callback code
                    Stack (ESP) variation calling your CBT_REPLACE callback code
          C++ function to hadle callback to trng patches
                    Input parameters of C++ TRNG patches callback
                    PatchIndex parameter
                    CBT_Flags parameter
                    TestFromJump parameter
                    pRegisters parameter
                    pESP value
                    ESP_MEM() macro
                    CPU_Flags value
                    Returned value by C++ callback for TRNG numerical patches
          Example: how to set a C++ CBT_FIRST callback for a trng numerical patch
          Example: How to set a C++ CBT_AFTER callback
          Example: how to work with assembly callbacks for trng patches
          Example: an assembly CBT_AFTER callback for trng patch
          How to replace trng patches
          How to understand the trng patch source: the "NumericalTrngPatchesCode.txt"
          Example: create a CBT_REPLACE assembly callback to a trng patch
                    Test replace assembly callback
          How to convert assembly trng code to C++ format
                    Our CBT_REPLACE C++ callback for trng patch
Callbacks for Object Procedures
          InitialiseObject procedure
                    Callback for InitialiseObject procedure
          ControlObject procedure
                    Callback for ControlObject procedure
          CollisionObject procedure
                    Callback for CollisionObject procedure
          DrawObject procedure
                    Callback for DrawObject procedure
          FloorObject procedure
                    Callback for FloorObject procedure
          CeilingObject procedure
                    Callback for CeilingObject procedure
          DrawExtraObject procedure
                    Callback for DrawExtraObject procedure
Callbacks for Special (Lara) Object procedure
          Callbacks for Lara's State-ids procedures
                    CB_STATE_ID_LARA_CTRL callback
                    CB_STATE_ID_LARA_COLLISION callback
          Callback for main Lara Control
                    CB_LARA_CONTROL callback
          Callback for Lara Draw procedure: CB_LARA_DRAW
          Callback for Animate Lara procedure: CB_ANIMATE_LARA
          Callbacks for Lara's hair procedures: CB_LARA_HAIR_DRAW and CB_LARA_HAIR_CONTROL
                    CB_LARA_HAIR_CONTROL callback
                    CB_LARA_HAIR_DRAW callback
          Callback for some vehicle procedures
                    CB_VEHICLE_CONTROL callback
Callbacks for Inventory Procedures
          Callback for Inventory procedure: CB_INVENTORY_MAIN
          Callback for Inventory's background procedures
          Callback for savegame management: CB_SAVEGAME_MANAGER
          Callback for pause screen procedure: CB_PAUSE_MANAGER
          Callback for Statistic screen procedure: CB_STATISTICS_MANAGER
          Callback for Options screen procedure: CB_OPTIONS_MANAGER
          Callback for Title Menu procedure: CB_TITLE_MENU_MANAGER
Table of Examples
Examples of Callback usage
          Creating hardcoded effects whereby Callbacks
          Example: Magic Glasses, how to work with ObjectCollision callback
                    Skipping Collision procedure to remove collisions
                    Code to pass through glass holding a flare
                    Problem with CollisionObject callbacks
                    Coupling FIRST and AFTER callbacks
                    Advantages of coupling callback trick
          Example: walkable deads, how to work with FloorProcedure
                    Adding a FloorProcedure to wildboard
                    Verify first release of walkable wildboar hardcoded effect
                    Forcing new coordinates for wildboar
          Examples with Inventory callbacks
          Example: add Lara's home level in title menu screen
                    Requiring the CB_TITLE_MENU_MANAGER callback
                    Drawing a sprite in title menu
                    The DrawSprite2D() function
                    Testing in game our Lara's home sprite
                    Starting a level from title manager callback
          Example: how to select different Lara's outfits from Inventory
                    Sprite to show in Inventory
                    Our new interactive Item: Outfit selector
                    Global variable to save to savegame
                    Initialise OutfitIndex global variable
                    Callbacks for Inventory main procedure
                    Code at start and end of Inventory phase
                    Code for inventory draw phase
                    Trying our Lara's outfit selector in game
                    Using DrawObject2D() function in inventory
                    PrintText() fucntion
Examples about Images and other Device Context operations
          Our project: a Control Panel to handle in game
          Triggers to engage the Control Panel mode
                    Code for our Condition Trigger
                    Code for 801 flipeffect trigger
                    The PerformControlPanelPc() function
          AllocateImage() and FreeImage() functions
          The ReadInputBox() function
          The Final PerformControlPanelPc() function
                    Suspend and Resume Audio Track
                    Global data used for Image operations
                    Create a Device Context compatible with Tomb Raider screen
                    Setting Font and Folor for Text in Device Context
                    Update Directx Input data in closed Loops
                    Working with rectangles for Text drawing
                    Whole DirectX drawing cycle
                    Quit process freeing and restoring allocated resources
          Try in game our Control Panel for PC Animating
                    Homeworks for Control Panel of PC
How to Create Patches
          Dynamic Patches under TRNG engine
          Flat Patches
                    Example of flat patch
          Patches with calls of Plugin Code: the Tomb4 Patcher Address
                    How to choose own Tomb4 Patcher Address
                    How to set Tomb4 Patcher Address
                    How to access to Tomb4 Patcher Address
                    Give a mnemonic name in Olly to our Tomb4 Patcher Address
                    What plugin procedure will be executed whereby Tomb4 Patcher Address?
          The MainPatcher plugin procedure
          Example of our first Numerical Patch
                    Creating an hook for our Numerical Patch
                    Initialise a Numerical Patch in Plugin source
                    Restoring original Tomb4 code in our Numerical Patch
                    Testing our rollingball OCB in game
          Patches with rilocation of whole procedures
                    Relocation of LaraBurn tomb4 procedure
                    Numerical patch with JMP to plugin code
                    Inform to have Relocated a Tomb4 Procedure: the ApplyRelocatorPatch() function
                    Converting Olly code to in-line assembly format
                    Testing in game the relocation of LaraBurn procedure
          The Parametric Patches
                    Parametric Patch to change Shatter Static Range
                    The ApplyParametricPatch() function
                    The StrParamPatch structure
                    How to discover real offset and size of Constant for Parametric Patch
                    How to set Gap field for Parametric Functions
                    Example of Parametric Patch
          Unrecoverable Patch Conflicts
                    The run-time Patches
          Recoverable Patch Conflicts
                    With Great Power comes Great Responsability - Rule
          The Call Parametric Patches
                    The ApplyCallPatch() function
          Patch to Restore Original Tomb4 Code
                    The ApplyRestoreCodePatch() function
          How to reserve Data Zone
                    The SetReservedDataZone() function
Conclusions
          About Clean Plugins (Again...)


Introduction

The second part of Plugin SDK help is more specific about low level programming: assembly code, patches in tomb4 executable and many callbacks to have an hook on any kind of elaboration in tomb4 program.
We'll see also some tools, new and old, to help us in our job: Olly debugger and the TrngPatcher utility.
While Olly debugger is a well-known debugger created by Oleh Yuschuk, TrngPatcher is a program of mine, that I created a lot of time ago to manage my job with tomb4 and next generation project.


Olly Debugger, What Else?


If you are wondering: "Why do you use another debugger, is it not enough that of Visual C++ 10?", this means you are a beginner about patching of tomb4 program.
I don't mean to do a tutorial about usage of Olly debugger and, probably, you can finding a lot of on-line reference about that.
Here I remember only that Olly is a particulary user-friendly debugger for patching and for this reason it has been chosen by a lot of LE programmers, included me.
I have always used the 1.10 release, in spite there is another, the 2.0, that should be more advanced.
The reason, I went on to use the 1.10, is because the internal format of .udd file is important for my tool TrngPatcher, but I know only the format of 1.10 release and not that 2.0.
So, I use only 1.10 and I suggest also to you to use that old release. If you don't want, it's ok for me but you'll be not able to copy in mnemonic symbols of olly all known functions and data I discovered in last years.
It's comfortable having names of variables and function while you are using the debugger.


Anyway, excluding above matter, I suppose that also v2.0 version was able to do same work we need to patch tomb4.


The Trng Patcher utility


Trng Patcher has the look of a common text editor but is a little collection of tools, to help us in our work of patching.
Now we see a short description of these tools, that is a good way to introduce many important topics, anyway then, many of these topics, will be described in depth in second part of this document.


Menu Trng Patcher: Settings->Change settings


The first step it should be to set the preferences of program.
It's necessary supply some folders and file names to have always the program ready to interact with tomb4, olly program and trng files.


Menu Trng Patcher: File->Load command


It's better remembering that you can load in TrngPatcher editor any kind of text file, and you have in "File->Load->[list]" menu, the chance to load immediately a given prefix file to get faster this operation.
For instance, when you set all right folders and paths in Settings window, then you'll be able to load the .btn/.script/.ocb files of your plugin (with reference to it in Settings), avoiding to browse folder to locate it.
Above plugin files will be loaded from NG_Center folder, while other files, like Tomb4Code and Tomb4Data sources, will be loaded from path you gave in Settings.
Once you edited a file, just choosing "File->Save" to save on disk that file in its original path.

Menu Trng Patcher: Assembly->Convert from Olly assembly to in-line assembly for Visual C


This command is very useful: you can convert a text file caught in olly assembler and convert it to the format of in-line assembly.
In this way you can move a code in your plugin source.
For example, if you have following code text from Olly debugger:

0043C273 |. 33F6 XOR ESI,ESI
0043C275 |> B8 01000000 /MOV EAX,1
0043C27A |. 8BCE |MOV ECX,ESI
0043C27C |. D3E0 |SHL EAX,CL
0043C27E |. 33C9 |XOR ECX,ECX
0043C280 |. 66:8B0D EDDF8000 |MOV CX,WORD PTR DS:[<ZonaSave_184_ComboItem1_4>]
0043C287 |. 85C1 |TEST ECX,EAX
0043C289 |. 74 0C |JE SHORT TOMB4.0043C297
0043C28B |. 8D56 31 |LEA EDX,DWORD PTR DS:[ESI+31]
0043C28E |. 52 |PUSH EDX
0043C28F |. E8 8C010000 |CALL TOMB4.0043C420
0043C294 |. 83C4 04 |ADD ESP,4
0043C297 |> 46 |INC ESI
0043C298 |. 83FE 10 |CMP ESI,10
0043C29B |.^7C D8 \JL SHORT TOMB4.0043C275
0043C29D |. 33F6 XOR ESI,ESI

Just you copy it to text editor of TrngPatcher and then choose the command: [Assembly->Convert from Olly asm to in-line assembly for Visual C code], and the above code it will be changed in following way:

          XOR ESI,ESI
Go1:
          MOV EAX,1h
          MOV ECX,ESI
          SHL EAX,CL
          XOR ECX,ECX
          mov ecx, 80DFEDh ;ZonaSave_184_ComboItem1_4
          MOV CX,WORD PTR [ecx]
          TEST ECX,EAX
          JE Go2
          LEA EDX,DWORD PTR [ESI+31h]
          PUSH EDX
          mov eax, 43C420h ;LOC_43C420
          CALL eax
          ADD ESP,4h
Go2:
          INC ESI
          CMP ESI,10h
          JL Go1
          XOR ESI,ESI


Nice fact is that, above code can be performed inside you plugin sources, just only enclose it inside the "__asm { }" C++ prototype:

_asm {
          XOR ESI,ESI
Go1:
          MOV EAX,1h
          MOV ECX,ESI
          SHL EAX,CL
          XOR ECX,ECX
          mov ecx, 80DFEDh ;ZonaSave_184_ComboItem1_4
          MOV CX,WORD PTR [ecx]
          TEST ECX,EAX
          JE Go2
          LEA EDX,DWORD PTR [ESI+31h]
          PUSH EDX
          mov eax, 43C420h ;LOC_43C420
          CALL eax
          ADD ESP,4h
Go2:
          INC ESI
          CMP ESI,10h
          JL Go1
          XOR ESI,ESI
          }

Note: you can use also some macros to set an assembly in-line code:

          BEGIN_ASM
          .... assembly code...
          END_ASM

Above macros will save and restore all registers with a pair of pushad and popad instructions. They will be used when you insert some assembly code inside a C++ function.

Then there are the macros to define a stand-alone assembly procedure:

          BEGIN_ASM_PROC(NameOfMyProc)
          ... code of assembly procedure
          END_ASM_PROC

Above macros have been already described in Plugin_SDK (1)


About conversion of Olly code
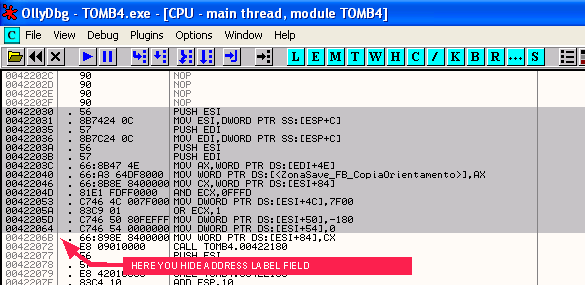
To avoid error messages or, worse, errorless bugs, you should take care to copy from olly the code with all its sides, well listed.
I mean that, if you let the default setting of window frames in disassembly (code) windows, you could "cut" the column about address label, or the column about hexadecimal dump of asm instructions.
All data is important for trng_patcher to perform a correct conversion.
For instance this is a bad setting of window frames, to export code list:


In above image the address label columen is fully hidden, but if you grab the frame border and drag, you can get it newly visible:


Since you are working about right size of frames, it's better adjust also the width of other columns, to have always surely visible all columns of disassembled code.


Limits and skills of olly code conversion
The changes performed by TrngPatcher are not simply about the "style" of code, in many circustances the code it will be own changed.
Indeed, there is a bad problem to solve, to have tomb4 code (from olly) working in in-line assembly of Visual C++.
Assembler of Visual C++ doesn't accept instruction where the code uses a tomb4 offset.
For instance a code from tomb4, like this:

          mov edx, dword ptr [LOC_4ab108]
          call LOC_7d9474

It cann't to be converted simply in this way:

          mov edx, dword ptr [4ab108h]
          call 7d9474h

The assembler of Visual C++, will give an error.
The problem is that the offsets 4ab108h and 7d9474h (in above example), are not in offset range of your dll library and for this reason, Visual C will see them like constant values, forbidding to use them to access to memory addresses.
There is a trick to solve above problem: we'll have to move that constant-offset in some register and then we'll be able to perform that instruction.
For instance, the above code will be converted by trng_patcher in following way:

          mov edx, 4ab108h ; LOC_4ab108
          mov edx, dword ptr [edx]
          mov eax, 7d9474h ; LOC_7d9474
          call eax

Using this register-trick we'll be able to convert any code but, own in above example, we can discover a collateral effect.
Trng_Patcher changed the code:

          call LOC_7d9474

with code:

          mov eax, 7d9474h ; LOC_7d9474
          call eax

Well, now let's wonder: what does it happens, if procedure at 7d9474 offset, required a given value in eax register?
The conversion indeed, added a new instruction ( mov eax, 7d9474h ; LOC_7d9474) modifiying the value of eax register.
Trng_patcher tries to handle this problem, choosing a unused register or restoring the original value before continuing, anyway in some circustances it is not able to fix itself the problem and so it will add a comment row to inform you about the problem.


The importance of moderation in importing tomb4 code in our dll
The operation we saw in above paragraph could be labeled "importing of tomb4 code", since the code that first was in tomb4 executable, then it will be executed in your dll library.
There are some reason to suggest avoiding massive importing:

note: if you import a whole procedure, remember to use the ApplyRelocatorPatch() function (instead the usual ApplyCodePatch() function). See Patches with rilocation of whole procedures chapter
This means that you should edit the code generated by TrngPatcher, replacing the "ApplyCodePatch(" with "ApplyRelocatorPatch(" and adding the two final arguments about offset ranges of whole procedure it will be imported in your plugin.


Menu Trng Patcher: Assembly->Convert from olly asm to compact assembly for reference


With this command, all text loaded in text editor it will converted to a compact format, the same you see in tomb4 sources in [PLUGIN_SDK_STORE/Tomb4Sources] folder.
For instance a code, from olly, like this:

0040109B . 0FBFC3 MOVSX EAX,BX
0040109E . 8D0C40 LEA ECX,DWORD PTR DS:[EAX+EAX*2]
004010A1 . 8D0C88 LEA ECX,DWORD PTR DS:[EAX+ECX*4]
004010A4 . 8D14C9 LEA EDX,DWORD PTR DS:[ECX+ECX*8]
004010A7 . 8D0CD0 LEA ECX,DWORD PTR DS:[EAX+EDX*8]
004010AA . 8B15 6CE17F00 MOV EDX,DWORD PTR DS:[<pVetItems>]
004010B0 . 8D0C49 LEA ECX,DWORD PTR DS:[ECX+ECX*2]
004010B3 . 66:837C4A 2C 01 CMP WORD PTR DS:[EDX+ECX*2+2C],1
004010B9 . 8D344A LEA ESI,DWORD PTR DS:[EDX+ECX*2]
004010BC . 75 0D JNZ SHORT TOMB4.004010CB
004010BE . 66:C746 2C 0000 MOV WORD PTR DS:[ESI+2C],0
004010C4 . 5F POP EDI
004010C5 . 5E POP ESI
004010C6 . 5B POP EBX
004010C7 . 83C4 3C ADD ESP,3C
004010CA . C3 RETN
004010CB > 8B7E 3C MOV EDI,DWORD PTR DS:[ESI+3C]

it will be converted in this way:

40109B:                    MOVSX EAX,BX
40109E:                    LEA ECX,DWORD PTR [EAX+EAX*2]
4010A1:                    LEA ECX,DWORD PTR [EAX+ECX*4]
4010A4:                    LEA EDX,DWORD PTR [ECX+ECX*8]
4010A7:                    LEA ECX,DWORD PTR [EAX+EDX*8]
4010AA:                    MOV EDX,DWORD PTR [pVetItems]
4010B0:                    LEA ECX,DWORD PTR [ECX+ECX*2]
4010B3:                    CMP WORD PTR [EDX+ECX*2+2Ch],1h
4010B9:                    LEA ESI,DWORD PTR [EDX+ECX*2]
4010BC:                    JNZ LOC_4010CB
4010BE:                    MOV WORD PTR [ESI+2Ch],0h
4010C4:                    POP EDI
4010C5:                    POP ESI
4010C6:                    POP EBX
4010C7:                    ADD ESP,3Ch
4010CA:                    RETN
4010CB: LOC_4010CB:
4010CB:                    MOV EDI,DWORD PTR [ESI+3Ch]

I used this command to get the "Tomb4Code.txt" and "Tomb4PatchedCode.txt" source files.

Menu Trng Patcher: Assembly->Create dynamic patch generator


This command allows to create a little C++ function that will generate a dynamic patch in tomb4 code.
In the past, before trng engine, the patches on tomb4 changed really the tomb4.exe file on disk and they were fixed.
Infact, trng and their plugins, will use another method: the tomb4.exe file is alaways the original, only when it has been loaded in memory, it will be patched.
The code used to create these patches is that you get with the command we are describing now.
Let's say that we are using olly debugger and we want change the following code:

004302B2 |. 68 83FEFFFF PUSH -17D
004302B7 |. 56 PUSH ESI
004302B8 |. 66:8B91 E8110000 MOV DX,WORD PTR DS:[ECX+11E8]
004302BF |. 66:C746 14 7200 MOV WORD PTR DS:[ESI+14],72

In this way:

004302B2 |. 68 83FEFFFF PUSH -180
004302B7 |. 56 PUSH ESI
004302B8 |. 66:8B91 E8110000 MOV DX,WORD PTR DS:[ECX+11E8]
004302BF |. 66:C746 14 7200 MOV WORD PTR DS:[ESI+14], 0

In this case we changed two constant values, but our example could work also if we changed some instruction.
We changed the -17D with -180 and the 72 value with 0.
We have to perform really these changes in olly and then, when we have the code as we wish, we select the changed zone and choose the command [Copy->To clipboard] (really we can get same results also with [Copy->To file], of course)


Now go to trng_patcher and paste the patched code in text editor, and we finally use our command [Assembly->Create dynamic patch generator].
TrngPatcher will prompt us to give a name for this patch, i.e. the name of function that it will create this dynamic patch.
Let's say we assign to it the name "Patch_ForConstants".
Now TrngPatcher will replace in text editor the olly code with a C++ source like this:

int Patch_ForConstants(void)
{
          static BYTE VetBytes[]={0x68, 0x83, 0xFE, 0xFF, 0xFF, 0x56, 0x66, 0x8B, 0x91, 0xE8,
                              0x11, 0x0, 0x0, 0x66, 0xC7, 0x46, 0x14, 0x72, 0x0};

          return ApplyCodePatch(0x4302B2, VetBytes, 19);
}

This new function, named "Patch_ForConstants()", when performed, will create the patch in tomb4 code we wished.
Note: this kind of functions (patch creators), should be copied always in Plugin_trng.cpp source, a bit over the function CreateMyCodePatches().
At end, we'll type the instruction to perform that function, own inside of CreateMyCodePatches() function.
For instance in above example,we'll have at end a code like this in Plugin_trng.cpp:

// --------------- CODE FOR TOMB4 "CODE" PATCHES --------------
// Note: please, don't change or remove the C++ procedure you find here,
// because they are necessary to do work the plugin with the trng dll
// Anyway in many of these functions you can add your code

int Patch_ForConstants(void)
{
          static BYTE VetBytes[]={0x68, 0x83, 0xFE, 0xFF, 0xFF, 0x56, 0x66, 0x8B, 0x91, 0xE8,
                              0x11, 0x0, 0x0, 0x66, 0xC7, 0x46, 0x14, 0x72, 0x0};

          return ApplyCodePatch(0x4302B2, VetBytes, 19);
}
// FOR_YOU: In this function you insert the callings of functions used to change tomb4 code
// You can get these functions, in the correct format, using Trng Core -> Asm Souce Editor -> Debugging menu
// program
// note: if there is a conflict the function will return "false"
// and the tomb4 program will abort with an error message
bool CreateMyCodePatches(void)
{


          // the call of the code patch to TYPE_HERE:
          // example:
          // SET_PATCH(Path_RedirCollision)
          // to call the function Patch_RedirCollision() created with TrngPatcher program (command Assmembly->Create Dynamic Patch Generator)

          SET_PATCH(Patch_ForConstants)

          
          return true;
}


Menu Trng Patcher: Debugging->Run Olly Debugger


This command will simply execute olly debugger, passing to it the tomb4.exe you set in the settings.
It's only an example about the partnership between trng_patcher and Olly debugger.


Menu Trng Patcher: Debugging->Import in olly tomb4 udd file all known symbols


This command will copy all known symbols (offsets whom has been given a meaningfull name in according with its scope) to internal olly database.
In this way you'll be able to see, in disassemby window...


Or in dump (data) window:


Note: as I had already said: this chance, to import in olly debugger the symbols, works only with "old" Olly's release 1.10.

Adding source line of C++ plugin code

When you give above command, "Import in olly tomb4 udd file all known symbols", you'll will be prompted with following request dialog:


If you choose "Yes", there will be additional infos in your disassembly panel, when you are working with Plugin's module.
To understand better this matter, it's necessary coming back to Olly debugger, talking about symbolic debuggin.


Debugging with Olly or with Visual C Debugger?

We said that Olly is very "patch friendly" and for this reason we'll use it very often; anyway it could be used also to debug tomb4 code, since, in my humble opinion, it is very friendly also for low level debugging and for this reason it's more comfortable using Olly to debug, step by step, some tomb4 procedures, rather that VC10 debugger.
More, we saw that we can load known tomb4 symbols in Olly and this will help us to understand better the tomb4 code we are debugging, chance this, missing in VC10 debugger.
However, in spite of all above speechs, it's yet true that, to debug Plugin code, is better using VC10 debugger, of course.
The problem about this choice is that, in many circustances, we'll have to debugging a mix of tomb4 + plugin code, since our patches and callbacks will move continuosly the execution from/to tomb4/plugin.
When we need to perform this "mixed" debugging, Olly is yet first choice, because, other to give us infos about symbolic names in tomb4 (those we discovered), more let's understand a bit also the plugin code.
Indeed, when plugin has been already loaded, i.e. when execution reached (or passed over) the tomb4 address 49F1B6


(note: the InizioLinkDll procedure loads all plugins and apply all patches)
We can use plugin symbolic names to watch some side of plugin code:


For instance in above example we wished watching the code of cbProcCollisionSlot function.
Olly is able to recognize these symbols, because we are working, with our plugin, in Debug mode, and in debug release there are all symbolic informations.


This fact to be able to use plugin names help us, but understanding the assembly code, generated by VC10 is not so easy, as you can see from above image.
Another great help is to be able to see the Source code, and we can realise this simply with keyboard shortcut CTRL F5:


It's really a nice chance that!
Anyway using a bit it, we discover that olly is not really able to debugging in (C++) source mode...
It means that, everytime we execute current assembly instruction (F8 or F7 keys), the disassembly panel will pop up, covering the source panel.
Also placing in a different position the souce panel, the updating of current executed asm instruction, will be not performed automatically.
Pratically, in spite the source panel is useful, it has some annoyng behaviour.
To have, constantly visible C++ source line, while we are debugging , step by step, plugin code, we can use own that chance to add "source plugin rows like comments", we saw in the description of "Import in olly tomb4 udd file all known symbols" command.
When we add these infos, then in Disassembly panel of Olly, while we are debugging plugin code, we'll see in Comment column the source C++ line that generates that assembly code:


As you can see in above image, in many disassembly rows, there is the C++ equilvalent line for that asm code.
The reason because not all asm linees have a C++ comment row, it's becasue a single one C++ instruction could require many assembly linees, of course.


Menu Trng Patcher: Debugging->Edit Known Symbols


As you saw, in some screenshots, many label (known symbols) are in italian. I'm sorry but this is my language and I use it a lot of times.
I tried to translate in english many function and variable names and you see the result in plugin sources, but it was too long perform a full translation.
Anyway if you want, you can perform this translation using this command.
You are free to add new label whom you know the meaning, or to translate the name in trng_patcher database in english or other language.
These changes will have no effect on plugin sources or other tools, they will be present only in trng_patcher and olly debugger for your reference.
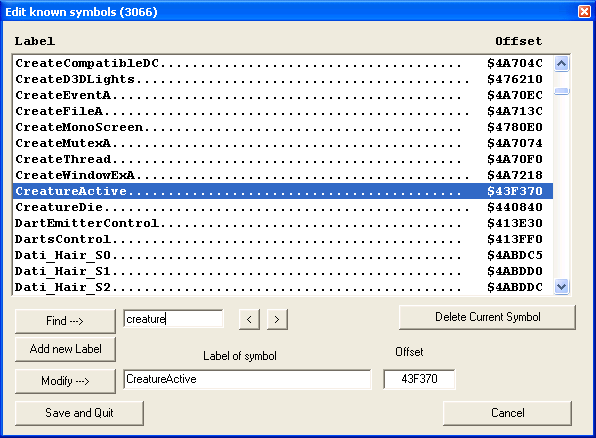
When you select the "Edit Known symbols" command, following window will be showed:


You can find label or hexadecimal offset (just looking for number in hex format).
You can add new label or modify the selected label, or (Not advisable) its offset value.
For instance an operation very advisable is to add as new symbol, to label the tomb4 offset you'll use for your numerical patches, the value you'll type in AdrTomb4Patcher.
If you call it "MyPatcher" then, in olly , when you'll create a new patch, you'll be able to use the mnemonic name, instead by remembering everytime its hexadecimal offset.
Better descrition about this matter it will come soon in next chapters...
Example: working on CollisionObject callback

Please note that when you'll click on [Save and Quit] button, the symbols will be saved on disk and you'll be prompted to update the symbols to olly debug files. It's advisable do it, otherwise the change will be not visible in Olly.

Techninal note: all labels and offsets are stored in file: "symbols.txt" you can find in trng_patcher folder.
It is a plain text file with a format where the ^ character it has been used as separator:

4607952^[L]^BikeCollideStaticObjects^0^
4608720^[L]^BikeBaddieCollision^0^
4418800^[L]^Splash^0^
4495952^[L]^GetWaterHeight^0^
4497904^[L]^TestTriggers^0^
4523360^[L]^GetBestFrame^0^
4560576^[L]^sgSaveGame^0^

You can understand easily its format: first column is offset value in decimal format, second column is always "[L]" to inform that is a label (in the past I used also to store comments and so there was the [C] symbol but then I removed it), third column is the mnemonic name (label) and fourth column is another useless field: it should be the size for variables 1 byte, 2 word, 4 dword, but I gave off also that field.
If you wish you can work also directly on "symbols.txt" file to automatize some parsing with another program, anyway the edit symbols of trng_patcher is already rather userfriendly for most usages, imho.

Menu Trng Patcher: Debugging->Decode text crash report


You see a lot of time (unfortunately) a crash report, of course.
Everytime there is a crash, trng generates a text file with name Last_Crash#.txt, saving it to trle folder.
A crash report shows technical infos about the crash: where is it happened (crash offset), value of registers, last error messages in tomb4 ect.
Many of these infos are already understandable but there are some raw data that require to be decoded.
The misterious data are these:

Stack=0x34FFE2C pContesto=0x34FFB60 pInfoEccezione=0x34FFB44
PRIMARY_STACK:
ESP=0x34FFE2C
STACK_TRACE:
          0x100D2CF1
          0x10038093
          0x1009234E
          0x1008C6F1
          0x100C958E
          0x475D2D
          0x448B7E
          0x100DDC60
          0x451FB3
          0x451166
          0x475155
          0x49E67C
          0x1000DDAF
<CRASH DURING STACK TRACE>
END_STACK_TRACE

SECONDARY_STACK:
ESP=0x12B12C
STACK_TRACE:
          0x460020
          0x48D323
          0x48D323
          0x48CC6B
          0x48CACE
          0x49F26B
END_STACK_TRACE

Above values are important to understand the path of performed procedures, before getting the crash.
Many of above offsets are callback addresses set when the program perform a call (to a subroutine or function).
The "Decode text crash report", convert above list of stack offsets in clips of source code (from tomb4 or your plugin) to get more easy understand what's happened before the crash.


How to simulate a crash
To understand better how this command works we can to do a test.
Now we'll change our code to have a crash in a given function of our plugin, and then we'll analyse the decoded crash report to see how to understand its output.

Note: In some cirucstances it could be really usefull generate a crash, in particular way when in game it's happening something of "weird" that we don't understand. Setting a crash in that moment, we'll be able to have an image of many data of the game in that moment, to study better.
There is a keyboard command to generate a crash: CTRL+SHIFT+I but it works only when your plugin is in debug mode (compiling the debug version to generata the dll in "debug" subfolder.

In spite of direct command to generate a crash (CTRL+SHIFT+I), now we prefer simulating a crash like it could really happen in game, to have a more realistiic behaviour.

So now we have to do a huge mistake in the code.
Let's say we create this crash in Star Wars Robot procedure, for instance when the robot is trying to shot lara with his elettric lightning.
So we'll type a wrong code in ShootLightning() function.
This is the original (working fine) function:

// shoot a lightning from star wars robot to lara
void ShootLightning(int SourceItemIndex, bool TestKill)
{
          int IdColor;
          WORD Flags;
          int IdParam;
          short Damage2;

          if (GET.pLara->Health <= 0) {
                    // lara is already dead: quit shooting
                    return;
          }

          Flags=LGTN_PLAY_SOUND+LGTN_ADD_GLOVE_LIGHT;

          if (TestKill==true) {
                    // red color
                    IdColor= Service(enumSRV.CREATE_COLOR_RGB_COMMAND, true, 128,0,0);
                    // flags to kill lara and to do scream her
                    Flags |= LGTN_FIRE_LARA;
..... other code .....
          
And we'll add a little code to generate a crash, in this way:

// shoot a lightning from star wars robot to lara
void ShootLightning(int SourceItemIndex, bool TestKill)
{
          int IdColor;
          WORD Flags;
          int IdParam;
          short Damage2;

          // only for #debug#: generate a crash in following access to GET.pLara
          GET.pLara = NULL;
          // end of #debug# code

          if (GET.pLara->Health <= 0) {
                    // lara is already dead: quit shooting
                    return;
          }

Setting to NULL item the structure pointer GET.pLara, when in next instruction the code will try too read Health field, there will be a crash, because the pointer is NULL and it's not possible accessing to memory address 0x00000 (the value of NULL is 0, pratically).
Technically it will be generated an "exception"

Note: As you see, I added also some comment lines to remember that code has been added only temporary for debug, using the #debug# text. This method is useful to avoid to forget some bad code (or temporary code) in the sources. When you wish remove all these bad codes, just you'll look for "#debug#" to locate immediately all this sides.

Now, to test our crash, we cann't perform the program using the debugger, because otherwise, it will be the debugger to catch the crash and no crash report will be generated.
So we have to build our plugin, copy the "plugin_trng.dll" to trle folder and start normally tomb4.exe
In game, we'll load level about SW robot and triggering it. Not just the robot will try to shot lara it will happen the crash..,

TRNG - Detected Unrecoverable Crash
Informations about current crash saved in following file:

"D:\Trle_esperimenti\trle\Last_Crash_12.txt"

NOTE: you removed CRS (Crash Resume System). If you want avoid crashes you should enable newly CRS

Ok, we'll get our crash.
Now we'll use TrngPatcher to study this crash, in our example is "Last_Crash12.txt"
From trngPacher, we'll use the menu command: "Load->Crash report (tomb4)" and we choose "Last_Crash12.txt" file
In text editor wee a common crash report.
Now we use the command to decode the crash report: "Debugging->Decode text crash report"

TrngPatcher will prompt you to select the folder of debug version of your plugin. It should already show right folder of your plugin (if you set it in the Settings), you have only to verify to select the "Debug" subfolder.
After some second decoding will be completed.
Apparently the text seems the same but it's only because first side is the same. The changes will be in bottom side of the report.
Now the stack callback list, it will have been replaced with real source code.
To understand the meaning of these infos, we have to look for the marker "<-----" that you see at right of some code line.
For instance:

======= START SECONDARY_STACK =============
49F256: <LOC_49F256>
49F25D:                    PUSH ESI ; Arg2
49F25E:                    PUSH ESI ; pModule
49F25F:                    CALL DWORD PTR [GetModuleHandleA] ; GetModuleHandleA
49F265:                    PUSH EAX ; Arg1
49F266:                    CALL LOC_48C720 ; LOC_48C720
49F26B:                    MOV DWORD PTR [EBP-60h],EAX <-------

----------------------------------------------------------------

Looking first code block you find the marker in the line with offset 49F26B.
Do you see that the previous line is a call instruction?

49F266:                    CALL LOC_48C720 ; LOC_48C720
49F26B:                    MOV DWORD PTR [EBP-60h],EAX <-------

Well, this means the code was performing the code in subroutine located at LOC_48C720 address and the execution has not been able to come back to following (the call) address (49F26B) own because it happened the crash.
Going on to analys other blocks, we see all subroutines performed, until to reach the position of crash offset.
Above block code is not so useful for us, since the "call LOC_48C720" is anonymous, anyway when the execution will pass through know tomb4 procedure or through our plugin code, the source will be more understandable.
For instance moving at bottom of the list (showing last function performed before the crash) we see:

----------------------------------------------------------------
1F24960: <RobotSW_DetectAndAttack>
1F24B53: <----- (distance from RobotSW_DetectAndAttack = 0x1F3)
; 1858 :                               // if there is hurting or killing shooting the lightning
; 1859 :                               // anyway, if it elasped too few time from last shooting: skip other shooting
; 1860 :                               if (GET.pItem->Reserved_3A == 0) {
001d0          8b 15 08 00 00
          00                     mov           edx, DWORD PTR ?GET@@3UStrGetLocator@@A+8
001d6          0f bf 42 3a           movsx           eax, WORD PTR [edx+58]
001da          85 c0                     test           eax, eax
001dc          75 3e                     jne           SHORT $L31715
; 1861 :                                         
; 1862 :                                         if (Flags & SWR_HURTING) {
001de          8b 4d 0c           mov           ecx, DWORD PTR _Flags$[ebp]
001e1          83 e1 02           and           ecx, 2
001e4          85 c9                     test           ecx, ecx
001e6          74 0e                     je           SHORT $L31716
; 1863 :                                                   ShootLightning(RobotIndex, false);
001e8          6a 00                     push           0
001ea          8b 55 08           mov           edx, DWORD PTR _RobotIndex$[ebp]
001ed          52                     push           edx
001ee          e8 00 00 00 00           call           ?ShootLightning@@YAXH_N@Z ; ShootLightning
001f3          83 c4 08           add           esp, 8 <------
$L31716:
----------------------------------------------------------------

As usual, we should look for "<----" marker and then look for previous code line.
In above case we find these two rows:

001ee          e8 00 00 00 00           call           ?ShootLightning@@YAXH_N@Z ; ShootLightning
001f3          83 c4 08           add           esp, 8 <------

In spite of some compilator data "mess", we recognize a function of ours: the ShootLightning() function.
This means that the execution reached inside code of ShootLightning() function.
Anyway in above code, we yet don't find the marker "#CRASH OFFSET# and indeed, we'll find it only in last code block (very common situation this):

1F23D60: <ShootLightning>
1F23D87: <----- #CRASH_OFFSET# (distance from ShootLightning = 0x27)
00008          57                     push           edi
00009          8d 7d b0           lea           edi, DWORD PTR [ebp-80]
0000c          b9 14 00 00 00           mov           ecx, 20                              ; 00000014H
00011          b8 cc cc cc cc           mov           eax, -858993460                    ; ccccccccH
00016          f3 ab                     rep stosd
; 1404 :           int IdColor;
; 1405 :           WORD Flags;
; 1406 :           int IdParam;
; 1407 :           short Damage2;
; 1408 :
; 1409 :           // only for #debug#: generate a crash in following access to GET.pLara
; 1410 :           GET.pLara = NULL;
00018          c7 05 00 00 00
          00 00 00 00 00           mov           DWORD PTR ?GET@@3UStrGetLocator@@A, 0
; 1411 :           // end of #debug# code
; 1412 :
; 1413 :           if (GET.pLara->Health <= 0) {
00022          a1 00 00 00 00           mov           eax, DWORD PTR ?GET@@3UStrGetLocator@@A
00027          0f bf 48 22           movsx           ecx, WORD PTR [eax+34] <------ #CRASH_OFFSET#
0002b          85 c9                     test           ecx, ecx
0002d          7f 05                     jg           SHORT $L31590

----------------------------------------------------------------


Above last code block, confirm to us that the execution came in the ShootLightning() function but in this case, we find also the "<---- #CRASH_OFFSET#" marker that says to us the exact code line where the crash happened:

00027          0f bf 48 22           movsx           ecx, WORD PTR [eax+34] <------ #CRASH_OFFSET#

That we see is the low level, assembly code, where crash happened, anyway to understand better the line, to see it in C++ style format, just coming up until to see first line starting with a semicolon character ";", and so we find, finally, the C++ line where the crash happened:

; 1413 :           if (GET.pLara->Health <= 0) {

Well, in our case we knew very well where was the crash and its reason (since we created it), anyway in other cases it will be very useful discover the execution path (the list of procedure called one inside other) and the final code performed the crash.
The presence of low level assembly lines is very usfeull, because it allows to us to understand the reason of the crash.
For instance the assembly line of the crash was:

00027          0f bf 48 22           movsx           ecx, WORD PTR [eax+34] <------ #CRASH_OFFSET#

Well, comparing this asm line, with its C++ source, we can understand that the [eax+34h] was the "pLara->Health", threfore, looking in crash report the value of eax register we can understand where was the problem:

REGISTERS:
          EAX=0
          EBX=0
          ECX=0
          EDX=37
          ESI=34FFED4
          EDI=34FFE3C
          EBP=34FFE3C
          EIP=1F23D87
          ESP=34FFDE0

We see that eas was 0, while it should having the value of Lara's structure.

Menu TrngPatcher: Debugging->Analyse memory crash report


The testual crash report is not the only report generated when a crash occurs: it will be created also a binary .mem file with same name.
In this binary file there will be an "image" of all critical memory zones about items, rooms, flags ect.
With current command you can explore the contents of this binary file.


Light blue frame shows always the root of all available structures.
Yellow frame keeps the depth path you are exploring and it will be used to come back to previous structure level.
White frame shows last structure you opened.
Every row beginning with the "[+]" symbol is expandable with a double click.


Menu TrngPatcher: Debugging->Analyse db_patches.bin report


The "db_patches.bin" file, or the "db_patches_crash.bin" file (created when it occurs a crash and saved inside last_crash.mem file), is a file with stored all resources required by each plugin (and trng engine): required callbacks and performed patches on tomb4.
When you use the "Analyse db_patches.bin report" command , all these binary data will be expanded in testual form, creating a long text file in the editor.
Other the callbacks and patches, you can discover other infos about specific plugins: like their "tomb4 patcher offset", the built date, their IDs (for script and ngle) and the offset range used in last running, when the db_patches.bin has been generated.
For instance these are the infos about plugins that you find at top:

TotPlugin = 2
-------------------- Tomb_NextGeneration.dll ------------------------------
Name:........................ Tomb_NextGeneration
Creation Date:................ 19 August 2016 (22:14:24)
ID_NG_Script:................ 0
ID_NGLE:...................... 0
Tomb4_Patcher_Offset:........ $4A6CA0
DirectCall_Offset:............ $0
Version (file):.............. 1.3.0.0
Version (product):............ 1.3.0.0
Start_Range:.................. $10001000
End_Range:.................... $101DF000
HandleInstance:.............. $10000000

-------------------- END PLUGIN DATA ------------------------------
-------------------- PlugIn_trng.dll ------------------------------
Name:........................ PlugIn_trng
Creation Date:................ 20 August 2016 (8:24:36)
ID_NG_Script:................ 2
ID_NGLE:...................... 1
Tomb4_Patcher_Offset:........ $0
DirectCall_Offset:............ $1F21217
Version (file):.............. 1.0.0.0
Version (product):............ 1.3.0.0
Start_Range:.................. $01F21000
End_Range:.................... $01F76000
HandleInstance:.............. $1F20000

REQUIRED CALLBACKS:

           TYPE PRM FLAGS ADDRESS
--------------------------------------------------------
          0 CB_INIT_PROGRAM 0 NULL $01F211D6
          1 CB_INIT_GAME 0 NULL $01F21212
          2 CB_INIT_LEVEL 0 NULL $01F2138E
          3 CB_SAVING_GAME 0 NULL $01F21186
          4 CB_LOADING_GAME 0 NULL $01F212C1
          5 CB_INIT_LOAD_NEW_LEVEL 0 NULL $01F2123A
          6 CB_FLIPEFFECT_MINE 0 NULL $01F21370
          7 CB_ACTION_MINE 0 NULL $01F213B6
          8 CB_CONDITION_MINE 0 NULL $01F21014
          9 CB_CUSTOMIZE_MINE 0 NULL $01F21154
          10 CB_PARAMETER_MINE 0 NULL $01F211E0
          11 CB_ASSIGN_SLOT_MINE 0 NULL $01F21320
          12 CB_CYCLE_BEGIN 0 NULL $01F21249
          13 CB_PROGR_ACTION_MINE 0 NULL $01F21230
          14 CB_INIT_OBJECTS 0 NULL $01F2106E
--------------------------------------------------------

DIRECT CALLBACK VECTOR:

           TYPE ADDRESS
           -----------------------------------------
          0 CB_INIT_PROGRAM $01F211D6
          1 CB_SAVING_GAME $01F21186
          2 CB_LOADING_GAME $01F212C1
          3 CB_INIT_GAME $01F21212
          4 CB_INIT_LOAD_NEW_LEVEL $01F2123A
          5 CB_FLIPEFFECT_MINE $01F21370
          6 CB_ACTION_MINE $01F213B6
          7 CB_CONDITION_MINE $01F21014
          8 CB_CUSTOMIZE_MINE $01F21154
          9 CB_PARAMETER_MINE $01F211E0
          10 CB_CYCLE_BEGIN $01F21249
          13 CB_INIT_OBJECTS $01F2106E
          14 CB_PROGR_ACTION_MINE $01F21230
          16 CB_INIT_LEVEL $01F2138E
          19 CB_ASSIGN_SLOT_MINE $01F21320
           -----------------------------------------
-------------------- END PLUGIN DATA ------------------------------

Note: please take care that, many of these runtime values, like offset range, Handle Instance or "Direct_Call offset" cann't be used in your code, because they can change to every new execution.
Most interessant for you are the list of patches performed by each plugin, or trng.

ALL PATCHED CODES:

           PluginName START END SIZE PATCH_TYPE MNEMONIC
           -----------------------------------------------------------------------------------------------------------------------
          0 Tomb_NextGeneration.. $42DE70 $42DE73 DWORD PARAMETRIC MEMORY_EXPAND
          1 Tomb_NextGeneration.. $42DEC8 $42DECB DWORD PARAMETRIC MEMORY_EXPAND
          2 Tomb_NextGeneration.. $42DECD $42DED0 DWORD PARAMETRIC MEMORY_EXPAND
          3 Tomb_NextGeneration.. $42DEE3 $42DEE6 DWORD PARAMETRIC MEMORY_EXPAND
          4 Tomb_NextGeneration.. $42DF05 $42DF08 DWORD PARAMETRIC MEMORY_EXPAND
          5 Tomb_NextGeneration.. $42DF2F $42DF32 DWORD PARAMETRIC MEMORY_EXPAND
          6 Tomb_NextGeneration.. $42DF53 $42DF56 DWORD PARAMETRIC MEMORY_EXPAND
          7 Tomb_NextGeneration.. $42DFC4 $42DFC7 DWORD PARAMETRIC MEMORY_EXPAND
          8 Tomb_NextGeneration.. $42DFEE $42DFF1 DWORD PARAMETRIC MEMORY_EXPAND
          9 Tomb_NextGeneration.. $42DF16 $42DF19 DWORD PARAMETRIC MEMORY_EXPAND
          10 Tomb_NextGeneration.. $42DF38 $42DF3B DWORD PARAMETRIC MEMORY_EXPAND
          11 Tomb_NextGeneration.. $42DF4A $42DF4D DWORD PARAMETRIC MEMORY_EXPAND

Anyway, the list is so long that it is not advisable trying to study this document to avoid conflicts. Trng will perform itself this check about conflicts and you'll receive a warning or error message, everytime you try to patch a tomb4 zone already patched.
These messages will be saved in the "PluginName_warm_up_log.txt" file on disk, if you are working in debug mode.

We'll see better this topic in next chapter.

Menu TrngPatcher: Tools->Check for further conflicts with given offset zone


In spite that the patcher functions, you'll use to create a patch, will say to you when there is a conflict, it's probable that you would prefer knowing in advance this information, to avoid to type a long patch only to discover, when you are tryng to apply it, that it generates a conflict.
The command whom we are talking is own that you need to know in advance if a given offset has been already patched by some plugin or trng engine.
The check will happen parsing last "db_patches.bin" file.
When you perform this command you'll be prompted to supply a start offset and then an ending offset and TrngPatcher will comunicate if there are conflicts for the given zone.

Note: this command works always fine when you are checking conflicts with trng (tomb_nextgeneration.dll) but about plugin it works only if you have been able to find and install all known plugins.


How to avoid conflicts
The problem, about conflicts with other plugins, is not so easy to solve completely, of course, because while your are building your own plugin, some other guy could be doing the same but you don't know yet the zones where he will patch tomb4, since you cann't analyse his plugin because it has not yet been developed.
The best solution should be to create a "clean" plugin, i.e. a plugin patch-less, like plugin_trng.dll was, in first seven level.

There are some important rules to reduce the risks of conflicts:
  1. You should limit patches on tomb4 and usage of tomb4 free zone the less it was possible.
    About free zone to store data, remember you have (almost) unlimited memory in your plugin, for data or code, so it should be a folishness going on to use the shared and limited free zones in tomb4 executable

  2. You should try to avoid pathes on tomb4 code when you need only of an "hook" to call your dll code from some position.
    Indeed, in these situations, you can require a callback to more than 300 trng patches, spread in any zone of tomb4 code, other that, callbacks for all object procedures and many other kinds.
    Using a (CBT_FIRST) callback you avoid any kind of conflict and you'll have your code performed from wished tomb4 code position.

  3. When you are building your plugin you should try to look for all available plugins on the net: download and intall them, on trle (using NG_Center plugin panel).
    In this way, trng core will be able to inform you about any kind of conflict, giving to you the chance to avoid it or to handle it.

  4. About a little free memory zone in tomb4 code, you should use the menu command "Get assignment of free memory range" and using that 128 bytes to store direct call to your dll (when it's necessary) or to use, from tomb4 code, wide memory zone allocated in your plugin

  5. At end of the list, it should be advisable having a forum for plugin developers, where everyone, that is going to create a plugin, tells in advance the memory zones he allocated and wishes using.


Menu TrngPatcher: Tools->Get assignment of free memory range


As I said (and I'll repeat over and over in this document) it's very important try to use less it was possible memory zones of tomb4.
I said, too, that there is also a good reason, other that to avoid conflicts: you have free MB absoluterly granted conflictless, using this method, so why do not use it?
Really I know that there is a reason...
In your plugin you can allocate a lot of memory but then, how can you use it from tomb 4 code?
Similar speech is for memory for codes, of course.
Well, there is simple trick to get this target.
Let's say you created a long code in your plugin to perform some tomb4 stuff. Now you wish create a patch in tomb4 code to call this code located in your plugin.
The problem is that, the offset address, of this your plugin code, that you could read from debugger, is not sure that was always the same. Indeed, everytime you'll add some public variable or change the code first of that, the start offset will be modified.
To solve this problem you should save, in dynamic way, the start offset of your plugin procedure in a tomb4 offset. Pratically just 4 byte (a dword) to store any kind of address.
That tomb4 offset is stable, it will be always the same, and this meand that you'll be able to call your plugin code using an instruction like this:

          call dword ptr [AdrOfMyPluginCode]

Where AdrOfMyPluginCode is an offset in tomb4 executable containing a long value that will be, time by time, the current start address of your plugin procedure.
The value of that start address will be set when your plugin has been just loaded in memory, and your plugin will copy the address of your plugin procedure (that , in that moment, is well known) in the tomb4 variable named AdrOfMyPluginCode (in our example).

This method could be used also for wide memory zone where storing data from tomb4 to your plugin data.
Just copying in a variable in tomb4 program, the start address of that plugin memory and then in tomb4 patches, it will be used in this way:

          mov ecx, dword ptr [MyPluginMemZone]
          mov word ptr [ecx], 45 ; you use it...

With above method, you can let 99% of your code and data memory in your plugin, and using in tomb4 code, only some pointer to locate these plugin zones.

The "Get assignment of free memory range" command, has own the target, to dispatch free memory zones of tomb4, to many different plugins.
Each block has 128 byte, and this means 32 pointers.
The command tries to avoid conflict in this first assignment, creating a link between the name of your plugin and the start address of this your block.
A different name, a different free tomb4 memory block.
          
For reference you can see the Table of free memory tomb4 zones


Menu TrngPatcher: Tools->Rename Plugin VC2010 project


About the opportunity to rename name and source files of a given VC2010 project, you should read also the Set the name for your Plugin chapter.
If you mean rename "plugin_trng" sources with a new your name, you should copy all file you find from some "plugin_trng" folder, to use a start-point (usually you'll get those files from "PLUGIN_SDK_STORE\Plugin\plugin_trng_start_vc2010_sources" folder, then past them in another new folder, you named with your new name, for instance:

Plugin_SantaMonica

Once, in above new folder there are all basic "plugin_trng files (and subfolders, "Debug" and "Release") you can use the "Rename Plugin VC2010 project" to assign, also to internal project names, the new name, in our example, "Plugin_SantaMonica".
So you'll have to:
  1. Browse to select the folder containing the source to rename. In our example it will be: "Plugin_SantaMonica" subfolder.
  2. Confirm the old basic name of files, to convert. Usually it will be "Plugin_trng"
  3. Then, you supply the new name. In our example it will be: "Plugin_SantaMonica"

At end, all "Plugin_Trng" names, will be replaced with "Plugin_SantaMonica"
You should load the "Plugin_SantaMonica.sln" (sln = SoLutioN file) and build "Debug" and "Release" versions.
And your plugin will have new name in each its side.

Menu Trng Patcher: Tools->Fix Visual C++ 2010 errorLNK 1207


Since there is a well-known bug in Visual C++ 2010 compiler, that it sometimes appear, in the case you received this error, you'll have to quit VC2010 editor, and then using this Tools fixer to solve the problem.
You'll have to choose the folder with VC2010 project that gave you that error.


Menu TrngPatcher: Tools->Fix VC6.0 error Auto Member List


If you are developing your plugin, using Visual C++ 6.0 release, it could occur a weird bug of this program.
When you type the "." (dot) or the "->" (indirection for pointer), working on some structure variable, the list of subfield will not appear.
When this happens, only way to solve the problem is to use this fixer.
You choose the "Tools->Fix VC6.0 error Auto Member List" and then select the folder with your VC6.0 project and TrngPatcher will fix the problem.
Note: rememer to quit VC6 editor, before executing the fixing.

Menu TrngPatcher: Tools->Replace NewLine chars with '>' char (and the opposite command)


This command and the following, are used to remove (or replace) the new line character (return and linefeed chars) from the selected text in the editor of TrngPatcher.
You should remove NewLine character from description of a single item before saving that plugin file.
This happens with ".script" file for plugin, where all description for a given mnemonic constant should stay on a single row.
Anyway, since it's annoying cann't format a bit a long text, you can edit the description in common way, adding some line separators, using [Enter] key, but before saving the .script file, you'll have to remove all NewLinew characters, selecting the wished zone and then using "Tools->Replace NewLine chars with '>' char" command.

Menu TrngPatcher: Updates->Check for On-line Updates


You can (and you should have to) check for updates.
Do you know that also NG_Center has a check for on-line updates, so it's better explaining better as the update matter works...
With NG_Center you detect and install updates about files like: tomb_nextgeneration.dll, ng_center.exe (in the past, it was ng_scripter.exe) and furtherly different "help_..." text files.
In ng_center updates there was no update about source files, of course, and neither in the furture there will be that kind of files.
To avoid to give to all level builder files that they will be not able to handle (if they didn't work with plugin sdk), the ng_center updates will work as in the past.
Anyway, for programmers and advanced level builders (that mean creating plugins) there will be another update files only for sources.
You can check for this kind of updates using "Check for On-line Updates" command.
When you use this command, it will be showed below window:


In spite the window show current (installed) dll version and (once you clicked on [Check for online updates]) that available for download, don't be confused.
Main target of this updating is never the dll updating (for that you'll use NG_Center update) but rather the download of source files like: "structures.h", "tomb_nextgeneration.h", "DefTomb4Funct.h" ect.
Anyway, about the relation between ng_center and trngpatcher update, we could say that, everytime you discover a new update for ng_Center (a new trng release), you should go to check also updates with TrngPatcher, since for each new trng version, it should be exist also a new update for source files.
Other these c++ source files, you could get updates own for Trng Patcher program, of course.

Note: there is a rare chance that you found a new update for plugin sources (using Trng Patcher to detect it) while there is no new update for tomb_nextgeneration.dll (with NG_Center).
It happens when there is some bug fixing about specific plugin files, not enclosed in tomb_nextgeneration.dll.

You'll discover these specific updates because the program will tell to you: "Ok the dll and TrngPatcher are already updated, but there are some files to update or new files to donwload"


Menu TrngPatcher: Help


There are different documentation available from Help menu.
Some tutorial are old, they describe stuff released many time ago, anyway I prefered pick up all previous tutorials in this help menu.
Then, there are new tutorials, like own those about plugin creation.
The first and main help file is: "Help->Plugin Reference->How to create Plugins - Tutorial (Plugin SDK)"


Table of free memory tomb4 zones

Free data memory zones in tomb4

Notes:
- First three zones have been used to dispatch free memory data with "Get assignment of free memroy range" command
-Free memory zones, littler than 1000 bytes, have been ignored in this table
Start End Size Description
$5C0678 $660678 655360 Zone used to store mesh data. Not ever used because now the expanded memory for this target is located inside tomb_nextgeneration.dll
$4BFD70 $52A210 435360 Zone to store scene memory. No more used because now the memory for this target has been expanded and stored in tomb_nextgeneration.dll
$660B60 $670B60 65536 Zone used to store pointer for mesh of scene memory. Now it is no more used.
$7F7769 $7FB3A0 15415 Zone used to store variable data of savegame. Now that zone has been expanded and relocated by tomb_nextgeneration.dll
$8012E0 $8046E0 13312 Zone used to store particle infos. Now is unused
$4AE590 $4B0190 7168 Zone used to store wav name (audio track). Now it has been replace with another larger zone, allocated by trng
$7F5960 $7F6D60 5120 Zone used in the past to store data about flyby camera. Now it unused
$52A220 $52A900 1760 Zone used to store data about fog bulb. Now it unused
$533290 $533920 1680 Zone in the past used to store collision box (edited object from ngle) but now it unused
$532C70 $533270 1536 Zone, in the past used to store data about animated textures. Now it unused


Callbacks to numerical TRNG Patches

For numerical patches I mean the most common patch type used by Tomb_NextGeneration.dll (or TRNG in this document).
If you look the Tomb4PatchedCode.txt source (you find it in PLUGIN_SDK_STORE folder), it's easy find code like this:

40B34F:                    JMP LOC_40B364
40B351: LOC_40B351:
40B351:                    MOV EDX,EAX
;patch per assign slot
40B353:                    MOV AX,111h
40B357:                    CALL DWORD PTR [TrngPatcher] ; Tomb_Nex.10002937
40B35D:                    NOP
40B35E:                    NOP

The TrngPatcher name you see in above rows has noting to do with TrngPatcher utility. It is only mnemonic name (label) for a tomb4 address :

4A6CA0: TrngPatcher:
4A6CA0:                    DD ?

In that dword variable trng store an address that points inside trng code, where there is a code very alike than that of your plugin_trng.cpp source:

// FOR_YOU: In the SubPatchArray you'll type all procedure names of your code in the dll you
// wish were called from tomb4 code.
// type them in the order of ax value. So first asm proc in the list, will be called
// with ax=0, while the second in the list will be called with ax=1 ect.

void *SubPatchArray[] = {
          
// TYPE_HERE your asm procedure names to call from tomb4 code
          NULL
};

// FOR_YOU: This is your main patcher procedure.
// All your patch in tomb4 code will call this procedure passing to it, in ax register,
// the number of subpatch to call

BEGIN_ASM_PROC(MainPatcher)
          and eax, 0ffffh
          mov eax, dword ptr [SubPatchArray+eax*4];
          jmp eax
END_ASM_PROC
          
So, the AX value set before calling that address, it will be used to call a different code in trng, where for each different value of AX there will be a different code.
This is method, already introduced in Menu TrngPatcher: Tools->Get assignment of free memory range chapter, to reduce the usage of tomb4 addresses.
With this method, indeed, I can call about 65535 differente subroutines (all located in trng) using only one tomb4 address.
Better this way, rather having a long list of tomb4 variables to jump to each different codes in .dll:

4A6CA0: AdrForSub1:
4A6CA0:                     DD ?
4A6CA4: AdrForSub2:
4A6CA4:                     DD ?
4A6CA8: AdrForSub3:
4A6CA8:                     DD ?
4A6CAC: AdrForSub4:
4A6CAC:                     DD ?
4A6CB0: AdrForSub5:
4A6CB0:                     DD ?
ect.

This is same method studied to work for you, with your plugin project.
We'll describe better how to use this chance for your plugin but now we come back to previous topic: the trng numerical patches.
I realized more than 300 subroutines in my tomb_nextgeneration.ll and to reach them, I used always the [TrngPatcher] offset.
Everytime I need that tomb4 code call my dll code, I use that method.
As result now there are a lot of these numerical trng patches in tomb4 code.
I know, you could find annoying that, since togle to you the chance to write in same position of code but own this is the matter: you can having your dll code (of your plugin) called in all positions where you see some trng numerical patch, simply requiring a callback for it.
Since these trng patches are in all critical zones, it's very probable that you'll find very useful having also your code called by those zones.

Different CBT_ types used for callbacks to trng numerical patches

We already saw the CBT_ types in sdk help 1 when you talked about callback for trng triggers.
Well the speech is almost the same, anyway here you have to take care, because we are working really at low level, and with some kind of callback (CBT_ASM) you'll have to handle correctly values in registers and in the stack.
Before describing better the CBT_ASM type, it's necessary coming back to CBT_FIRST, CBT_REPLACE and CBT_AFTER, because they have to understood really fine when you use, one or another, for you callback to numerical trng patches.


CBT_FIRST for numerical trng patches
You already know that a CBT_FIRST callback will be called FIRST to perform given trng code (the numerical trng patch, in this case) and then, when your callback code has been completed, the execution will go on with original trng code (really it could go on with other CBT_FIRST callbacks of other plugins)
If you understood above speech, you'll understand also because it's important that you let registers with the values that, reasonably, trng code (or other CBT_FIRST plugin callbacks) are waiting.
If you wish having only an hook, and you are not interested to change the value of registers in that tomb4 code, ok, that is better and more easy.
If you are working with CBT_ASM callback, just you start your assembly code with PUSHAD instruction (that saves all registers in the stack) and, just previous instruction of your RETN instruction, you'll use the POPAD instruction, to restore all register values you had saved with PUSHAD.
For instance:

BEGIN_ASM_PROC(MyCodeForCallback)
          pushad
          .. your assembly code to handle callaback...
          popad
          retn
END_ASM_PROC

In this way there will be no problem.
About C++ callback, i.e. when CBT_ASM flag is missing, it's yet easier: just only you don't write in pRegisters structure and all registers will keep original value.
For instance:

void * cbManageTrngPatches(WORD PatchIndex, WORD CBT_Flags, bool TestFromJump, StrRegisters *pRegisters)
{
          // my c++ code to manage callback
          // in pRegister you find all current values of registers
          // we suppose to read from register some tomb4 structure:

          StrItemTr4 * pItem;
          int IndexRoom;

          if (pRegisters->bx == 4) {
                    // in esi there is an item structure
                    pItem = (StrItemTr4*) pRegisters->ESI;

                    IndexRoom=pItem->Room;
          }
          return NULL;
}


Stack (ESP) variation calling your CBT_FIRST or CBT_AFTER callback code
If you mean access to memory pointed by esp (very common in tomb4 code), you should remember the variation of esp occurred calling your plugin code.
For instance, look this code:

409DD0:                    MOV DWORD PTR [ESP+3Ch],EAX
409DD4:                    MOV DWORD PTR [ESP+38h],ECX
409DD8:                    MOV DWORD PTR [ESI+40h],EDI
409DDB:                    MOV DWORD PTR [ESI+48h],EBX
409DDE:                    CALL GetCollidedObjects
409DE3:                    MOV EDX,DWORD PTR [ESP+3Ch]
;altra patch per collide pushable
409DE7:                    MOV AX,36h
409DEB:                    CALL DWORD PTR [TrngPatcher]

Now, let's say, you required a callback own for 36h trng patch, and it is a CBT_FIRST or CBT_AFTER callback.
If you need to know the value stored in [ESP+3Ch] memory from line:

409DD0:                    MOV DWORD PTR [ESP+3Ch],EAX

In your code (supposing the callback was also of CBT_ASM (because with C++ callbacks it is different), you cann't use same ESP+3Ch dispatch, because the ESP value changed from the value that it had in tomb4 code.
In detail there will be following changes

409DD0:                    MOV DWORD PTR [ESP+3Ch],EAX
409DD4:                    MOV DWORD PTR [ESP+38h],ECX
409DD8:                    MOV DWORD PTR [ESI+40h],EDI
409DDB:                    MOV DWORD PTR [ESI+48h],EBX
409DDE:                    CALL GetCollidedObjects
409DE3:                    MOV EDX,DWORD PTR [ESP+3Ch]
;other patch to object collision
409DE7:                    MOV AX,36h
409DEB:                    CALL DWORD PTR [TrngPatcher]
                                        ESP = ESP - 4 (to host return address from above Call
                                        ;from the trng code (pointed by TrngPatcher value) there will be a call to reach the code of your callback:
                                        call YourCBFirstCode
                                                  ESP = ESP - 4 (to host return address from above call
                                                   ;------ your plugin callback code -------------------
                                                  ; now to read the value stored in that instruction (MOV DWORD PTR [ESP+3Ch],EAX) you'll have to use an instruction like this:
                                                  mov eax, dword ptr [ESP+44h]
                                                  ;since 3Ch + 8 = 44h

Pratically, all access to ESP, to locate values you see in tomb4 code, should have a further +8 of original constant displacement.
Note: when you perform this conversion, it's advisable to do not like in above code, computing the sum and typing the result. It's more understandable and safe, if you let the "+8" in assembly instruction, letting to compiler (preprocessor) the job to do the addition.
For instance if you wish recover both values:

409DD0:                    MOV DWORD PTR [ESP+3Ch],EAX
409DD4:                    MOV DWORD PTR [ESP+38h],ECX

From your callback CBT_FIRST code, just you type assembly instructions:

          mov eax, dword ptr [esp+3Ch+8]
          mov ecx, dword ptr [esp+38h+8]

This method is better, because you can yet recognize old original displacement, to understand better your code.

Important Notes:
- Remember that above speech is for CBT_FIRST or CBT_AFTER callback (+ CBT_ASM), while for CBT_REPLACE the matter is a bit different...
- If the trng patch it has been executed, not with a "call", but with a "jmp", then the value to add (algebrically), to esp in your code, it will be "+4" and not "+8", since there will one call instruction less, in this case.
- When tomb4 code call the trng patch with a "JMP" (instead by using a "CALL), it's not allowed a CBT_AFTER callback, because with JMP the trng code (or your CBT_REPLACE callback code) will come back to tomb4 code using another JMP and not a "RETN" instruction, so there will be no "after" code to perform.


Stack (ESP) variation calling your CBT_REPLACE callback code
In above paragraph we saw how access to esp from CBT_FIRST or CBT_AFTER callback code, but when your callback was CBT_REPLACE the situation is a bit different.
In callback code for CBT_REPLACE there is one (esp = esp -4) less than CBT_FIRST or CBT_AFTER.
This means that:
If the tomb4 code to call trng patch was:

          mov ax, 55h
          call dword ptr [TrngPatcher]

In your assembly code you'll have to add a "          +4" to esp displacement.
While when the call of trng patch was:

          mov ax, 55h
          jmp dword ptr [TrngPatcher]

There will be NO adjustment to perform: the esp memory will have, in your callback code, the same access than tomb4 code.


C++ function to handle callback for trng patches

When you handle your callback in C++ code, i.e. omitting in callback request the FTB_ASM flag, you should create your C++ function following the prototype you see in DefTomb4.h source:

// prototype for CB_NUMERIC_TRNG_PATCH
// note: this prototype is usefull only when is missing the CBT_ASM flag.
// While, if it has CBT_ASM flag, there is no function c++ to call but only an address where to jump
// receive in input:
// PatchIndex: the index of trng patch you are elaborating
// CBT_Flags: the type of current callback (CBT_FIRST,          CBT_AFTER or CBT_REPLACE)
// TestFromJump : if this trng patch has been executed with a "jmp call dword [TrngPatcher]" TestFromJump == true
// pRegisters: pointer to strutcture with all current values of registers. You can read or change these values
// return: callback code can return a valid tomb4 code offset to jump directly to it, avoiding
// the coming back to address follwing the caller code in tomb4 (ONLY FOR CBT_REPLACE callback)
// or NULL if you wish letting the standard coming back after caller code in tomb4
typedef void* (__cdecl *CALL_CB_NUMERIC_TRNG_PATCH) (WORD PatchIndex, WORD CBT_Flags, bool TestFromJump, StrRegisters *pRegisters);

For instance in Plugin_trng.cpp you could type in this way your callback function:

// code to handle callbacks of numerical trng patches (without CBT_ASM flag) in your code
void * cbManageTrngPatches(WORD PatchIndex, WORD CBT_Flags, bool TestFromJump, StrRegisters *pRegisters)
{
          return NULL;
}


Input parameters of C++ TRNG patches callback
Input paramaters that your code will receive, are:


PatchIndex parameter
WORD PatchIndex // to remember you what numerical patch your are managing. For instance if the tomb4 code was:

          mov ax, 45h
          call dword ptr [TrngPatcher]


PatchIndex will have the value 45h
note: This extra info allow you to use same callback function to hande all your (C++) CB_NUMERIC_TRNG_PATCH callbacks.


CBT_Flags parameter
WORD CBT_Flags; // since you can use same function to hanle all kinds of trng patches callbacks, you can test the CBT_Flags to understand if you are handling CBT_FIRST, CBT_AFTER or CBT_REPLACE callback.
To test this value it's better using "&" rather "==", since it is a flag mask.
For instance:

          if (CBT_Flags & CBT_FIRST) {
                    // We are handling a CBT_FIRST callback
          }


TestFromJump parameter
bool TestFromJump; // to remember to you, wehter current trng patch was with a "jmp [TrngPatcher]" (TestFromJump==true) or with a common "call" (TestFromJump==false)
Probably, when you have required a callback for a given trng patch, you already know if the code called it, was "call" or "jmp".
Anyway, sinche the callback code (your cbManageTrngPatches() function) will be used for all trng patch callback, you can customize your code in according with method used to call that "generic" trng patch.


pRegisters parameter
StrRegisters *pRegisters; // pRegisters point to StrRegisters structure, where you can find, read and change, all main registers (ecx, dl, esi ect.) whose values were original, when the trng patch has been called
You can read or also modify registers, to let new values for following tomb4 code.
Note that you'll have some register named in upper case (EAX, ECX, EDX ect.) and the same in lower case (eax, ecx, edx ect). The difference is only the C++ type used: Lower case are signed variables while upper case are unsigned.
When you use them in some C instruction, you should the (signed/unsigned) right type, to avoid annoygin warnings.
For instance:

          int MyCordY;

          ..... code ....
          if (pRegisters->ecx > MyCordY) {
                    .... code ...
          }

In above example we used "ecx", signed value, because also MyCordY variable is signed value (int). If we did the opposite:

          if (pRegisters->ECX > MyCordY) {

Compiler warns about different signed/unsigned types.

In StrRegisters structure (pointed by pRegisters) you find also some special values:


pESP value
This variable hosts the same value of ESP registers (stack pointer) that they had in tomb4 code, in last istruction, before calling/jumping to trng patch.
It is a BYTE * pointer, in spite it will be used almost always to access to (int)/(dword) values.
You can read values stored to some displacement of pESP using the ESP_MEM() macro.


ESP_MEM() macro

// ESP_MEM(Displacement)
// to use ONLY inside of C++ function to handle callback to numerical trng patches
// it used to reach memory, pointed by pRegisters->pESP, adding to it a displacement offset, in assembly style
// It access to memory always as (int), so if you wish a different type you'll have to cast
// the value adding a casting at left of these macro: for instance:
// (StrItemTr4 *) ESP_MEM(0x40)
#define ESP_MEM(Offset) \
          (* ((int*) &pRegisters->pESP[Offset]))

For instance, if you wish (from C++) getting same result of an assembly instruction like:

          mov ecx, dword ptr [ESP+34h]
          mov dword ptr [MyVariable], ecx

You can use this macro, in C sourcers, in this way:

          int MyVariable;

          MyVariable = ESP_MEM(0x34);

With same macro you can also set a value to memory pointed by esp, or to test its value:

          if (ESP_MEM(0x34) == 0) {
                    // the [ESP+34h] dword is 0
          }

          // to get a code like assembly:
          // mov dword ptr [ESP+34h] , 1
          // you use:
          ESP_MEM(0x34) = 1;


CPU_Flags value
The StrRegisters structure, hosts a bit mak to keep values about flag registers.
Carry, Zero, Overflow and others, are status bit to describe some info about last performed assembly instructions.
For us the only importance of these bits is that, in seldom circustances, trng patches returns c=1 or c=0 (or z=1 or z=0) to signal some different action to perform when the execution will come back to tomb4 code.
In these situations, if your are handling a CBT_REPLACE or CBT_AFTER callback, you could wish read or set these status bits.
Since CPU_Flags value is a bit mask, you should never use a common "=" to change these values but always logical operators like "|" (Or to set a bit), "& ~" (and with not) to clear a bit, or "&", in conditional instrucion, to check the presence of given bit.
The values of these bits are in enumCPU_ enumerator.
So we see some example:

          // test se c (carry) is 1
          if (pRegisters->CPU_Flags & enumCPU.CARRY) {
                    // carry was set
          }

          // test se s (sign) is 0
          if ((pRegisters->CPU_Flags & enumCPU.SIGN)==0) {
                    // sign is 0
          }
          // force z (zero) to 1
          pRegisters->CPU_Flags |= enumCPU.ZERO;

          // clear carry, to set it to 0
          pRegisters->CPU_Flags &= ~enumCPU.CARRY;


Returned value by C++ callback for TRNG numerical patches
Looking newly the prototype of C++ callback we see the kind of returned value:

typedef void* (__cdecl *CALL_CB_NUMERIC_TRNG_PATCH) (WORD PatchIndex, WORD CBT_Flags, bool TestFromJump, StrRegisters *pRegisters)

Please, don't confuse that "void" with "no returned value", because in this case there is also a "*" character to change the situation.
The "(void *)" is a pointer to a not-well-known type of variable.
Pratically your callback code can return a pointer to some tomb4 code address.
If you don't want (or you cann't) return a tomb4 address, you have to end your C++ function with:

return NULL;

And it means: "I have no tomb4 address to return"

But what is the target of this (further) returned value?
It works only in a very specific situations:

This means that the returned value will be ignored for CBT_FIRST or CBT_AFTER callbacks and also it's not advisable return a tomb4 address when the trng patch had been called with a common CALL.

We can see a little example.
If you wish replace (CBT_REPLACE) this trng patch:

40CB56:                    JMP LOC_40CA21
;patch per assign slot
40CB5B: LOC_40CB5B:
40CB5B:                    MOV AX,112h
40CB5F:                    JMP DWORD PTR [TrngPatcher] ; Tomb_Nex.10002937
40CB65:                    NOP
40CB66:                    NOP
40CB67:                    NOP
40CB68:                    NOP
40CB69:                    NOP
40CB6A: LOC_40CB6A:
40CB6A:                    MOV EBX,DWORD PTR [ESP+10h] ; Case 8 of switch 0040BE93

If you required a CBT_REPLACE callback (C++ mode) to manage the 112h trng patch...
Since the original trng patch will be not performed, you'll have to choose the tomb4 address where coming back, since it's not possible using a "retn" isntruction in this case.
Probably you'll choose the offset 40CB6Ah with a "return (void *) 0x40CB6A;" instruction, but it's possible also that in some situation, your code prefered coming back to another address of that tomb4 code, let's say 40CA21, with a "return (void *) 0x40CA21;"
Notes:
- If your callback is CBT_ASM type, you have to use directly, in your code, a "jmp Tomb4Offset" (only when it is a CBT_REPLACE callback, called with a "jmp" from tomb4 code)
- When you manage a callback with a C++ function, you have to not worry about esp stack situation, just only that your function let esp value unchanged.


Example: how to set a C++ CBT_FIRST callback for a trng numerical patch

Now we can try some pratical experiment.
Let's say, we find this side of tomb4 code (looking the tomb4patchedCode.txt source) where we wish having a callback for 5Eh trng patch:

414EF8:                    CMP EBX,EDI
414EFA:                    MOV DWORD PTR [ESP+20h],EDI
414EFE:                    JLE LOC_414FDA
;se tocca terreno fare calcoli complessi, altrimenti lasciare solo caduta gravita'
;qui fare patch per evitare suono e terremeoto se ocb = 1
414F04:                    MOV AX,5Eh
414F08:                    CALL DWORD PTR [TrngPatcher] ; Tomb_Nex.10002937
414F0E:                    JB LOC_414F7F
414F10:                    NOP
414F11:                    NOP
414F12:                    MOV EAX,DWORD PTR [Camera_SourceX]
414F17:                    MOV ECX,DWORD PTR [EBP]

Studyng the source, we discover that this 5Eh patch, is in RollingBall control function:

414E50: ControlSlot_130_ROLLINGBALL:

Translating the comment we discover that this patch has been used to skip playing sfx sounds if rolling ball OCB had bit 1 set.
When patch returns c=1 then the sounds will be skipped, while with c=0 there will be common management.
We try to do a CBT_FIRST callback in C++ style (i.e., no CBT_ASM flag)
So we create the function to manage the callback, following the prototype found in "DefTomb4Funct.h" source.

// code to handle callbacks of numerical trng patches (without CBT_ASM flag)
// typedef void* (__cdecl *CALL_CB_NUMERIC_TRNG_PATCH) (WORD PatchIndex, WORD CBT_Flags, bool TestFromJump, StrRegisters *pRegisters);
void * cbManageTrngPatches(WORD PatchIndex, WORD CBT_Flags, bool TestFromJump, StrRegisters *pRegisters)
{
          return NULL;
}

Then, we go to write, inside of bool RequireMyCallBacks() function, the request to handle this callback:

          GET_CALLBACK(CB_ASSIGN_SLOT_MINE, 0,0, cbAssignSlotMine);
          GET_CALLBACK(CB_CYCLE_BEGIN, 0, 0, cbCycleBegin);
          GET_CALLBACK(CB_PROGR_ACTION_MINE, 0, 0, cbProgrActionMine);
          GET_CALLBACK(CB_INIT_OBJECTS, 0, 0, cbInitObjects);

          // require call back to manage trng patch 0x5e
          GET_CALLBACK(CB_NUMERIC_TRNG_PATCH, CBT_FIRST, 0x5e, cbManageTrngPatches);

At end we'll have to write some code to verify if all works.
Since we (probably) will have other callbacks for trng patches, we type our code to filter the trng patch index and the CBT_Type, so we'll be able to use only one function (cbManageTrngPatches()) to manage all callbacks for trng patches.

void * cbManageTrngPatches(WORD PatchIndex, WORD CBT_Flags, bool TestFromJump, StrRegisters *pRegisters)
{
          if (PatchIndex == 0x5e) {
                    // patch for rollingball
                    if (CBT_Flags & CBT_FIRST) {
                              // code to handle callback for 5Eh trng patch when it is of CBT_FIRST type.

About the code to perform, probably we'll want call some our C function for specifc target (when rolling ball touch the ground, this code will be performed) but now it's enough verifying that this callback works.
So we write a little code to manage registers and esp memory.
Since in tomb4 code we saw, some rows over the trng patch, this code:

414EFA:                    MOV DWORD PTR [ESP+20h],EDI

We can test if really in esp+20h dword there is same value that had EDI register: it should be, since edi register didn't change upto reach trng patch and, therefor, our callback.
So we type these few rows:

void * cbManageTrngPatches(WORD PatchIndex, WORD CBT_Flags, bool TestFromJump, StrRegisters *pRegisters)
{
          int Value;

          if (PatchIndex == 0x5e) {
                    // patch for rollingball
                    if (CBT_Flags & CBT_FIRST) {
                              // code to handle callback for 5Eh trng patch when it is of CBT_FIRST type.
                              // now we try to read value store in [esp+20h] by previous tomb4 code instruction:
                              // 414EFA:                     mov [esp+20h], edi ; (LOCALE_ESP - 0x14) current block height
                              Value = ESP_MEM(0x20);
                              if (Value == pRegisters->edi) {
                                        // value is the same
                                        // now we change value of ecx register
                                        pRegisters->ECX = 0x7653210;
                              }
                              // a CBT_FIRST callback, will return always NULL
                              return NULL;
                    }
          }
          return NULL;
}

We added also a row:

                                        pRegisters->ECX = 0x7653210;

To change the (final) value of ECX register: it is only a useless experiment.
Well, we did our first callback for trng patch.
Now we build our plugin, copy the "plugin_trng.dll" file, from "debug" folder to "trle" folder and now we'll have to execute tomb4 using the debugger.
First of this, we have to place a breakpoint (F9 key) in first row of our cbManageTrngPatches() function, to verify, step by step, if all will work fine.


And now, finally, we can start the game with debugger command "Debuggin->Run debugger (F5)".
In game, we choose the "Example 1" and now we move lara over red texture to tirgger the rolling ball.
We'll see that, when rollingball touch the ground, our trng callback has been reached.
Performing some instruction (F10 key) we can check that memory read from ESP+20h has yet same value of EDI register:


Now we can perform another test: since our code changes ecx value, to verify this matter, we can place a breakpoint in tomb4 code, immediately following the trng patch.
As first point we remove the current breakpoint, otherwise we'll be prompted over and over.
So click on the row with breakpoint and hit F9 key to toggle it.
Now we click on right mouse button and choose "Go to disassembly"


In this way we can operate in assembly mode.
Now we go to watch the code where there was the trng patch we are handling.
Now we type in row named "Address:" the hex offset of tomb4 to show, let's say "0x414EFA" (we'll type it over the previous function name):


And now we place a breakpoint at offset 414F12.
Just click on the row with 414F12 address and hit F9 key to see appearing the tradizional red sphere.
Finally we can go on with running, with F5 key.
The debugger will break newly the program at new breakpoint at 0x414F12.
All code about trng patch and also our callback, has been already performed now.
We can discover the value of ecx register, to verify if it has new value that our callback set for it: 0x07653210

Note: If you are using the express version of Visual C++, the Registers window will be missing, unfortunately, anyway it's easy passing over this limitation.
Click on "Watch1" label (at bottom) and type in Name field "ecx".
In this way the value of ecx will be showed.
To have the hexadecimal view, right mouse click (over Watch1 panel) and choose "Hexadecimal Display"
In this way we can discover that our change worked fine:


Our first experiment worked!
Now we can toggle the breakpoint, and hit F5 to restart the game and then quit tomb raider.

Example: How to set a C++ CBT_AFTER callback

Now we try another experiment.
If we wish change something of job performed by a trng patch, we'll have to use a CBT_AFTER callback, of course.
Now we can try to change the carry returned value from trng patch.
We saw that, if c=1 all sounds about rollingball will be skipped. Well, in spite the rollingball of our example has not the "silent mode" bit, we can force to return c=1 with our after callback.
So to get easy our job, we can simply change the flag from CBT_FIRST to CBT_AFTER in function to require a callback:

          // require call back to manage trng patch 0x5e
          GET_CALLBACK(CB_NUMERIC_TRNG_PATCH, CBT_AFTER, 0x5e, cbManageTrngPatches);

About the code in cbManageTrngPatches() function, it's not necessary remove old CBT_FIRST management, just only adding other code for CBT_AFTER management.
In this case we need only to set 1 the carry.
So this will be the code added:

          if (PatchIndex == 0x5e) {
                    // patch for rollingball
                    if (CBT_Flags & CBT_FIRST) {
                              // code to handle callback for 5Eh trng patch when it is of CBT_FIRST type.
                              // now we try to read value store in [esp+20h] by previous tomb4 code instruction:
                              // 414EFA:                     mov [esp+20h], edi ; (LOCALE_ESP - 0x14) current block height
                              Value = ESP_MEM(0x20);

                              if (Value == pRegisters->edi) {
                                        // value is the same
                                        // now we change value of ecx register
                                        pRegisters->ECX = 0x7653210;
                              }
                              // a CBT_FIRST callback, will return always NULL
                              return NULL;
                    }
                    // ****** NEW CODE FOR CBT_AFTER *************
                    if (CBT_Flags & CBT_AFTER) {
                              // set carry = 1
                              pRegisters->CPU_Flags |= enumCPU.CARRY;
                              return NULL;
                    }
          }
          return NULL;
}

Now we can build the plugin, copy to trle folder and launch the game. In this case it's not necessary using the debugger, we can discover if our callback work, because, if it does, the sound and earthquake, will be missing.

Example: how to work with assembly callbacks for trng patches

Now we can try to use callback written in assembly.
About the reasons to use one method or other, we could say that:

  • C++ callbacks are more comfortable and less dangerous, since all stack/registgers management is granted by trng code.
  • C++ callbacks have already pRegister->pESP set to same value of tomb4 code, while with assembly procedures you have compute the adjustment
  • With assembly callbacks there is less code to perform, since all C++ stuff will be skipped
  • With assembly code you have a better control of some low level stuff, like stack memory and registers
  • At end, it depended also by your feelings: if you are more able to program in a way or another, you could feel better chosing your prefered language


    When we are working with assembly callbacks, we do not use ever the C++ function to manage them, but we'll have a specific assembly procedure.
    We can intiialise this procedure in this way:

    // assembly procedure to manage the callback to trng patch with number 5Eh
    BEGIN_ASM_PROC(cbAsmCallBackFirst5e)

              retn
    END_ASM_PROC

    // FOR_YOU:
    // in this function RequireMyCallBacks() you'll type
    // a list of:
    //                    GET_CALLBACK(CB_..., ,)
    // one for each callback you need
    bool RequireMyCallBacks(void)

    Note: please, remember that is always better place the code of some function or procedure UPPER of the side where you'll use its name.
    In this case we placed our callback upper about the RequireMyCallBacks() function, where we'll type its name.
    Indeed, now we require the callback , typing inside of RequireMyCallBacks() the row:

              GET_CALLBACK(CB_NUMERIC_TRNG_PATCH, CBT_FIRST | CBT_ASM, 0x5e, cbAsmCallBackFirst5e);

    We added the CBT_ASM flag and we set the name of our asm procedure to handle the callback.

    Missing great ideas, let's say that we wish perform same target gotten with C++ callback, but this time, in assembly language.\
    Since in CBT_FIRST C++ callback we have this code:

                        if (CBT_Flags & CBT_FIRST) {
                                  // code to handle callback for 5Eh trng patch when it is of CBT_FIRST type.
                                  // now we try to read value store in [esp+20h] by previous tomb4 code instruction:
                                  // 414EFA:                     mov [esp+20h], edi ; (LOCALE_ESP - 0x14) current block height
                                  Value = ESP_MEM(0x20);

                                  if (Value == pRegisters->edi) {
                                            // value is the same
                                            // now we change value of ecx register

                                            pRegisters->ECX = 0x7653210;
                                  }
                                  // a CBT_FIRST callback, will return always NULL
                                  return NULL;
                        }

    We could do the same but in assembly.
    So we'll chek if memory that (was) pointed by [ESP+20h] has same value of EDI register and if it has, we change value of ECX register.
    Please, remember that with assembly procedures no saving/restoring registers will be performed by trng code.
    This means that, if you wish change a register, just changing it in normal way. By other hand, if you don't want get a mess, you should remember to save and restore critical register that you don't wish change.
    Our assembly code could be the following:

    // assembly procedure to manage the callback to trng patch with number 5Eh
    BEGIN_ASM_PROC(cbAsmCallBackFirst5e)
              mov eax, dword ptr [ESP+20h+8] // access to (original) ESP+20h memory with adjustament by +8 on ESP
              cmp eax, edi
              jnz Different
              // they have same value: change the ecx register
              mov ecx, 07653210h
    Different:
              retn
    END_ASM_PROC

    This procedure doesn't return anything, as you see. An assembly procedure can returning a value setting it in eax register, anyway since this is a CBT_FIRST callback, the eax value should be ignored.
    Please note like, as general rule, it's always better using registers as EAX, ECX, EDX, rather that ESI, EDI, EBP.
    This is standard in C++ compiler rules.
    Anyway if you need to change temporarily some high level register (ESI, EDI, EBP) remember at least, first to save its value and then restore it, before quiting your procedure.
    Eas it's only one register that you can modify always, since it has been used also by trng to set its patch number.

    Now we can build pugin, copy to trle folder, and then place a breakpoint at begin of our cbAsmCallBackFirst5e procedure to see what happen when game will be played.

    Note: Visual express 2010 has an annoying bug. When you build the plugin and, after having copied it to trle folder, start debugging, VC2010 prompt you saying that the procjet is out of date, in spite it's not true. You can ignore that message, and , furtherly, disable it forever checking "don't show ever this warning".
    It seems that this bug happens only when you add assembly code to your project.


    As we can see the access to [ESP+20h] works but it need that adjustament with +8.


    Example: an assembly CBT_AFTER callback for trng patch

    We can perform another example: this time we'll handle a CBT_AFTER callback with an assembly procedure.
    We initialise the basic code for our asm procedure:

    // assembly procedure to handle a CBT_AFTER callback to 5Eh trng patch
    BEGIN_ASM_PROC(cbAsmCallBackAfter5e)
              retn
    END_ASM_PROC

    Then we go to require a callback for our procedure, inside of RequireMyCallBacks() function:

              // require call back to manage trng patch 0x5e
              GET_CALLBACK(CB_NUMERIC_TRNG_PATCH, CBT_AFTER, 0x5e, cbManageTrngPatches);
              GET_CALLBACK(CB_NUMERIC_TRNG_PATCH, CBT_FIRST | CBT_ASM, 0x5e, cbAsmCallBackFirst5e);
              GET_CALLBACK(CB_NUMERIC_TRNG_PATCH, CBT_AFTER | CBT_ASM, 0x5e, cbAsmCallBackAfter5e);


    Now we have to type some code in cbAsmCallBackAfter5e() procedure.
    When we are working with After assembly callback, our job should be very precise, since all registers we change will be used directly by tomb4 code.
    In this case we'll copy (too) the after callback written in C++. In that callback the code was simply:

                        if (CBT_Flags & CBT_AFTER) {
                                  // set carry = 1
                                  pRegisters->CPU_Flags |= enumCPU.CARRY;
                                  return NULL;
                        }

    Working in assembly , setting carry =1, is very easy and fast:

    // assembly procedure to handle a CBT_AFTER callback to 5Eh trng patch
    BEGIN_ASM_PROC(cbAsmCallBackAfter5e)
              // set c=1
              stc
              retn
    END_ASM_PROC

    Now, before building the project, we have to remove the C++ CBT_AFTER callback, because it did same job and so we could not know if the missing of sound it has been performed by assembly callback or C++ callback:

              // require call back to manage trng patch 0x5e
              // GET_CALLBACK(CB_NUMERIC_TRNG_PATCH, CBT_AFTER, 0x5e, cbManageTrngPatches);
              GET_CALLBACK(CB_NUMERIC_TRNG_PATCH, CBT_FIRST | CBT_ASM, 0x5e, cbAsmCallBackFirst5e);
              GET_CALLBACK(CB_NUMERIC_TRNG_PATCH, CBT_AFTER | CBT_ASM, 0x5e, cbAsmCallBackAfter5e);

    In this way now only the two assembly callbacks will work.
    Now we build, copy plugin to trle and start the game.

    The test gave good result: it works.


    How to replace trng patches

    We know that we can replace the code of a trng patch with ours, but before working for this target we need to understand what that trng patch did.
    In tomb4patchedcode.txt you find some little comments before many numerical trng patches but probably it's not enough to understand the details.
    About this topic I have to say that I hope you don't mean replacing trng patches only for fun but, rather, because you have already some idea about problema or possible improvements of given trng patch. If this second thought is true, this means you have already some idea about the target of that trng patch.
    Before trying a full replacing (rather that a safer after or first callback) you should be sure:


    How to understand the trng patch source: the "NumericalTrngPatchesCode.txt"

    In PLUGIN_SDK_STORE you find the file "NumericalTrngPatchesCode.txt" (stored in "Tomb4Sources" subfolder).
    This is an abstract of original trng sources to handle numerical trng patches. This is a way to give the chance to understand better how these patches work, in the case you wish replace them.
    As you can see, in this abstract are not present all numerical trng patches. Some patches have been exlcuded because they are so connected with trng core, that their replacing it's not possible. If you tried that, you pratically kill trng core, getting plenty of bugs.
    Anyway I let all "flat" patches that you could really replace or fixing (in some circustances also with a simple CBT_AFTER callback).
    About the code you find in "NumericalTrngPatchesCode.txt" document, there are some adjustments to perform to adapt it to your plugin code.
    Main reason is that, the global structure whom you access whereby a: "Trng.pGlobTomb4->", in original trng source will be accessed with a direct "GlobTomb4."
    For instance:

                        mov eax, dword ptr [GlobTomb4.pVehicleIndex]
                        cmp word ptr [eax], di          ; Cases 0,4 of switch 00430409

    In above example, to access to value of VehicleIndex you should convert in this way:

              mov eax, dword ptr [Trng.pGlobTomb4]
              mov eax, dword ptr GlobalFields.pVehicleIndex[eax]
              cmp word ptr [eax], di

    This topic has been already described in How to use the offsets of a structure
    Anyway I can give a little descrition for this specific case.
    The "GlobTomb4", you read in trng patch source, is the name of structure variable whom address is stored in Trng.pGlobTomb4 of your plugin.
    While trng code will access directly with:

              GlobTomb4.pVehicleIndex

    You need to copy the address of GlobTomb4 in some register:

              mov eax, dword ptr [Trng.pGlobTomb4]

    and then, to access to some field of that structure (StrGlobaliTomb4 structure) you need to use the offset, i.e. the value to add to the begin of GlobTomb4 address, to get the address of some given field.
    In our case we wanted read the value of "pVehicleIndex" and to have the offset (respect to the start of GlobTomb4 structure) we used the "GlobalFields." enumerator of structure offset.

              mov eax, dword ptr GlobalFields.pVehicleIndex[eax]

    With above instruction we moved the pointer (do you see that lower case "p" in front of its name?) of vehicle index to eax register.
    Now eax points to the short value of vehicle index and so we read, or compare, its value with an instruction like this:

              cmp word ptr [eax], di

    About the name used to reach that offset, the "GlobalFields", you should remeber that all structures in trng/plugin sources follow this rule: when you wish know the offsets to access, in assembly, to some field of a given structure, look for that structure name in "structures.h" source, then you scroll down to see the end of that structure definition and you'll see the name of offset enumerator for that structure.

              DWORD CheckValue1_2_2_8; // value will be 0x01234567

    }GlobalFields;

    Above is the final side of StrGlobaliTomb4 structure of Trng.pGlobTomb4.
    Note: if when you type "GlobalFields." you don't see showed the list of fields to choose, just you move (temporarily) this editing outside of assembly procedure, placing it in any C++ function, and the list will appear.
    Then you can copy and paste the right path in assembly procedure.

    In spite this conversion is a bit longer than it was in C++ language, it's not so complicated, of course.
    Rather, another problem, is when you find neither a GlobTomb4 reference, but something of different and, apparently, unknown.
    For instance, in Patch_23 (0x23) we find:

                        cmp byte ptr [BaseCustomize.TestDisableMissingSounds], 0
                        jz FaiIlSolito

    How can we locate "BaseCustomize" in our plugin source?
    Looking for "BaseCustomize" in "structures.h" source, we find this:

              StrBaseCustomize *pBaseCustomize;

    It is a field of StrGlobaliTomb4 structure, i.e. our Trng.pGlobTomb4 main structure.
    Since it is a pointer (there is "*" also "p" prefix in front of its name) we can get the address of BaseCustomize reading the value from pBaseCustomize field.
    In this case the code to adapt above trng code to our plugin code, is a bit longer but the method is always the same:

              mov eax, dword ptr [Trng.pGlobTomb4]
              ; now in eax we have the address of GlobTomb4 structure
              ;now we wish read the pointer stored at offset pBaseCustomize of StrGlobTomb4 structure, so we'll use this instruction:
              mov eax, GlobalFields.pBaseCusomize[eax]
              ;now in eax there is the address of BaseCustomize
              ;finally, we can read the field "TestDisableMissingSounds
              cmp byte ptr BaseCustomizeFields.TestDisableMissingSounds[eax]


    Example: create a CBT_REPLACE assembly callback to a trng patch

    Now it's time to try to replace a trng patch.
    We'll replace the 112h trng patch, since it offers the chance to describe many complicated stuff.

    ;patch per assign slot
    40CB5B: LOC_40CB5B:
    40CB5B:                    MOV AX,112h
    40CB5F:                    JMP DWORD PTR [TrngPatcher] ; Tomb_Nex.10002937
    40CB65:                    NOP
    40CB66:                    NOP
    40CB67:                    NOP
    40CB68:                    NOP
    40CB69:                    NOP
    40CB6A: LOC_40CB6A:

    Above is the code we see in Tomb4PatchedCode.txt, while belove we can see the source of this trng patch:

    __declspec(naked) void Patch_112(void)
    {
              __asm {
                        cmp word ptr [esi+0ch], 43 // BADDY_2
                        jz Baddy2
                        // slot it's not baddy2 and neither baddy_1
                        // checking assignslot we discover what is this
                        movzx ecx, word ptr [GlobTomb4.BaseAssignSlot.TotNewAssign]
    LoopRecords:
                        dec ecx
                        js Baddy2

                        mov dx, GlobTomb4.BaseAssignSlot.VetNewAssign[ecx*4]
                        cmp word ptr [esi+0ch], dx
                        jnz LoopRecords
                        // found the linked slot
                        // now discover if it works like a baddy_1 or baddy_2
                        mov dx, GlobTomb4.BaseAssignSlot.VetNewAssign[ecx*4+2]
                        cmp dx, 43 // BADDY_2
                        jz Baddy2
                        cmp dx, 41 // BADDY_1
                        jnz LoopRecords
                        // it is a baddy1
                        mov dword ptr [esi+15eeh], 7E0880h

                        jmp Esci
    Baddy2:
                        mov dword ptr [esi+15eeh], 880h
    Esci:
                        mov eax, 40ca21h
                        jmp eax
              }
    }

    We can understand (also watching the previous tomb4 code) that current patch is trying to apply the change of AssignSlot= script command to moveable with its structure (StrItemTr4) store in [esi].
    Now we create a CBT_REPLACE of CBT_REPLACE and CBT_ASM type.
    First step we initialise a assembly proc to handle this callback:

    // procedure to handle CBT_REPLACE callback to 112h trng patch
    BEGIN_ASM_PROC(cbAsmCallBackReplace112)
              
    END_ASM_PROC

    And now we add a row to require this callback inside of RequireMyCallBacks() function:

              GET_CALLBACK(CB_NUMERIC_TRNG_PATCH, CBT_REPLACE | CBT_ASM, 0x112, cbAsmCallBackReplace112);

    About the code to write in our cbAsmCallBackReplace112() procedure a good first step is to copy the original trng code and then we'll be able to modify it, easily, to fix bugs or to improve it.
    As we saw the target to adapt trng source to plugin source is not so easy, and we chose a pariculary complicated source to convert.
    We can start copy the trng code to our assembly procedure:

    // procedure to handle CBT_REPLACE callback to 112h trng patch
    BEGIN_ASM_PROC(cbAsmCallBackReplace112)
                        cmp word ptr [esi+0ch], 43 // BADDY_2
                        jz Baddy2
                        // slot it's not baddy2 and neither baddy_1
                        // checking assignslot we discover what is this
                        movzx ecx, word ptr [GlobTomb4.BaseAssignSlot.TotNewAssign]
    LoopRecords:
                        dec ecx
                        js Baddy2
                        mov dx, GlobTomb4.BaseAssignSlot.VetNewAssign[ecx*4]
                        cmp word ptr [esi+0ch], dx
                        jnz LoopRecords
                        // found the linked slot
                        // now discover if it works like a baddy_1 or baddy_2
                        mov dx, GlobTomb4.BaseAssignSlot.VetNewAssign[ecx*4+2]
                        cmp dx, 43 // BADDY_2
                        jz Baddy2
                        cmp dx, 41 // BADDY_1
                        jnz LoopRecords
                        // it's a baddy1
                        mov dword ptr [esi+15eeh], 7E0880h
                        jmp Esci
    Baddy2:
                        mov dword ptr [esi+15eeh], 880h
    Esci:
                        mov eax, 40ca21h
                        jmp eax
    END_ASM_PROC

    Our first change it has been the remotion of starting:

    __declspec(naked) void Patch_112(void)
    {
              __asm {

    and final:

              }
    }

    Because the assembly constructor in our case is already present in the macros:

    BEGIN_ASM_PROC(cbAsmCallBackReplace112)

              ;assembly code

    END_ASM_PROC


    Most of the code will work fine with no changes but there are some fixing to perform everytime trng code access to GlobTomb4 structure.
    So we have to convert where there is an access to:

    GlobTomb4.BaseAssignSlot

    We have already described this topic in chapter: How to understand the trng patch source: the "NumericalTrngPatchesCode.txt"
    In this case we'll use also a little trick to get easy our job.
    Since in trng code the GlobTomb4.BaseAssignSlot will be used in many rows, we could save, once and forever, the address of BaseAssignSlot in a global (extern all functions) vairable, and then we'll take from there that value.
    We could use also a register to save temporarily that address, of course, anyway we'll use the method of a global variable to remember that you have this chance also for massive code, where you could need an access of some intermediate structure, plenty of times.
    So we declare a common variable outside of our cbAsmCallBackReplace112 procedure.
    Note that in this case, since we are working in assembly, it's not necessary we define this variable as pointer to specific structure, a simple:

    int MyBaseAssign;

    It will be enough.
    From first row with BaseAssignSlot we'll get the address of this structure:

                        mov ecx, dword ptr [Trng.pGlobTomb4]
                        lea ecx, GlobalFields.BaseAssignSlot[ecx]
                        mov dword ptr [MyBaseAssign], ecx

    Well, now we analyse this first change.
    You see that this adjustment is a bit different than other showed in How to understand the trng patch source: the "NumericalTrngPatchesCode.txt" chapter.
    In this case we used a "lea" instruction instead by using a "mov".
    The reason is that, in this case, the field "BaseAssignSlot" is NOT a pointer but it is own a structure, located inside StrGlobaliTomb4 structure.
    After above code we got the address of BaseAssignSlot in [MyBaseAssign].
    Now we'll use only that address to access to other subfields.
    In original trng code there was the line:

                        movzx ecx, word ptr [GlobTomb4.BaseAssignSlot.TotNewAssign]

    we convert it with the row:

                        movzx ecx, word ptr BaseAssignSlotFields.TotNewAssign[ecx]

    Please, note that in ecx there was already the value stored in [MyBaseAssign]
    And now we convert also the access to VetNewAssign array;

                        mov edx, dword ptr [MyBaseAssign]
                        mov dx, BaseAssignSlotFields.VetNewAssign[edx][ecx*4]

    At end our final code will be this:

    // procedure to handle CBT_REPLACE callback to 112h trng patch
    int MyBaseAssign;
    BEGIN_ASM_PROC(cbAsmCallBackReplace112)
                        cmp word ptr [esi+0ch], 43 // BADDY_2
                        jz Baddy2
    // slot it's not baddy2 and neither baddy_1
    // checking assignslot we discover what is this

                        mov ecx, dword ptr [Trng.pGlobTomb4]
                        lea ecx, GlobalFields.BaseAssignSlot[ecx]
                        mov dword ptr [MyBaseAssign], ecx
                        movzx ecx, word ptr BaseAssignSlotFields.TotNewAssign[ecx]

    LoopRecords:
                        dec ecx
                        js Baddy2
                        mov edx, dword ptr [MyBaseAssign]
                        mov dx, BaseAssignSlotFields.VetNewAssign[edx][ecx*4]
                        cmp word ptr [esi+0ch], dx
                        jnz LoopRecords
                        // found the linked slot
                        // now discover if it works like a baddy_1 or baddy_2
                        mov edx, dword ptr [MyBaseAssign]
                        mov dx, BaseAssignSlotFields.VetNewAssign[edx][ecx*4+2]

                        cmp dx, 43 // BADDY_2
                        jz Baddy2
                        cmp dx, 41 // BADDY_1
                        jnz LoopRecords
                        // it's a baddy1
                        mov dword ptr [esi+15eeh], 7E0880h
                        jmp Esci
    Baddy2:
                        mov dword ptr [esi+15eeh], 880h
    Esci:
                        mov eax, 40ca21h
                        jmp eax
    END_ASM_PROC

    Some notes:
    - The 112h trng patch has been called whereby a JMP and indeed we return to tomb4 code using JMPs and not a "retn" instuction
    - In this case there is no access to stack memory (with ESP register), anyway if it there was, we had no adjustment to do on esp displacement, since this is a replace callback, called with a jump. This means that we'll have used same displacemente seen in tomb4 code before this patch.
    - We tried to do not use other register different than ecx or edx, following the track of trng code, anyway, studying tomb4 code calling this patch, we can discover if there was the chance to use another register, or, it there wasn't, we can save a register like "ebx" in the stack:

              push ebx

    Use it to load address of MyBaseAssign:

              mov ebx, dword ptr [MyBaseAssign]

    and then, remember to restore its value, before quiting and coming back to tomb4 code:

              pop ebx


    Test replace assembly callback
    Now we can test if our code will be executed and what happens with debugger.
    So, build the plugin, copy to trle folder, set a breakpoint at first row of our callback:


    Now we start debugging Debug->Start Debugging.
    In game, move lara, first over the gray with black cross texture, and then, over red with arrow texture.


    This complication is because, the code of 112h trng patch, it will be executed only when baddy is drawing out its sword but this doesn't happen so easily, so I had to add a trigger to force animation 22, where baddy draws sword.
    When the execution pass to debugger, we'll perform some instruction, with F10 key, to verify if read data from BaseAssignSlot are reasonable


    We see they are.
    The TotNewAssign is "1" and indeed there is only one AssignSlot command in our script.
    Now, going on with execution step by step, we see that also data of VetNewAssign[] array, are correct.
    Ok, it works.

    How to convert assembly trng code to C++ format

    Now we can attempt an interesting experiment: using a replace callback written in C++ language, starting from trng assembly source code.
    Pratically we'll have to "translate" from assembly to C++ language, other having usual conversion to access to GlobTomb4 structure.
    Since it's not possible having two replace callbacks for same trng patch, we have to remove the request for assembly callback.

              // GET_CALLBACK(CB_NUMERIC_TRNG_PATCH, CBT_REPLACE | CBT_ASM, 0x112, cbAsmCallBackReplace112);

    Then we can use the usual cbManageTrngPatches() function to handle this replace callback.

    As we said, an advantage, to use C++ code to manage callback, is that we can use same function to handle all our trng patch callbacks.
    So we add the request for a CBT_REPLACE callback for 0x112 trng patch, inside RequireMyCallBacks() function:

              // GET_CALLBACK(CB_NUMERIC_TRNG_PATCH, CBT_REPLACE | CBT_ASM, 0x112, cbAsmCallBackReplace112);

              GET_CALLBACK(CB_NUMERIC_TRNG_PATCH, CBT_REPLACE, 0x112, cbManageTrngPatches);

    Now we can organize better the code inside of cbManageTrngPatches() function.
    Indeed, since it is going to increase the number of trng patches to handle, it's better using a switch() case, rather a long list of "if (PatchIndex == ..." instructions.

    // code to handle callbacks of numerical trng patches (without CBT_ASM flag)
    //(__cdecl *CALL_CB_TRNG_PATCH) (WORD PatchIndex, WORD CBT_Flags, bool TestFromJump, StrRegisters *pRegisters);
    void * cbManageTrngPatches(WORD PatchIndex, WORD CBT_Flags, bool TestFromJump, StrRegisters *pRegisters)
    {


              int Value;

              switch (PatchIndex) {
              case 0x5e:
                        // patch for rollingball
                        if (CBT_Flags & CBT_FIRST) {
                                  // code to handle callback for 5Eh trng patch when it is of CBT_FIRST type.
                                  // now we try to read value store in [esp+20h] by previous tomb4 code instruction:
                                  // 414EFA:                     mov [esp+20h], edi ; (LOCALE_ESP - 0x14) current block height
                                  Value = ESP_MEM(0x20);

                                  if (Value == pRegisters->edi) {
                                            // value is the same
                                            // now we change value of ecx register

                                            pRegisters->ECX = 0x7653210;
                                  }
                                  // a CBT_FIRST callback, will return always NULL
                                  return NULL;
                        }
                        if (CBT_Flags & CBT_AFTER) {
                                  // set carry = 1
                                  pRegisters->CPU_Flags |= enumCPU.CARRY;
                                  return NULL;
                        }
                        break;
              case 0x112:
                        // code to handle 0x112 trng patch
                        break;
              }
              return NULL;
    }


    First step for assembly / C++ language, is to understand what the assembly code does, of course.
    Watching newly that code (we'll watch original trng code now), we can discover some stuff:

                        cmp word ptr [esi+0ch], 43 // BADDY_2
                        jz Baddy2

    Above code, were there is a check about slot (43 = slot of baddy2) say to us that [esi] store the StrItemTr4 structure of an item.
    In following code there will be looked for the slot of current item in VetAssignSlot array:

                        movzx ecx, word ptr [GlobTomb4.BaseAssignSlot.TotNewAssign]
    LoopRecords:
                        dec ecx
                        js Baddy2
                        mov dx, GlobTomb4.BaseAssignSlot.VetNewAssign[ecx*4]
                        cmp word ptr [esi+0ch], dx
                        jnz LoopRecords

    Then, it it will be found, it will be used the slot to assign for that source slot:

                        mov dx, GlobTomb4.BaseAssignSlot.VetNewAssign[ecx*4+2]

    At end, the new assigned slot, will be compared with baddy1 and baddy2 slot, and, in according with slot type, it will be type a different value in StrItemTr4 structure at displacement +15eeh.

                        cmp dx, 43 // BADDY_2
                        jz Baddy2
                        cmp dx, 41 // BADDY_1
                        jnz LoopRecords
                        // e un baddy1
                        mov dword ptr [esi+15eeh], 7E0880h

                        jmp Esci
    Baddy2:
                        mov dword ptr [esi+15eeh], 880h
    Esci:

    Last code row is to come back, with a direct jump to tomb4 code:

                        mov eax, 40ca21h
                        jmp eax

    Well, knowing all above infos it's easy convert that code to C++ language but there is a mistery to solve.
    What is field corresponding to displacement +15eeh?

                        mov dword ptr [esi+15eeh], 880h

    Since we understood that [esi] is a StrItemTr4 structure, we are looking for the name of field with a displacement of 0x15ee from beginning of structure.
    To solve this problem I computed the displacement of all field of main tomb4 structures.
    In structures.h file, you see these infos at right of each row, also for StrItemTr4 structure:

              BYTE *pZone1;                    // 15e2
              BYTE *pZone2;                    // 15e6
              DWORD FlagsMain;                    // 15ea (FITEM_.. flags)
              DWORD FlagsSwapMesh;          // 15ee
              DWORD Mistery5;                    // 15f2
    }ItemFields; // size 0x15f6

    So we can discover that, the 15ee offset, is for FlagsSwapMesh field.

    Our CBT_REPLACE C++ callback for trng patch
    Now we have all infos to write our C++ code:

    // new local variable defined for replace callback of 112h trng patch
              StrItemTr4 *pItem;
              WORD SlotId;
              int i;

    // other code ....

              case 0x112:
                        // code to handle 0x112 trng patch
                        if (CBT_Flags & enumCBT.REPLACE) {
                                  // verify if pItem (with structure in [esi] register), has a SlotId set in AssignSlot script command.
                                  // if it has, replace the old id with new assigned slot id, and use the result to verify if it is baddy1 or baddy2
                                  // to perform a different kind of swapmesh

                                  // copy pointer of StrItemTr4 structure in local pItem pointer
                                  pItem = (StrItemTr4 *) pRegisters->ESI;
                                  // read the slotid
                                  SlotId = pItem->SlotID;
                                  // check in BaseAssignSlot if it's necessary assign another slot to current SlotId
                                  for (i=0;i<Trng.pGlobTomb4->BaseAssignSlot.TotNewAssign;i++) {
                                            if (SlotId == Trng.pGlobTomb4->BaseAssignSlot.VetNewAssign[i].MioSlot) {
                                                      // found: replace it with new assigned slot
                                                      SlotId = Trng.pGlobTomb4->BaseAssignSlot.VetNewAssign[i].TipoSlot;
                                                      // exit from for loop
                                                      break;
                                            }
                                  }
                                  // now verify if current slot is baddy1 or baddy2
                                  if (SlotId == enumSLOT.BADDY_1) {
                                            // it is BADDY1, set swap mesh flags at 7E0880h
                                            pItem->FlagsSwapMesh = 0x7E0880;
                                  }else {
                                            // otherwise we use baddy2, setting swap mesh flags to 880h
                                            pItem->FlagsSwapMesh = 0x880;
                                  }
                                  // now we have to return with a jump at tomb4 code to 40ca21h offset          
                                  return (void *) 0x40ca21;
                        }          
                        break;
              }
              return NULL;
    }

    Now we can build the project, copy dll to trle folder, and set a breakpoint at first row for 112h callback:


    Now we start debuging to verify if all works fine.


    Callbacks for Object Procedures

    All moveables have a set of procedures to handle some specific target.
    Most of them will be executed each game cycle, while others will be performed only when a specific situation happens.
    Pratically all operativity of a given moveable, depends by its procedures, named also "slot" procedures, since its slot structure, hosts all pointers to these procedures.
    As we'll see, you can get callback for all slot procedures, getting a CBT_FIRST, CBT_AFTER or also CBT_REPLACE callback.
    The good news is that, using this method you have a full controll of any kind of moveable, avoding patches and problem with further conflicts.
    About this speech.... do you remember when, in sdk help 1, we built new moveables, like StarWars robot, or Crane, or MechWarrior? Well, also in that operations we managed Slot Procedure, setting directly in slot fields (pProcControl, pProcInitialise ect), our new management procedures.
    Well, I hope you understood the huge difference, between working with new moveables, that have no slot procedure (since they are new), with working wiht old, well-known moveables.
    I mean, that method to create our procedure and then save its address in to the fields of slot procedure, was ok only for NEW moveables, but with old moveable you should neve using that method. When you wish use your code to handle some slot procedure (of old moveables) you should always require a callback (replace in this case) for that slot and procedure type,

    In this chapter we'll see these callbacks for slot procedures and we'll do also some example about target we can getting with them.
    If you "catch" a slot procedure, it's very important that you understand very fine what the procedure does, and when it will do that.
    For this reason, now we'll give a better description of all main procedures that you can catch with a callback.

    Note: All callbacks for Object Procedures don't admit CBT_ASM type, so they will be called following C++ method. In spite of this fact, you could anyway type an assembly procedure to handle them, but reading parameters from stack ([esp+4] ect.) following C++ conventions.


    InitialiseObject procedure

    Prototype:

    void InitilaliseObject(short ItemIndex);

    In the case of InitialiseObject() is easy misunderstanding and believe that it will be called when a moveable has been just triggered in game.
    No, it's not this its behaviour.
    InitialiseObject procedure will be called when the tr4 level have been just loaded and game has not yet really started.
    The target of this procedure is to initialise the StrItemTr4 structure for the given ItemIndex moveable.
    Usually it will set first animation and frame number, it will fix Y position to align with current floor height (if it is an enemy), and, sometimes, it will initialise some reserved fields of StrItemTr4 structure:

              short Reserved_34;                     // 34
              short Reserved_36;                                        // 36
              short Reserved_38;                                        // 38
              short Reserved_3A;                                        // 3A

    In the case this item has some special interactions with another item, in Iinitalise() procedure, it will be looked for that "partner" item.
    Above are main operations performed from InitialiseObject() procedure, and they will be performed when the item is not yet enabled in game and neither the game (current level) is really running.


    Callback for InitialiseObject procedure
    You require a callback for InitialiseObject procedure of a given slot, using the function:

                        GET_CALLBACK(CB_SLOT_INITIALISE, CBT_flags, SlotId, cbMyFunctionToHandleInitialiseSlot);

    Placed , as usual, inside of: RequireMyCallBacks() function.
    The callback function has following prototype

    typedef int (__cdecl *CALL_SLOT_MANY) (short IndexItem, StrItemTr4 *pItem, WORD CBT_Flags);

    That means, you'll type in Plugin_trng.cpp source a function like this:

    int cbMyFunctionToHandleInitialiseSlot(short ItemIndex, StrItemTr4 *pItem, WORD CBT_Flags)
    {
              return SRET_OK;
    }

    Notes:
    - The returned value SRET_SKIP_ORIGINAL, it will be checked only for CBT_FIRST callbacks, and, in that case, finding that value, the following original InitaliseObject() procedure, will be skipped. You'll return that value when you wish transform your CBT_FIRST in a CBT_REPLACE callback, only after you checked some condition about current item.
    While for CBT_REPLACE and CBT_AFTER the returned value will be ignored.
    - For InitialiseObject() procedure it's not very proababy you'll require a CBT_FIRST callback, with only one exception that seen in above note.

    ControlObject procedure

    Prototype:

    void ControlObject(short ItemIndex);

    The control procedure is the main procedure: it moves the item, to do it burning, emitting smoke, shooting, attack lara and every other action it is able to perform.
    In this procedure there will be the change of animations in according with actions that the item has to peform.
    If item is an enemy, in ControlProcedure there will be the AI management to choose its actions.
    Control object procedure will be always called, also when the item is dead or not yet triggered in game. Indeed, first code of this procedure checks own if the given item is alive and triggered, if it isn't, the procedure quits immediately.
    Note: Trng, to create the "freeze moveable" effect, skips the ControlProcedure of that moveable. In this way, it will be yet visible but with no movement: frozen.


    Callback for ControlObject procedure
    You require a callback for ControlObject procedure of a given slot, using the function:

                        GET_CALLBACK(CB_SLOT_CONTROL, CBT_flags, SlotId, cbMyFunctionToHandleControlSlot);

    Placed , as usual, inside of: RequireMyCallBacks() function.
    The callback function has following prototype

    typedef int (__cdecl *CALL_SLOT_MANY) (short IndexItem, StrItemTr4 *pItem, WORD CBT_Flags);

    That means, you'll type in Plugin_trng.cpp source a function like this:

    int cbMyFunctionToHandleControlSlot(short ItemIndex, StrItemTr4 *pItem, WORD CBT_Flags)
    {
              return SRET_OK;
    }

    Note:
    - Callback for ControlObject is the only one that can return the SRET_SKIP_TRNG_CODE value. The reason is that trng manages the control procedures of all moveables to apply the feeeze effect and other cutscene stuff. If you return SRET_SKIP_TRNG_CODE, the trng code will be skipped. Don't confuse SRET_SKIP_TRNG_CODE with SRET_SKIP_ORIGINAL value.
    The SRET_SKIP_ORIGINAL value says to skip the original ControlProcedure of current item, while standalone SRET_SKIP_TRNG_CODE doens't skip original control procedure but only trng management for control objects.
    You can also return both values:

              return SRET_SKIP_TRNG_CODE | SRET_SKIP_ORIGINAL;

    I don't suggest to skip trng code, since then, many trng stuff could stop to work. Anyway skipping trng code (but letting original procedure), you will remove freeze effect for current moveable.
    - It's better checking for SlotId of current item, to verify that it was that you believe, because, in spite you equired a callback for a given slotid, it's possible that two or more slots had same control procedure. For this reason, if you wish performing some special effects only on a given slot, you should check if current item has own the wished slot and, if it hadn't, skip it.


    CollisionObject procedure

    Prototype:

    void CollisionObject(short ItemIndex, StrItemTr4 *pLara, StrCollisionLara *pCollisions);

    The CollisionObject procedure is not used, from current object, to check its further collisions with floor, walls or other objects (this target will be performed in ControlObject() procedure) but only for collision with Lara.
    It's only when Lara is enough close to that Object (less or even three sectors, 3072 game units), that this procedure will be executed, while when Lara is very far, there will be no execution.
    Usually main target of Collision procedure is to keep away Lara, avoiding she enters inside of object's collision box, anyway for some interactive items, like doors, switches or vehicle, it will be used also to verify if lara is able to interact with that object, to activate its particular features.


    Callback for CollisionObject procedure
    Prototype:

    typedef int (__cdecl *CALL_SLOT_CB_COLLISION) (short IndexItem, StrItemTr4 *pItem, WORD CBT_Flags, StrCollisionLara * pCollision);

    Note: differently by original CollisionObject procedure, the callback receive the StrItemTr4 structure of the same moveable (owner of CollisionObject procedure) and not that of Lara.

    The callback function in your plugin_trng.cpp soruce, will have following layout:

    int cbManageCollisionSlotCallback(short ItemIndex, StrItemTr4 *pItem, WORD CBT_Flags, StrCollisionLara * pCollision)
    {
              return SRET_OK;
    }

    You'll require this callback placing following row inside RequireMyCallBacks() function.

              GET_CALLBACK(CB_SLOT_COLLISION, CBT_Flags, SlotId, cbManageCollisionSlotCallback);

    note: If you require a CBT_FIRST callback, you should remember to check the distance between Lara and the object before perfomring some action, since lara could be yet very far.

    DrawObject procedure

    Prototype:

    void DrawObject(StrItemTr4 *pItem);

    How its explains, this procedure draws the object.
    Read current frame and apply to it al rotation on three axis, add (further) footstep shadown, apply light for the object.


    Callback for DrawObject procedure
    Prototype:

    typedef int (__cdecl *CALL_SLOT_MANY) (short IndexItem, StrItemTr4 *pItem, WORD CBT_Flags);

    The callback function in your plugin_trng.cpp soruce, will have following layout:

    int cbManageDrawSlotCallback(short IndexItem, StrItemTr4 *pItem, WORD CBT_Flags)
    {
              return SRET_OK;
    }

    You'll require this callback placing following row inside RequireMyCallBacks() function.

              GET_CALLBACK(CB_SLOT_DRAW, CBT_Flags, SlotId, cbManageDrawSlotCallback);


    FloorObject procedure

    Prototype:

    void FloorObject(StrItemTr4 *pItem, DWORD X, int Y, DWORD Z, int *pNewY);

    pItem is the structure of item that owns current FloorObject() procedure
    X, Y and Z are the coordinate (usually of Lara) to check if this 3d point is over the pItem object.
    pNewY is a pointer where to type the new Y coordinate in the case this moveable (usually Lara) was over "floor" object

    This procedure it will be called in very original way: when tomb4 is analysing the floor (belov some object to compute floor height), if it finds a trigger, check the item refered from that trigger and verify if that object has a FloorProcedure. If it has, it will be called and the *pNewY coordinate will be used as current floor height.
    For this reason it's necessary triggering the bridge (or two block platform, ect) with a dummy trigger. Really, it's not necessary it was a dummy trigger, any kind of trigger will work as well.

    Note: if the procedure supply a floor for Moveable in X,Y,Z position, other that write in *pNewY the new Y position of the moveable, it will write to following global tomb4 variables:

    Trng.pGlobTomb4->pAdr->pTestOverPlatform = TRUE;
    Trng.pGlobTomb4->pAdr->pInclinationType = enumSLOPE...(some slope value for virtual floor)


    Callback for FloorObject procedure
    Prototype:

    typedef int (__cdecl *CALL_SLOT_CB_FLOOR) (WORD CBT_Flags, StrItemTr4 *pItem, DWORD CordX, int CordY, DWORD CordZ, int *pNewCordY);

    The callback function in your plugin_trng.cpp soruce, will have following layout:

    int cbManageFloorSlotCallback(WORD CBT_Flags, StrItemTr4 *pItem, DWORD CordX, int CordY, DWORD CordZ, int *pNewCordY)
    {
              return SRET_OK;
    }

    You'll require this callback placing following row inside RequireMyCallBacks() function.

              GET_CALLBACK(CB_SLOT_FLOOR, CBT_Flags, SlotId, cbManageFloorSlotCallback);

    Note: remember that most of moveables have NO floorprocedure, so trying to get a callback for them should be useless.
    If you wish adding some "floor" features to some moveables, you'll have to write directly in its slot a floor procedure.
    You can use yours, but in this case you have to remember to use, not the prototype of callback, but that of original FloorProcedure, i.e this.:

    void FloorObject(StrItemTr4 *pItem, DWORD X, int Y, DWORD Z, int *pNewY);


    CeilingObject procedure

    Prototype:

    void CeilingObject(StrItemTr4 *pItem, DWORD X, int Y, DWORD Z, int *pNewY);

    Prototype is the same of FloorObject procedure.
    The CeilingObject procedure works alike the FloorObject, but in this case it will set in *pNewY the y coordinate of ceiling.
    Note: diffrently by FloorObject, in this case we have no need to set some global variable if our object give a ceiling feature.


    Callback for CeilingObject procedure
    Prototype:

    typedef int (__cdecl *CALL_SLOT_CB_CEILING) (WORD CBT_Flags, StrItemTr4 *pItem, DWORD CordX, int CordY, DWORD CordZ, int *pNewCordY);

    The callback function in your plugin_trng.cpp soruce, will have following layout:

    int cbManageCeilingSlotCallback(WORD CBT_Flags, StrItemTr4 *pItem, DWORD CordX, int CordY, DWORD CordZ, int *pNewCordY)
    {
              return SRET_OK;
    }

    You'll require this callback placing following row inside RequireMyCallBacks() function.

              GET_CALLBACK(CB_SLOT_CEILING, CBT_Flags, SlotId, cbManageCeilingSlotCallback);

    Note: remember that most of moveables have NO ceilingprocedure, so trying to get a callback for them should be useless.
    If you wish adding some "ceiling" features to some moveables, you'll have to write directly in its slot a ceiling procedure.
    You can use yours, but in this case you have to remember to use, not the prototype of callback, but that of original CeilingProcedure, i.e this.:

    void CeilingObject(StrItemTr4 *pItem, DWORD X, int Y, DWORD Z, int *pNewY);

    Note: the code in this function works about in this way:
    - Check if X,Z coordinates are overlapped to ceiling object zone
    - Check if Y coordinate are a little down of pItem->CordY, creating a situation where this enemy could be stopped, in his upper side, from the ceiling
    - If above checks give a positive result, the procedure will write in pNewY coordiante the lower Y coordinate of pItem (ceiling) object.
    - When the object has same area of one sector, the check about X and Z coordinate is futile, since the trigger covered own that sector and, by other hand, if x,y,z was not been over that sector there will be NO trigger and this ceiling procedure will be neither exectued. Indeed, ceiling and floor procedure for two block platform, do a check only on Y coordinates


    DrawExtraObject procedure

    Prototype:

    void DrawExtraObject(StrItemTr4 *pItem);

    This procedure will draw only some "gadgets" of its owner (main obiect).
    It's not so clear why eidos programmers wanted dividing drawing operations in two procedures but I suppose it was to keep a generic drawing procedure (for instance for a vehicle) to use newly for other moveables in the future, letting some specific stuff in another draw (extra) procedure to remove easily them in new objects.
    For instance, the bike draws (as extra) the speedometer and the beam, while the jeep draws the speedometer but no beam.


    Callback for DrawExtraObject procedure
    Prototype:

    typedef int (__cdecl *CALL_SLOT_MANY) (short IndexItem, StrItemTr4 *pItem, WORD CBT_Flags);

    The callback function in your plugin_trng.cpp soruce, will have following layout:

    int cbManageDrawExtraSlotCallback(short IndexItem, StrItemTr4 *pItem, WORD CBT_Flags);
    {
              return SRET_OK;
    }

    You'll require this callback placing following row inside RequireMyCallBacks() function.

              GET_CALLBACK(CB_SLOT_DRAW_EXTRA, CBT_Flags, SlotId, cbManageDrawExtraSlotCallback);


    Callbacks for Special (Lara) Object procedure

    If you try to handle Lara object using above callbacks, you coud be disappointed, indeed, Lara is not a common object, she is "special" and most of her control procedures will be not performed whereby slot procedures but other, specific, special procedures.
    For above reason, to handle Lara code, you cann' use common callbacks for slot procedures but other special callbacks created for this target.


    Callbacks for Lara's State-ids procedures

    You should know the "state-id" value. It specifies what lara is doing, her current action or state.
    For each state-id Lara has a different control procedure and collision procedure.
    If you wish a callback for a given state-id of lara you should use one of these callbacks:


    CB_STATE_ID_LARA_CTRL callback
    Prototype:


    typedef int (__cdecl *CALL_CB_STATE_ID) (WORD StateId, WORD CBT_Type, StrItemTr4 *pLara, StrCollisionLara * pCollision);

    The state-id control procedure handles the behaviour of Lara while she is in that state-id.
    You can create a callback function, to handle it, using a code like this:

    int cbStateIdCtrlLara(WORD StateId, WORD CBT_Type, StrItemTr4 *pLara, StrCollisionLara * pCollision)
    {
              return enumSRET.OK;
    }
    while in RequireMyCallBacks() function you'll type:
              CALL_BACK(CB_STATE_ID_LARA_CTRL, enumCBT.AFTER, 57, cbStateIdCtrlLara);

    In above example we required an after callback for when Lara is climbing-up (state-id = 57)


    CB_STATE_ID_LARA_COLLISION callback
    Prototype:

    typedef int (__cdecl *CALL_CB_STATE_ID) (WORD StateId, WORD CBT_Type, StrItemTr4 *pLara, StrCollisionLara * pCollision);

    The prototype is the same of control state-id procedure, anyway in this case the procedure will manage the collision of Lara with walls, floor ect.

    You can create a callback function, to handle it, using a code like this:

    int cbStateIdLaraColl(WORD StateId, WORD CBT_Type, StrItemTr4 *pLara, StrCollisionLara * pCollision)
    {
              return enumSRET.OK;
    }
    while in RequireMyCallBacks() function you'll type:
              CALL_BACK( CB_STATE_ID_LARA_COLLISION, enumCBT.AFTER, 57, cbStateIdLaraColl);

    In above example we required an after callback for when Lara is climbing-up (state-id = 57), like in previous example but in this case for her collision procedure.
    Please note that you cann't use same callback procedure for Collisional and Control Lara's procedures, because otherwise you'll be not able to understand if the current execution is about Control or Collision procedure.
    In spite of this, you can use same Control callback function, for all your required Control callbacks, so you can do the same, but with another distinct callback management function, for all Collision procedures.


    Callback for main Lara Control

    Ok, it seems weird that there was another lara control procedure, since we have already seen the CB_STATE_ID_LARA_CTRL callback but... lara is really a very special object, as we said.
    While the state-id control is a very specific code to handle Lara when we know what she is doing, the main lara control procedure is where tomb4 discovers what lara is doing and if it is necessary changing her previous state-id.
    In main lara control, it will be checked for current environment of Lara, ground, water surface, under-water and further vehicle. Once main control understood how lara is doing, or if it is necessary changing her previous state-id, the code will set new state-ids and then it will perform the specific state-id control (and collisional) procedures.


    CB_LARA_CONTROL callback
    prototype:

    typedef int (__cdecl *CALL_LARA_CTRL) (WORD CBT_Flags, StrItemTr4 *pLara);

    You can type the function to handle a callback with this code:

    int cbLaraControl (WORD CBT_Flags, StrItemTr4 *pLara)
    {
              return enumSRET.OK;
    }

    And require the callback typing in RequireMyCallBacks() function following row:

              CALL_BACK( CB_LARA_CONTROL, enumCBT.FIRST, 0, cbLaraControl );


    Callback for Lara Draw procedure: CB_LARA_DRAW

    Prototype:

    typedef int (__cdecl *CALL_LARA_DRAW) (WORD CBT_Flags, StrItemTr4 * pLara, bool TestNoUpdateLight, bool TestMirror);

    This procedure is like the "draw" object procedure for common moveables but it is a bit advanced than others.
    In input parameters you receive, other that lara structure, also two "test" parameters:
    TestNoUpdateLight, to signal to avoid the updating of object light. Really I don't understand so fine, why sometimes the light have to be updated and other times, they haven't, anyway the value of this parameter gives this info.
    TestMirror. When this parameter is "true", it means the draw procedure is drawing the mirror image of Lara.

    You can type the function to handle the callback with this code:

    int cbLaraDraw (WORD CBT_Flags, StrItemTr4 * pLara, bool TestNoUpdateLight, bool TestMirror)
    {
              return enumSRET.OK;
    }

    And require the callback typing in RequireMyCallBacks() function following row:

              CALL_BACK( CB_LARA_DRAW, enumCBT.FIRST, 0, cbLaraDraw);


    Callback for Animate Lara procedure: CB_ANIMATE_LARA

    Protoptype:

    typedef int (__cdecl *CALL_ANIMATE_LARA) (WORD CBT_Flags, StrItemTr4 *pLara);

    This callback works to handle AnimateLara function that works only to update current animation/frame of Lara object.
    When you wish monitoring, or changing, the progress of animation number or frame number of Lara, you should hook this function, rather other lara "control" procedures.


    Callbacks for Lara's hair procedures: CB_LARA_HAIR_DRAW and CB_LARA_HAIR_CONTROL

    Lara's hair are like another distinct object, in spite they were "pasted" to Lara's head.
    We can handle them with two callback, one for control procedure and other for draw procedure:


    CB_LARA_HAIR_CONTROL callback
    prototype:

    typedef int (__cdecl *CALL_HAIR_CONTROL) (WORD CBT_Flags, bool TestKeepDownHair, bool TestSecondTail, void *pData);

    There are some (a bit misterious) parameters for this callback:
    TestKeepDownHair set if lara's hair are moving or less. When this parameter is true, ponytail should be down and still. Anyway I'm not so sure about this paraemeter.
    TestSecondTail: when this parameter is "false", we are working on single ponytail of adult lara, or (checking script setting) on first of two ponytail of young Lara. When this paraemter is "true", we are working surely on young lara and on her second tail.
    pData: this parameter is a pointer to some unknown data. Probably infos about current ponytail position and shape. I don't know, anyway this parameter very often is NULL, i.e. not set.


    CB_LARA_HAIR_DRAW callback
    prototype:

    typedef int (__cdecl *CALL_HAIR_DRAW) (WORD CBT_Flags);

    No special parameters in this case.


    Callback for some vehicle procedures

    For unknow reasons, in tomb4 code, some vehicle are handled in a way and others in another way.
    So, while for some vehicle, the common slot control procedure work fine, for others there is another way to call the given control procedure.
    The CB_VEHICLE_CONTROL callback borns own to handle this special control procedure.


    CB_VEHICLE_CONTROL callback
    Prototype:

    typedef int (__cdecl *CALL_VEHICLE_CONTROL) (WORD CBT_Flags, int VehicleIndex);

    The vechicle requiring this kind of callback are: jeep, bike and kayak, while other vehicle will be handled by common slot control procedures.


    Callbacks for Inventory Procedures

    In this chapter we'll see some callbacks used to "catch" execution of tomb4 when it is NOT in game phase.
    Therefor, for "inventory procedures", we don't mean only real inventory but also saving/loading savegame, option panel and main title menu.
    Using following callbacks we can act on these extra-game phases to add new features.


    Callback for Inventory procedure: CB_INVENTORY_MAIN

    Prototype:

    typedef int (__cdecl *CALL_INVENTORY_MAIN) (WORD CBT_Flags, bool TestLoadedGame, int SelectedItem);

    Inventory procedure stops the game, show a background and then create an interactive interface to handle pickup items, reading compass, load and save the game ect.
    This callback is for main (full) inventory managment, while, as we'll see, there are other callbacks for more specific phases of inventory.
    This callaback receive following parameters:
    CBT_Flags: flag of current callback: CBT_FIRST, CBT_AFTER or CBT_REPLACE
    TestLoadedGame: valid only for CBT_AFTER callback: it has been loaded a savegame from last inventory session
    SelectedItem: the slot of item chosen by inventory (like a key, puzzleitem ect)
    note: this parameter has a valid value only in CBT_AFTER callback, while if its value == -1, then it has not been chosen any item


    Callback for Inventory's background procedures

    All callbacks for inventory's background management have same prototype:

    typedef int (__cdecl *CALL_INVENTORY_BACKGROUND) (WORD CB_Type, WORD CBT_Flags, WORD PHASE_Type);

    The managment of background works in three steps:

    For each of above phases we have a different callback:


    Callback for savegame management: CB_SAVEGAME_MANAGER

    Prototype:

    typedef int (__cdecl *CALL_SAVEGAME_MANAGER) (bool TestLoad, bool TestTitle);

    Input parameters:
    TestLoad: if == true callback has to work to load a savegame, if == false, to save current game in some savegame slot
    TestTitle: if == true call back it has been called from title level
    Returned possible values:

    This callback works only as a replace callback, you cann't require a CBT_FIRST or CBT_AFTER flag, it replaces old tomb4/trng management and you'll have to handle whole operation to show current savegame and give to the player the chance to select one of them.
    You can create your callback to work stopping the game, i.e., avoiding to quit your function, until player didn't select one savegame or aborting the operation.
    But you can using also another working mode: performing the graphic update of screen, reading input and, if no selection has bene done, returns with -1, to get newly the execution at next cycle. This second mode is advisable when you work in title mode.


    Callback for pause screen procedure: CB_PAUSE_MANAGER

    Prototype:

    typedef int (__cdecl *CALL_PAUSE_MANAGER) (void);

    This callback has no input parameter and it returns a PRET_ constant
    It works like a replace callback. If you require this callback, your code should handle what happens after player hit "P" key and quiting when all job has been completed.


    Callback for Statistic screen procedure: CB_STATISTICS_MANAGER

    prototype:

    typedef bool (__cdecl *CALL_STAT_MANAGER) (void);

    This callback has no input parameters and it can return true or false. If returns true it means that it completed its job, while if if returns "false" it means that original Statistics code should be performed.
    This callback works like a replace procedure and don't accept CBT_FIRST or CBT_AFTER flags.


    Callback for Options screen procedure: CB_OPTIONS_MANAGER

    Prototype:

    typedef int (__cdecl *CALL_OPTIONS_MANAGER) (bool TestTitle, bool TestCommands, int SelectedRow);

    Received input:
    TestTitle: true when executed from title level
    TestCommands: true when options are working on keyboard/joystick commands
    SelectedRow: number of selected (and interactive) row. Starting from 1 (that at top of the screen)
    returns: SRET constant (valid only for CBT_LOOPED callback)
    This callback accepts two kinds of flags: CBT_REPLACE and CBT_LOOPED the CBT_LOOPED is very alike than CBT_FIRST but it will be peformed in progress, contiuosly, while option screen is running.


    Callback for Title Menu procedure: CB_TITLE_MENU_MANAGER

    Prototype:

    typedef int (__cdecl *CALL_TITLE_MANAGER) (WORD PHASE_Type, DWORD * pInputFlags);

    Received in input:
    PHASE_Type: enumPHASE value describing current phase in title level
    pInputFlags: pointer to flag mask with input commands. You can read them and/or change/remove them
    returns: 0= no operation / negative values: number of savegame to load / Positive (non-zero) values: number of level to load
    This callback works like a looped mode, many plugins can having their own CB_TITLE_MENU_MANAGER callback but no one has to manage all title procedure.
    If your callback return a value different than 0, it means that your code will quit title level, loading a savegame (negative values) or loading a new level (positive values).


    Table of Examples

    Reference Table of Examples

    Link Level Name Room
    Link Title: Lara's Home level ...
    Link Example1: callbacks for trng numerical patches 38
    Link Example2: callback for collision procedure 42
    Link Example3: callbacks for floor and control procedures 46
    Link Example4: callbacks for inventory 48
    Link Example5: Images and input box 50
    Link Example6: Numerical Patch 56


    Examples of Callback usage


    Creating hardcoded effects whereby Callbacks

    We know work "hardcoded" but now, using our plugin, we can realise our hardcoded effects.
    The advante of an hardcoded effect is that it's very easier building a specific special effect, working only in a given level or room, rather creating a new trigger or object that can be used in general way, in any situation.
    Now we'll build several hardcoded effects to show how to use many kinds of callbacks


    Example: Magic Glasses, how to work with ObjectCollision callback

    Now we'll make an hardcoded effect using the ObjectCollision callback.
    Our target is to have in game some glasses that worked like doors, to stop lara to enter in some room.


    Note: oddly, we cann't use common doors to have this effect, because the doors create a collision box (when closed) that works without need of their Collision Procedure, so we'll usa a PANEL_BORDER to have a collision like a door, between two rooms.

    The hardcoded effect will permit to pass through these glasses when lara holds a flare, stopping her in other situations.
    To complicate the matter, we can suppose that there will be good glasses (blue color) and bad glasses (red color). While with good glasses will be possible passing through holding a flare, the bad glasses will fire Lara if she is holding the flare.
    The object used is always the same: PANEL_BORDER, and we'll set "good" or "bad" feature using OCB values.
    Let's say that we use OCB 8 for good glasses and OCB 16 (0x10) for bad glasses.


    Skipping Collision procedure to remove collisions
    The trick we'll use is this:
    - We require a CBT_FIRST callback for CollisionProcedure of our "glass" (PANEL_BORDER)
    - In the callback we check if the panel has OCB 8 (good glass) and either if lara is holding a flare
    - When both above conditions are true, we'll quit callback returning enumSRET.SKIP_ORIGINAL

    Since that, when we return enumSRET.SKIP_ORIGINAL the collision procedure will be not performed, in that moment the collision for that object will be missing and Lara will be able to pass trough the panel.


    Code to pass through glass holding a flare
    We initialise our function to handle all collision slot callbacks:

    // function to handle collisionobject procedures
    int cbProcCollisionSlot(short IndexItem, StrItemTr4 *pItem, WORD CBT_Flags, StrCollisionLara * pCollision)
    {
              return enumSRET.OK;
    }

    Now we require a CBT_FIRST callback for slot PANEL_BORDER, inside of RequireMyCallBacks() function:

              // GET_CALLBACK(CB_NUMERIC_TRNG_PATCH, CBT_REPLACE | CBT_ASM, 0x112, cbAsmCallBackReplace112);
              // GET_CALLBACK(CB_NUMERIC_TRNG_PATCH, CBT_REPLACE, 0x112, cbManageTrngPatches);

              GET_CALLBACK(enumCB.SLOT_COLLISION, enumCBT.FIRST, enumSLOT.PANEL_BORDER, cbProcCollisionSlot);


    Then we type our code to catch CBT_FIRST callback and we verify if panel_border has 8 ocb and if lara holds a flare:

    int cbProcCollisionSlot(short IndexItem, StrItemTr4 *pItem, WORD CBT_Flags, StrCollisionLara * pCollision)
    {
              WORD Slot;

              Slot = pItem->SlotID;

              switch (Slot) {
              case SLOT_PANEL_BORDER:
                        if (CBT_Flags & enumCBT.FIRST) {
                                  Get(enumGET.INFO_LARA,0,0);
                                  if (pItem->OcbCode & 0x008) {
                                            // pass through panel if lara holds flare
                                            if (GET.LaraInfo.HoldedItem == enumHOLD.FLARE) {
                                                      // to remove collisione, just skipping original collision procedure
                                                      return enumSRET.SKIP_ORIGINAL;
                                            }
                                            // no flare, no special action
                                            break;
                                  }
                        }
                        break;
              }
              return enumSRET.OK;
    }

    Now we can try in game this first release of our hardcoded effect.


    It works!
    When lara doesn't hold the flare, she will be stopped, while with the flare she is able to pass through the glass.


    Problem with CollisionObject callbacks
    Now we have to complete our hardcoded effect, adding the burning of lara if she tries to pass red (bad) magic glass, holding the flare.
    The code to add should be this:

                                  if (pItem->OcbCode & 0x008) {
                                            // pass through panel if lara holds flare
                                            if (GET.LaraInfo.HoldedItem == enumHOLD.FLARE) {
                                                      // to remove collisione, just skipping original collision procedure
                                                      return enumSRET.SKIP_ORIGINAL;
                                            }
                                            // no flare, no special action
                                            break;
                                  }
                                  if (pItem->OcbCode & 0x10) {
                                            // bad (red) glass
                                            if (GET.LaraInfo.HoldedItem == enumHOLD.FLARE) {
                                                      // burn lara
                                                      LaraBurn();

                                            }
                                            break;
                                  }

    But if we try this code we have a bad surprise...


    In spite Lara was yet far from red glass, she immediately burns.
    Unfortunately we are discoverying a problem with CollisionObject: since this procedure will be executed when lara is about 3 sectors (or less) of distance from main object, we have no sureness that lara is touching main object.
    For this reason, when lara extracted the weapon she immedtialey burns.
    Now we have to do some improvement to our code, to discover when lara is really touching the glass, ignoring other situations.


    Coupling FIRST and AFTER callbacks
    Apparently, when we need to know what happens in some slot procedure (like Collision procedure), only way is to apply a patch inside that procedurre, to have more infos, but there is another way, very useful because allow us to avoid a patch, getting anyway the infos we wished.
    The trick is to require two callback for same object procedure, CBT_FIRST and CBT_AFTER.
    In CBT_FIRST management we'll save some values, like coordinates of Lara, while in CBT_AFTER callback, we'll verify if above global values have been changed.
    In our case, since when lara tries to enter in some object the collision procedure will push away her, sometimes changin (a bit) her facing, if we detect a change between FIRST and AFTER callback it means lara touch the glass.
    So now we require another callback, for same object and procedure type but this time of CBT_AFTER kind:

              GET_CALLBACK(enumCB.SLOT_COLLISION, enumCBT.FIRST, enumSLOT.PANEL_BORDER, cbProcCollisionSlot);
              GET_CALLBACK(enumCB.SLOT_COLLISION, enumCBT.AFTER, enumSLOT.PANEL_BORDER, cbProcCollisionSlot);

    Note that we can use same function to manage also this new callback.
    In CBT_FIRST (with red glass, ocb 0x10) we'll simply save current X, Z lara coordinates, while in CBT_AFTER callback we'll verify if they changed. That will happen only when collision procedure modified them, otherwise in collision procedure there is no common movement of lara that it happens in other procedures of tomb4 code.
    Our code will become the following:

    // function to handle collisionobject procedures
    DWORD SaveXLara;
    DWORD SaveZLara;
    int cbProcCollisionSlot(short IndexItem, StrItemTr4 *pItem, WORD CBT_Flags, StrCollisionLara * pCollision)
    {
              WORD Slot;

              Slot = pItem->SlotID;

              switch (Slot) {
              case SLOT_PANEL_BORDER:
                        if (CBT_Flags & enumCBT.FIRST) {
                                  Get(enumGET.INFO_LARA,0,0);
                                  if (pItem->OcbCode & 0x008) {
                                            // pass through panel if lara holds flare
                                            if (GET.LaraInfo.HoldedItem == enumHOLD.FLARE) {
                                                      // to remove collisione, just skipping original collision procedure
                                                      return enumSRET.SKIP_ORIGINAL;
                                            }
                                            // no flare, no special action
                                            break;
                                  }
                                  if (pItem->OcbCode & 0x10) {
                                            // bad (red) glass
                                            // now we save some global value of Lara
                                            Get(enumGET.LARA,0,0);
                                            SaveXLara = GET.pLara->CordX;
                                            SaveZLara = GET.pLara->CordZ;
                                            break;
                                  }
                        }
                        if (CBT_Flags & enumCBT.AFTER) {
                                  // callback AFTER
                                  if (pItem->OcbCode & 0x10) {
                                            // red glass
                                            // verify if lara coordinates have been changed from FIRST callback
                                            Get(enumGET.LARA,0,0);
                                            if (GET.pLara->CordX != SaveXLara ||
                                                      GET.pLara->CordZ != SaveZLara) {
                                                      // Lara's coordinates changed
                                                      Get(enumGET.INFO_LARA,0,0);
                                                      if (GET.LaraInfo.HoldedItem == enumHOLD.FLARE) {
                                                                // and lara is holding flare: burn her
                                                                // burn lara
                                                                LaraBurn();
                                                      }
                                            }
                                  }
                                  break;
                        }
              }
              return enumSRET.OK;
    }

    Note: we created two global variables:

    // function to handle collisionobject procedures
    DWORD SaveXLara;
    DWORD SaveZLara;

    outside of any function to preserve their values, between a call and the next, of callback functions.
    Now we build the project and perform some tests....


    We see that it works:
    A) When lara, holds the flare, but she is far, nothing of bad happens...
    B) She is able to pass over the good blue glass
    C) She doesn't burn untile she doesn't touch the red bad glass
    D) Bus she does when touches it.


    Advantages of coupling callback trick
    The coupling callback trick seems empiric but it works fine and not only in this case. Everytime we wish discover what happened in main original procedure, just you require a couple of callback, first and after, in the first save values you are monitoring, while in that after, you verify the changes and then perform wished actions.
    About this speech, remember that, excluding DrawProcedure and DrawExtraProcedure() in all others there is no drawing operations, this means you can restore or modify (In your AFTER callback) all values you wish, avoiding any collateral effect.
    For instance, if you wish prevent that some moveable set a given animation, you can save current animation and frame in FIRST callback, verify, in AFTER callback, if main (control) procedure changed the animation that you want prevent, and now you can restore previous animation (you saved) or set another animation, and no flickering or other visible problems will happen.


    Example: walkable deads, how to work with FloorProcedure

    Now we'll build an advanced hardcoded effect to solve a puzzle.


    Lara is in a room where there is a monkyable ceiling but it is too high, lara can't reach it.
    We see there is a column where pickup an item but also this pilar is too high.
    Then we see a wildboar closed behind a gate and we find a key to open the gate.
    What is the solution of this puzzle?
    It's easy: we get free the wildboar, kill him and then lara moves up over his body to reach the ceiling.
    Usually these actions should be not possible in tomb4 (and in whole civil world) but we can realise any kind of hardcoded effect, so let's try...


    Adding a FloorProcedure to wildboard
    We'll have to solve several techincal issues to realise our hardcoded effect.
    The first is that wildboard has not (of course) a default FloorProcedure, so we'll have to supply to him a new , created by us.
    In this case, since it is NOT a callback but own an original FloorProcedure we'll have to use following prototype:

    void FloorObject(StrItemTr4 *pItem, DWORD X, int Y, DWORD Z, int *pNewY);

    So we create a new FloorProcedure for wildboards...

    // new FloorProcedure for wildboars
    void WildBoarFloorProc(StrItemTr4 *pItem, DWORD X, int Y, DWORD Z, int *pNewY)
    {
              // we'll apply this weirdness only on wildboard with OCB 64
              if ((pItem->OcbCode & 0x40) == 0) return;
              // we apply this effect only when wildboar is on dying animation 5
              if (GetRelativeAnimation(pItem) != 5) return;
              // skip, if the check is own to compute position on the floor of same wildboar
              if (pItem->CordX == X && pItem->CordY == Y && pItem->CordZ == Z) return;
              // verify if distance between y and pItemY is not so big to be in another (above or belove) room
              if (AbsDiffY(pItem->CordY, *pNewY) > 1024) return;

              // now, let's say, that wether lara (x,y,z) is in the circle with r= 64 game units, respect pivot
              // of pItem, we'll give a different Y coordinate for floor
              if (GetDistanceXZ(pItem->CordX, pItem->CordZ, X, Z) > 64) return;

              // ok, now move the floor upper of one click (256 game units, upper in tomb4 3d world, means -256)
              *pNewY = pItem->CordY - 256;
              // now we set global variable to rememebr that there is a fake floor working
              *Trng.pGlobTomb4->pAdr->pTestOverPlatform = TRUE;
              *Trng.pGlobTomb4->pAdr->pInclinationType = enumSLOPE.FLAT;
    }

    Some notes about above FloorProcedure:

    Now we have to "put" the FloorProcedure in WildBoar slot.
    We could perform this job in cbInitObjects() function:

    void InitWildBoar(void)
    {
              // set a floorprocedure for wildboard (for hardcoded effect)
              Get(enumGET.SLOT, enumSLOT.WILD_BOAR,0);
              GET.pSlot->pProcFloor = &WildBoarFloorProc;
    }
    void cbInitObjects(void)
    {
              InitSlotRobotCleaner();
              InitSlotRobotStarWars();
              InitSlotCrane();
              InitSlotCtrlPanelCrane();
              InitSlotMechwarrior();
              InitSlotMechwarriorLara();

              InitWildBoar();
    }

    Ok, now also the wildboar has a floorprocedure, our floorprocedure, but our long day is just started...

    We should also avoiding that wildboar vanishes after his dead, and it's not enough enabling the trng setting of CUST_KEEP_DEAD_ENEMIES, because we need, not only of his body but also of his alive body, since when a moveable dies, it will be untriggered and floorprocedure works only with triggered moveables.
    Pratically we should use another trick: freezing the wildboar when he is starting dying animation but before he died really and its "object" was removed from active object list.
    To realize this target we need of a CBT_FIRST ControlProcedure callback.

              GET_CALLBACK(enumCB.SLOT_COLLISION, enumCBT.AFTER, enumSLOT.PANEL_BORDER, cbProcCollisionSlot);

              // callbacks for walkable wildboar
              GET_CALLBACK(enumCB.SLOT_CONTROL, enumCBT.FIRST, enumSLOT.WILD_BOAR, cbProcControlSlot);

    With this callback we'll check for current wildboar animation and when he is going to die, we'll skip original ControlProcedure to avoid further progress of this critical animation.
    The dying animation is 5th animation and it has 30 frames. We, for safety, we'll stop it at 28th frame

    // function to handle controlObject callbacks
    int cbProcControlSlot(short IndexItem, StrItemTr4 *pItem, WORD CBT_Flags)
    {
              WORD SlotId;

              SlotId = pItem->SlotID;

              switch (SlotId) {
              case SLOT_WILD_BOAR:
                        // wildboard
                        if (CBT_Flags & enumCBT.FIRST) {
                                  // perform special target only if it is wildboar with OCB 64
                                  if (pItem->OcbCode & 0x40) {
                                            // ok, we are managing our special wildboar
                                            if (GetRelativeAnimation(pItem)== 5) {
                                                      // stop on 28th frame (last)
                                                      if (GetCurrentFrame(pItem) == 28) {
                                                                // skip original ControlObject to freeze wildboar
                                                                // and preserve opacity
                                                                pItem->Trasparency = 0;

                                                                return enumSRET.SKIP_ORIGINAL;
                                                      }
                                            }
                                  }
                        }
                        break;
              }
              return enumSRET.OK;
    }

              
    With above code we get to have wildboar yet present after his (almost) dying.
    Anyway, we have another problem to solve.
    The CollisionProcedure of wildboard, since he is yet alive, will keep away lara from wildboard, getting impossible move up his body.
    So we have to disable standard wildboar collision, when he reaches 5th animation (and it has been frozen by our hardcoded effect)
    So we'll require a callback for CollisionProc of wildboar:

              // callbacks for walkable wildboar
              GET_CALLBACK(enumCB.SLOT_CONTROL, enumCBT.FIRST, enumSLOT.WILD_BOAR, cbProcControlSlot);
              GET_CALLBACK(enumCB.SLOT_COLLISION, enumCBT.FIRST, enumSLOT.WILD_BOAR, cbProcCollisionSlot);

    We can use the cbProcCollisionSlot() function, already used for PANEL_BORDER.
    Now we add this code to handle the frozen wildboar, in cbProcCollisionSlot() function:

              case SLOT_WILD_BOAR:
                        // if it is ocb 64 wildboar, disable collsion when it has (dying) animation 5
                        if (CBT_Flags & enumCBT.FIRST) {
                                  if (pItem->OcbCode & 0x40) {
                                            // special wildboar
                                            if (GetRelativeAnimation(pItem)==5) return enumSRET.SKIP_ORIGINAL;
                                  }
                        }
                        break;
              }
              return enumSRET.OK;
    }


    Verify first release of walkable wildboar hardcoded effect


    The test has not gone so bad:
    A) Body of wildboar is yet visible after his (almost) dying
    B) Lara is able to move up wildboar...
    C) ... and to reach monkey ceiling

    But... looking the D picture, it's not so fine to see. There is a big visible gap, between lara's feet and wildboard.


    We could try to fix also this problem.


    Forcing new coordinates for wildboar
    An idea could be this: if we move up a bit the wildboar, when he dies, the visible gap between lara and the boar, will be littler. Pratically we could divide the gap in two stripes: one between wildboar and the floor, and other between lara and the wildboar. The hoping is that, in this way, these two little gaps will be less visible.
    First problem is WHEN will we move up the wildboar?
    Performing when he is yet alive and running, should be too weird: we'll see he run letting a gap between his legs and the floor.
    By ohter hand, also move suddenly the body up, only when he dies, it should be too evident.
    So a good idea could be to move up, slowly, his body, only when he is dying, while the 5th animation is in progress.
    To realize this target we should force a new Y coordinate for wildboar but this is not possible from a CBT_FIRST callback, since, then, the original ControlProcedure could set newly wildboard Y coordinate, using the floor height as value.
    So we should require a CBT_AFTER callback for control procedure of wildboar:

              // callbacks for walkable wildboar
              GET_CALLBACK(enumCB.SLOT_CONTROL, enumCBT.FIRST, enumSLOT.WILD_BOAR, cbProcControlSlot);
              GET_CALLBACK(enumCB.SLOT_COLLISION, enumCBT.FIRST, enumSLOT.WILD_BOAR, cbProcCollisionSlot);
              GET_CALLBACK(enumCB.SLOT_CONTROL, enumCBT.AFTER, enumSLOT.WILD_BOAR, cbProcControlSlot);          

    The we'll need of a global variable where store this new Y coordinate, since we cann't use the CordY field of wildboar, because original procedure will overwrite it.
    The we can use the frames of 5th animation to decrease value of our Y coordinate and then, in CBT_AFTER callback, force this value in CordY field of wildboar.
    At end our function to handle ControlObject callbacks, will be:

    // function to handle controlObject callbacks
    int ForceYWildBoar;
    int OriginalYWildBoar;
    int cbProcControlSlot(short IndexItem, StrItemTr4 *pItem, WORD CBT_Flags)
    {
              WORD SlotId;
              DWORD FrameNow;

              SlotId = pItem->SlotID;

              switch (SlotId) {
              case SLOT_WILD_BOAR:
                        // wildboard
                        if (CBT_Flags & enumCBT.AFTER) {
                                  // verify if we have to force new Y coordinate
                                  if (pItem->OcbCode & 0x40) {
                                            // special wildboar
                                            if (GetRelativeAnimation(pItem)==5) {
                                                      // yes: we force new y coordinate
                                                      pItem->CordY = ForceYWildBoar;

                                            }
                                  }
                                  break;
                        }
                        if (CBT_Flags & enumCBT.FIRST) {
                                  // perform special target only if it is wildboar with OCB 64
                                  if (pItem->OcbCode & 0x40) {
                                            // ok, we are managing our special wildboar
                                            if (GetRelativeAnimation(pItem)== 5) {
                                                      FrameNow= GetCurrentFrame(pItem);
                                                      if (FrameNow==0) {


                                                                // save start (original Y coordinate of wildboar)
                                                                ForceYWildBoar = pItem->CordY;
                                                                OriginalYWildBoar = pItem->CordY;
                                                      }
                                                      if (FrameNow==28) {
                                                                // stop on 28th frame (last)

                                                                // skip original ControlObject to freeze wildboar
                                                                // and preserve opacity
                                                                pItem->Trasparency = 0;

                                                                return enumSRET.SKIP_ORIGINAL;
                                                      }
                                                      // intermediate frames of 5th animation: move up wildboar
                                                      ForceYWildBoar -= 3;
                                                      // if we passed over original - 64, force to -64
                                                      if ((OriginalYWildBoar-ForceYWildBoar) > 64) {
                                                                ForceYWildBoar = OriginalYWildBoar-64;
                                                      }                    
                                            }
                                  }
                        }
                        break;
              }
              return enumSRET.OK;
    }

    There is another change we have to do: in our FloorProcedure for wildboar we had the code:

              // ok, now move the floor upper of one click (256 game units, upper in tomb4 3d world, means -256)
              *pNewY = pItem->CordY - 256;

    We have used, as new "fake" floor height, the current Y coordinate of wildboar ("CordY") adding a -256 (one click higher).
    It worked but now we moved up the wildboar of 64 game units and adding other -256 game units, it will move lara too much over the required height.
    So we have to change above code, to compute the "-256" not on CordY of wildboar (that has been changed by us) but on original floor height belove the wildboar.
    We find this value in "HeightFloor" field of StrItemTr4 structure.
    So the above code will become:

              // ok, now move the floor upper of one click (256 game units, upper in tomb4 3d world, means -256)
              *pNewY = pItem->HeightFloor - 256;


    Now we can try these changes in game.


    There is a little improvement.
    Now the wildboar is a bit higher than floor but at least, the gap between wildboar and lara is less clear.
    Probably we should have had to use a bigger animal, to realise this hardcoded effect, the sphink was perfect as size, but very hard to kill.
    Another weird idea may be this: don't apply the floor effect only on dead body, but when the animal is alive and running. Lara should try to jump over his back and then jump to grab the ceiling.
    If you wish try, rememebr to disable common collision of that animal and change all sides of code about final dying animation.


    Examples with Inventory callbacks

    In spite most of new skills will be created in game, it's interesting the chance to improve also the inventory management of tomb raider.
    Using inventory callbacks we can add new features to inventory or restyling it fully.
    Now we are going to show some example...

    Example: add Lara's home level in title menu screen

    Old tomb raider adventures had a Lara's home level (or a "training" level) selectable from inventory. It was a nice feature that disappeared in tomb 4, unfortunately.
    Anyway it's enough easy restore it.
    In this example we'll show how manage CB_TITLE_MENU_MANAGER callback to get this target. More, we'll introduce some graphic fucntions we can use in our inventory callbacks (and other sides, really).

    Important: To realise this example you need to copy the CUSTOM_SPRITE object, from plugins.wad to title.wad, and then build newly title.tr4.

    We'll use a sprite to give to the player the info about the key to use, to play Lara's home level.
    It was possible also using a common text printed on scren, of course, anyway it's interesting learning something about low level function to draw sprites.


    Requiring the CB_TITLE_MENU_MANAGER callback
    We create our function to handle the callback:

    // callback procedure to add "Lara's home" level in main title menu
    int cbProcTitleMenu(WORD PHASE_Type, DWORD * pInputFlags)
    {
              return 0;
    }

    Now, in RequireMyCallBacks() function, we require this callback:

              GET_CALLBACK(enumCB.TITLE_MENU_MANAGER, 0, 0, cbProcTitleMenu);


    Drawing a sprite in title menu
    We need to show the sprite only when main title menu is "on air", while we'll omit to show it, when title is showing other screen, like Load game, options ect.
    The code in our callback becomes this:

    // callback procedure to add "Lara's home" level in main title menu
    int cbProcTitleMenu(WORD PHASE_Type, DWORD * pInputFlags)
    {
              RECT MyRect;

              if (PHASE_Type == enumPHASE.TITLE_MENU) {
                        // draw sprite with Lara's home picture
                        // position in microunits
                        // 767, 698, 201, 249
                        MyRect.left = 767;
                        MyRect.top = 698;
                        MyRect.right = 201;
                        MyRect.bottom = 249;
                        ConvertMicroUnits(&MyRect);

                        DrawSprite2D(&MyRect, enumSLOT.CUSTOM_SPRITES, 3, 255, 0);
              }
              return 0;
    }

    Some description about above code:
    - We check for current phase, to show the sprite only in main title menu:

              if (PHASE_Type == enumPHASE.TITLE_MENU) {

    - We set origin and size of sprite in microunits to keep valid these settings with any kind of tomb raider resolution.
    To get those values we used the [Get Screen Frames] of [Tool] panel of NG_Center.
    We choose to place the image of Lara's home in right-bottom corner:


    - Then, since the DrawSprite2D() function works only on real pixel coordinates, we convert the microunits in pixels:

              ConvertMicroUnits(&MyRect);

    The ConvertMicroUnits() function, works reading current resolution of tomb raider screen and change the values in MyRect structure to give right coordinates and size.
    - Finally we call the DrawSprite2D() function, passing the RECT with origjn and size for the sprite, the Slot where the sprite is hosted and relative index (from 0) about the sprite to draw (index = 3).


    The DrawSprite2D() function
    Prototype:

    void DrawSprite2D(RECT *pRect, WORD Slot, int SpriteIndex, BYTE Opacity, COLORREF Color);

    Remember that this function works only when tomb raider is in drawing mode phase. All inventory callbacks are in that phase, so no problem this time. Anyway you can't using DrawSprite2D() from control or collision callbacks and neither from the code of common progressive action (you'll have to perform the code of these progressive actions inside of CB_PROGR_ACTION_DRAW_MINE callback function).
    Parameters:
    pRect: is a pointer to the RECT structure where you typed pixel values for origin (left, top) and width (right) and height (bottom) of the sprite on the screen. Note that the size (right, bottom) has nothing to do with real source size of the sprite.
    Slot: the (sprite) slot where take the sprite to draw
    SpriteIndex: the index, from 0, of sprite to draw, read from given Slot
    Opacity: a value between 0 (fully transparent) and 255 (fully opaque)
    Color: a further gradient color to add to the sprite. If you don't add any color, type 0 for this parameter


    Testing in game our Lara's home sprite
    Now we can build the plugin_trng.dll and copy to trle folder for first test.


    Ok, perhaps the sprite is not so fine and the position is not well thought, anyway it works.
    The image of Lara's home, with info about the key to hit, is visible only in Title menu, while it's missing in other title screens.
    Now we have to launch the Lara's home level when Player


    Starting a level from title manager callback
    Now we have to detect if player hits [space] and launch the Lara's home level.
    Usually this option will work when we have [PlayAnyLevel] disabled, of course and Lara's home level will be an unplugged level from level chain.
    Let's say that the Lara's home level, was the number 6 (really in our plugin demo it is the "Exercise 6: driving the crane").

    We can use the parameter "* pInputFlags" of our callback to detect the [space] command, then we'll have simply to return the value 6 to force the loading of that level.
    This is final code of our callback:

    // callback procedure to add "Lara's home" level in main title menu
    int cbProcTitleMenu(WORD PHASE_Type, DWORD * pInputFlags)
    {
              RECT MyRect;

              if (PHASE_Type == enumPHASE.TITLE_MENU) {
                        // draw sprite with Lara's home picture
                        // position in microunits
                        // 767, 698, 201, 249
                        MyRect.left = 767;
                        MyRect.top = 698;
                        MyRect.right = 201;
                        MyRect.bottom = 249;
                        ConvertMicroUnits(&MyRect);

                        DrawSprite2D(&MyRect, enumSLOT.CUSTOM_SPRITES, 3, 255, 0);

                        if (*pInputFlags & enumCMD.DRAW_WEAPON) {
                                  // draw_weapon is the space
                                  // we force the loading of level #6
                                  return 6;
                        }
              }
              return 0;
    }


    Example: how to select different Lara's outfits from Inventory

    In this example we'll show how to add new interactive items in Inventory mode, using only callbacks.
    Note: Since our main target is to show the code to realise this extra-item management, the swap mesh phase will be only symbolic. To avoid the long and annoying job to remap mesh vertices for a correct lara's skin swapping, we'll use only an easy swap mesh, with only lara's skin (no joints).

    Our target is to give to the player the chance to give to Lara different looks, choosing one of three outfits from inventory.
    There are different way to realise this target, we'll try two ways: with sprites and with meshes.


    Sprite to show in Inventory
    In CUSTOM_SPRITE we have three sprites showing different Lara's outfits:


    The three outfits are also present in plugin level, of course:
    ANIMATING6_MIP : Outfit by Horus Goddess (gray background in above image)
    ANIMATING7_MIP: Outfit by Po Yu (white background in above image)
    ANIMATING8_MIP: Outfit by Trangel (black background in above image)
    As said, it should be better having also slot for joints, screaming head, hairs ect, but now we wish show only how handle new interactive items in inventory.


    Our new interactive Item: Outfit selector
    We need to keep, in some our global variable, the infos about what is current Outfit of lara.
    Then we'll show in inventory the currently selected outfit, giving the chance to the player to change it, selecting another outfit.
    When inventory quiets, we'll check if the selected outfit, from inventory, is different than that was used at start of inventory. If it is, we'll perform a swap mesh to give to Lara the new chosen outfit.


    Global variable to save to savegame
    Since when player:

    When he will reload the savegame, Lara should have from start, the last outfit selected, we need to save in savegame the info about that outfit.
    So we'll declare a global variable "OutFitIndex" inside of structure with data to save/restore to/from savegame:

    typedef struct StrSavegameLocalData {
              // FOR_YOU:
              // define here your variables that you wish were saved (and then restored) to/from savegame in LOCAL section (one for each different level)
              // note: the size of this structure should be always even (if you add BYTE variable, compensate it with another BYTE vairable or placefolder)
              
              int FlareVSpeed;
              int OutfitIndex; // index: 0,1 or 2 of current outfit lara is dressing (level 11 only)
    }SavegameLocalDataFields;

    The we'll access to above variable in this way:

    MyData.Save.Local.OutFitIndex

    We chose the "local" section because it works only in 11th level, in spite there is the doubt that lara can go on, to following levels with same outfit. In that case it was better choose "Global" section, that work over all levels.
    Anyway we'll use a selectable outfit only for level 11, so let it as "local".
    Note: you find above structure definition in "structures_mine.h" source, of course.


    Initialise OutfitIndex global variable
    We should initialise OutfitIndex it to some value: when a level is going to be loaded (if it is "local"), or at start of tomb raider (when it is "global").
    In our case, we could initialise it in InitializeAll() function, at start of whole game:

              MechWarriorTestPosition.Dynamic=0;
              MechWarriorTestPosition.Flags = TPOS_TURN_FACING_180;

              MyData.Save.Local.OutfitIndex=0;
              return true;
    }

    Callbacks for Inventory main procedure
    We need to place some our code, when Inventory is going to be showed, and another code when Inventory quits.
    So we requeire two CB_INVENTORY_MAIN callbacks, one with CBT_FIRST and other with CBT_AFTER.
    So, in RequireMyCallbacks() function we add:

              // for Lara's outfit selector
              GET_CALLBACK(enumCB.INVENTORY_MAIN, enumCBT.FIRST, 0, cbProcMainInvent);
              GET_CALLBACK(enumCB.INVENTORY_MAIN, enumCBT.AFTER, 0, cbProcMainInvent);

    We set both to same cbProcMainInvent() function, of course, since they are of same kind.


    Code at start and end of Inventory phase

    int cbProcMainInvent(WORD CBT_Flags, bool TestLoadedGame, int SelectedItem)
    {
              bool TestRightLevel;

              // since our Outfit selector works only for level 11, we have to verify if we are in right level
              if (*Trng.pGlobTomb4->pAdr->pLevelNow == 11) {
                        TestRightLevel=true;
              }else {
                        TestRightLevel=false;
              }
              if (CBT_Flags & enumCBT.FIRST) {
                        // first of inventory we set current outfit in another, temporary variable, that we'll use
                        // to change the current outfit inside of inventory, everytime Player hits [Space]
                        if (TestRightLevel) {
                                  OutfitSelectedNow = MyData.Save.Local.OutfitIndex;
                                  TestDownSpace=false;
                        }
              }
              if (CBT_Flags & enumCBT.AFTER) {
                        // now inventory has been closed.
                        // We have to verify if outfit selected in inventory is different than that previous.
                        if (TestRightLevel == true && OutfitSelectedNow != MyData.Save.Local.OutfitIndex) {
                                  // it has been changed.

                                  // we store new outfit index:
                                  MyData.Save.Local.OutfitIndex = OutfitSelectedNow;
                                  // now we should perform the swap mesh.
                                  // anyway, if player selected a new savegame (loading game) there is no time (or useness)
                                  // to perform the swap mesh.
                                  // so we'll perform the change of outfit only if there is no loading savegame that is coming:
                                  if (TestLoadedGame == false) {
                                            // now we copy mesh from new outfit to Lara
                                            // using Flipeffect 105
                                            // ; Exporting: TRIGGER(66:0) for FLIPEFFECT(105) {Tomb_NextGeneration}
                                            // ; <#> : Lara. (Mesh) Copy meshes from <&>slot to Lara meshes in (E)way
                                            // ; <&> : SLOT 438 ANIMATING6_MIP
                                            // ; (E) : Lara Skin (standard)
                                            PerformFlipeffect(NULL, 105, 66 + OutfitSelectedNow, 0);
                                  }
                        }
              }

              return enumIRET.OK;
    }

    Above code is already richly commented, anyway a litle description it's necessary for the usage of flipeffect 105:

                                            // using Flipeffect 105
                                            // ; Exporting: TRIGGER(66:0) for FLIPEFFECT(105) {Tomb_NextGeneration}
                                            // ; <#> : Lara. (Mesh) Copy meshes from <&>slot to Lara meshes in (E)way
                                            // ; <&> : SLOT 438 ANIMATING6_MIP
                                            // ; (E) : Lara Skin (standard)
                                            PerformFlipeffect(NULL, 105, 66 + OutfitSelectedNow, 0);

    We get the parameter to use with [Export Function] button of Set Trigger Type window:


    We get the text:

    ; Set Trigger Type - FLIPEFFECT 105
    ; Exporting: TRIGGER(66:0) for FLIPEFFECT(105) {Tomb_NextGeneration}
    ; <#> : Lara. (Mesh) Copy meshes from <&>slot to Lara meshes in (E)way
    ; <&> : SLOT 438 ANIMATING6_MIP
    ; (E) : Lara Skin (standard)

    PerformFlipeffect(NULL, 105, 66, 0);

    But, since we don't mean use this flipeffect only for ANIMATING6_MIP, but also for other slots, we have to understand what input parameter we should change to use it with other slots.
    The problem is that in exported function:

    PerformFlipeffect(NULL, 105, 66, 0);

    We don't see the "438" slot of ANIMATING6_MIP...
    The mistery is given by fact that, since there are too many slot to be hosted in trigger type data, NGLE used a preset list of slots where it will be possible performing mesh swapping and the "66" value, you see in exported function, is the relative index in this preset list of slot.
    To understand better, we have to click on that little [P] button at right of "SLOT 438 ANIMATING6_MIP" combo box and we'll get following list:

    #ID DESCRIPTION
    --------------------------------------------------------------------------------
    0: SLOT 36 SKELETON_MIP
    1: SLOT 38 GUIDE_MIP
    2: SLOT 40 VON_CROY_MIP
    3: SLOT 42 BADDY_1_MIP
    4: SLOT 44 BADDY_2_MIP
    5: SLOT 46 SETHA_MIP
    6: SLOT 48 MUMMY_MIP
    7: SLOT 50 SPHINX_MIP
    8: SLOT 52 CROCODILE_MIP
    9: SLOT 54 HORSEMAN_MIP
    10: SLOT 56 SCORPION_MIP
    11: SLOT 58 JEAN_YVES_MIP
    12: SLOT 60 TROOPS_MIP
    13: SLOT 62 KNIGHTS_TEMPLAR_MIP
    14: SLOT 64 MUTANT_MIP
    15: SLOT 66 HORSE_MIP
    16: SLOT 68 BABOON_NORMAL_MIP
    17: SLOT 70 BABOON_INV_MIP
    18: SLOT 72 BABOON_SILENT_MIP
    19: SLOT 74 WILD_BOAR_MIP
    20: SLOT 76 HARPY_MIP
    21: SLOT 78 DEMIGOD1_MIP
    22: SLOT 80 DEMIGOD2_MIP
    23: SLOT 82 DEMIGOD3_MIP
    24: SLOT 83 LITTLE_BEETLE
    25: SLOT 85 BIG_BEETLE_MIP
    26: SLOT 92 DOG_MIP
    27: SLOT 94 HAMMERHEAD_MIP
    28: SLOT 96 SAS_MIP
    29: SLOT 98 SAS_DYING_MIP
    30: SLOT 100 SAS_CAPTAIN_MIP
    31: SLOT 103 AHMET_MIP
    32: SLOT 105 LARA_DOUBLE_MIP
    33: SLOT 108 GAME_PIECE1
    34: SLOT 109 GAME_PIECE2
    35: SLOT 110 GAME_PIECE3
    36: SLOT 111 ENEMY_PIECE
    37: SLOT 112 WHEEL_OF_FORTUNE
    38: SLOT 296 WATERSKIN1_EMPTY
    39: SLOT 297 WATERSKIN1_1
    40: SLOT 298 WATERSKIN1_2
    41: SLOT 299 WATERSKIN1_3
    42: SLOT 300 WATERSKIN2_EMPTY
    43: SLOT 301 WATERSKIN2_1
    44: SLOT 302 WATERSKIN2_2
    45: SLOT 303 WATERSKIN2_3
    46: SLOT 304 WATERSKIN2_4
    47: SLOT 305 WATERSKIN2_5
    48: SLOT 409 SMASH_OBJECT1
    49: SLOT 410 SMASH_OBJECT2
    50: SLOT 411 SMASH_OBJECT3
    51: SLOT 412 SMASH_OBJECT4
    52: SLOT 413 SMASH_OBJECT5
    53: SLOT 414 SMASH_OBJECT6
    54: SLOT 415 SMASH_OBJECT7
    55: SLOT 416 SMASH_OBJECT8
    56: SLOT 417 MESHSWAP1
    57: SLOT 418 MESHSWAP2
    58: SLOT 419 MESHSWAP3
    59: SLOT 420 DEATH_SLIDE
    60: SLOT 421 BODY_PART
    61: SLOT 428 ANIMATING1_MIP
    62: SLOT 430 ANIMATING2_MIP
    63: SLOT 432 ANIMATING3_MIP
    64: SLOT 434 ANIMATING4_MIP
    65: SLOT 436 ANIMATING5_MIP
    66: SLOT 438 ANIMATING6_MIP
    67: SLOT 440 ANIMATING7_MIP
    68: SLOT 442 ANIMATING8_MIP
    69: SLOT 444 ANIMATING9_MIP
    70: SLOT 446 ANIMATING10_MIP
    71: SLOT 448 ANIMATING11_MIP
    72: SLOT 450 ANIMATING12_MIP
    73: SLOT 452 ANIMATING13_MIP
    74: SLOT 454 ANIMATING14_MIP
    75: SLOT 456 ANIMATING15_MIP
    76: SLOT 458 ANIMATING16_MIP
    --------------------------------------------------------------------------------
    Total Items = 77

    Above is the preset list, and 66 index is own that of ANIMATING6_MIP, while following are those we need to reach other slots:

    66: SLOT 438 ANIMATING6_MIP
    67: SLOT 440 ANIMATING7_MIP
    68: SLOT 442 ANIMATING8_MIP

    Since we placed the lara's outfit, own in:

    ANIMATING6_MIP
    ANIMATING7_MIP
    ANIMATING8_MIP

    To reach right slot, just only add 0, 1 or 2 to first 66 index of slot.
    For this reason we typed this code:

              PerformFlipeffect(NULL, 105, 66 + OutfitSelectedNow, 0);


    Code for inventory draw phase
    That above was the code to perform FIRST (to initialise our variables) and AFTER (to perform the swap mesh) inventory quits, but now we have to write the code to change the sprite to show in inventory in according with [Space] command.
    For this target the better solution is a CB_INVENT_BACKGROUND_DRAW callback, since it will be performed continuosly until inventory is running, and we'll be able to perform draw operation inside of it.
    So we require this callback:

              GET_CALLBACK(enumCB.INVENT_BACKGROUND_DRAW, CBT_AFTER,0, cbProcInventBack);

    And then we type the function to handle it.
    In this code we'll check for [Space] input command and then we'll show one of three sprite, in according with temporary variable OutfitSelectedNow:

    // two temporary variables used for Lara's outfit selector, effect
    int OutfitSelectedNow;
    bool TestDownSpace;
    // callback to handle CB_INVENT_BACKGROUND_DRAW callback
    int cbProcInventBack(WORD CB_Type, WORD CBT_Flags, WORD PHASE_Type)
    {
              RECT MyRect;

              switch (CB_Type) {
              case CB_INVENT_BACKGROUND_DRAW:
                        if (PHASE_Type == enumPHASE.INVENTORY_MAIN) {
                                  // for experiemnt, we enable this feature only in a given level: the 11th level
                                  if (*Trng.pGlobTomb4->pAdr->pLevelNow == 11) {
                                            Get(enumGET.INPUT,0,0);
                                            // now we verify if player hit [Space] to change selected outfit
                                            if (TestDownSpace==true) {
                                                      // we had already checked for [Space] and it was continuosly down.
                                                      // now we check only to verify if it has been released
                                                      // note: 57 is the scan code for SPACE

                                                      if (GET.Input.VetScanCode[57] == 0) {
                                                                // finally SPACE has been released
                                                                TestDownSpace=false;
                                                      }
                                            }else {
                                                      // SPACE was NOT down. Now we check if it has been just hit:
                                                      if (GET.Input.VetScanCode[57] > 0) {
                                                                // yes:
                                                                TestDownSpace=true;
                                                                // change current index for outfit
                                                                OutfitSelectedNow++;
                                                                // if number over 2, we'll set it to 0 (circular changing)
                                                                if (OutfitSelectedNow > 2) OutfitSelectedNow=0;
                                                                // sound MENU_SELECT when outfit changes
                                                                SoundEffect(109, NULL, 0);
                                                      }
                                            }
                                            // 690, 317, 268, 344
                                            MyRect.left = 690;
                                            MyRect.top = 317;
                                            MyRect.right = 268;
                                            MyRect.bottom = 344;

                                            ConvertMicroUnits(&MyRect);
                                            DrawSprite2D(&MyRect, enumSLOT.CUSTOM_SPRITES, OutfitSelectedNow , 255,0);
                                  }
                        }
              }
              return enumSRET.OK;
    }

    Some note about above code:
    - We used the "TestSpaceDown" variable to avoid a problem in input management.
    Since our callback will be performed continuosly (until inventory is "on air") also our check on [Space] ley will be performed 30 times for second.
    If we don't use the trick of TestSpaceDown, the result should be that our sprite image will change continuolsy, while player is keeping down the [Space] command.
    This happens because the low-level input works only in repeat-mode, but we need to have a on/off (or flip/flop) method to use: when player press [Space] we detect this input but then, until he goes on to keep down the space command, we should ignore it, until he releases newly the key.
    This is that we got with TestSpaceDown variable.

    - We chose to get enabled this effect only for level 11, so in our procedure we check if level is == 11, to perform our code.


    Trying our Lara's outfit selector in game
    If now we build the plugin and try it, we see that our selector works, in spite the mesh swap is very poor, since we skipped joints swap, to get easier our job.
    I apologize with creators of those outfits for this my shameless job.


    Using DrawObject2D() function in inventory
    We could try to change a bit our Outfit selector, using real mesh of outfit, rather the sprite image.
    We need to change only few rows for this experiment.
    Just we change the code where we drew the sprite:

                                            // 690, 317, 268, 344
                                            MyRect.left = 690;
                                            MyRect.top = 317;
                                            MyRect.right = 268;
                                            MyRect.bottom = 344;

                                            ConvertMicroUnits(&MyRect);
                                            DrawSprite2D(&MyRect, enumSLOT.CUSTOM_SPRITES, OutfitSelectedNow , 255,0);

    With this new code:


                                            // we try to use drawing of real outfit slot as selector:
                                            MyRect.left = 800;
                                            MyRect.top = 700;
                                            ConvertMicroUnits(&MyRect);
                                            DrawObject2D(enumSLOT.ANIMATING6_MIP + OutfitSelectedNow*2,
                                                                                    MyRect.left, MyRect.top, 0,0,0, 1700);

    Trying in game effect is not so fine: lara is showing only her back (not so bad, ok, but her face?!)
    The advantage to use 3d object is that we can to do rotate it, so we could improve our selector, rotating continuosly the current outfit.
    To realise this change we need of another variable to host the facing:

    // some temporary variables used for Lara's outfit selector, effect
    int OutfitSelectedNow;
    bool TestDownSpace;
    WORD FacingRotate;
    // callback to handle CB_INVENT_BACKGROUND_DRAW callback
    int cbProcInventBack(WORD CB_Type, WORD CBT_Flags, WORD PHASE_Type)

    We'll intialise to 0 the FacingRotate variable, in CBT_FIRST callback of inventory:

              if          (CBT_Flags & enumCBT.FIRST) {
                        // first of inventory we set current outfit in another, temporary variable, that we'll use
                        // to change the current outfit inside of inventory, everytime Player hits [Space]
                        if (TestRightLevel) {
                                  OutfitSelectedNow = MyData.Save.Local.OutfitIndex;
                                  TestDownSpace=false;
                                  FacingRotate=0;
                        }
              }

    And then we'll change its value in cbProcInventBack() function:

                                            // we try to use drawing of real outfit slot as selector:
                                            MyRect.left = 800;
                                            MyRect.top = 700;
                                            ConvertMicroUnits(&MyRect);
                                            DrawObject2D(enumSLOT.ANIMATING6_MIP + OutfitSelectedNow*2,
                                                                                    MyRect.left, MyRect.top, FacingRotate,0,0, 1700);
                                            FacingRotate += 256;

    We give the FacingRotate as OrientX parameter of DrawObject2D() function and then we change its value for next execution:

                                            FacingRotate += 256;

    Watching in game the effect is not so bad now, anyway it's missing the info about key to hit to change outfit.
    To fix this problem we have to print a text in inventory, belove our outfit object.


    PrintText() fucntion
    We can use PrintText() function to show the text "SPACE TO CHANGE", belove the oufit in inventory.
    This function works at very low level, it prints the text for that frame, i.e. you have not to set a durate time, but only continuing to print that text until you wish it was present on the screen.
    The text is not (necessarily) a string from script.dat, you have to supply the text as argument and in some circustance this is nice chance, to avoid to have always the right string in english.dat file.
    You can use this function only when drawing operations are in progress, like it happens in CB_INVENT_BACKGROUND_DRAW callback, fortunately.
    So we'll add a call to PrintText to show the info "SPACE TO CHANGE"

                                            DrawObject2D(enumSLOT.ANIMATING6_MIP + OutfitSelectedNow*2,
                                                                                    MyRect.left, MyRect.top, FacingRotate,0,0, 1700);
                                            FacingRotate += 256;
                                            // print text "SPACE TO CHANGE"
                                            MyRect.left= 700;
                                            MyRect.top = 750;
                                            ConvertMicroUnits(&MyRect);
                                            PrintText(MyRect.left, MyRect.top, "SPACE TO CHANGE",
                                                                          enumFT.SIZE_ATOMIC_CHAR, enumFC.GOLD, enumFTS.ALIGN_LEFT | enumFTS.BLINK);


    Now we try in game last changes...


    Examples about Images and other Device Context operations

    In above chapters we saw that we can to draw sprites or meshes and print standard tomb4 texts on screen.
    There is another way to draw on screen that we've not yet described: using an handle of Device Context of tomb raider screen (hDC) and, whereby this hDC, using common GDI (Graphics Device Interface) and raster functions, supplied by Windows APIs (Application Program Interface).
    The advantage to use this method is that these graphics API fucntions are well-known by programmers (better, usually than directx functions) and, about 2D graphic, easier to be used.
    Anyway it's important remembering that there is also an important disvantage using raster API functions: they are very slower than directx code.
    This leak of performance discourage to use them too often, anyway there are special situation where we can don't worry about performance and, for this reason, using them in intensive way.
    We need to keep a good grade of performance when our code is linked in the drawing directx loop, handled by tombraider engine. In this case our code could occur a slowdown with loosing of right frame-rate (FPS) and this is no good to see in game: flickering or frozen screens are two possible results of this problem.
    However, when we handle fully ourself the whole drawing cycle, ignoring and therefor freezing tomb4 engine, we have no ever hurry. In this situation we'll replace, temporarily, the directx engine of tomb4, with our windows api based little program to interact with the player.
    Now we'll create a specific example of this situation, taking also the chance to describe better the functions about images and how to catch hDC of tomb raider and how to handle it correctly.


    Our project: a Control Panel to handle in game

    Our idea is this: Lara finds a computer and enable it. The PC requires login data to access.

    In the storyboard we suppose to have to do a long job to discover the username and password to use for the login.
    Once lara discovered these data, she will be able to enter in control panel mode of the pc and she will be able to use the pc to discover other informations or to change something in game: opening doors, disable alarms, flood swimming pool ect.
    Now we'll do only a basic example, to explain how to handle this "control panel" effect in our code.


    Note: check to have the "@image1.bmp" in "pix" folder of trle.


    Triggers to engage the Control Panel mode

    To pass the control to our plugin code we need of some hook. In this case we'll not use callbacks (in spite it should be possible) but a simple trigger for this hardcoded effect.
    We go to edit the "Plugin_trng.trg" file (that in trle folder), adding a flipeffect to show our control panel:

    ;------------------ Section for flipeffect trigger: description of the trigger -------------------------------
    <START_TRIGGERWHAT_9_O_H>
    800:Experiments. Perform <&>experiment passing to it the (E)Value
    801:HardCoded. Perform <&>hardcoded effect
    <END>

    ;type here the sections for arguments used by above flipeffects
    <START_EFFECT_800_T_H>
    1: Move the cube
    <END>

    <START_EFFECT_800_E_H>
    #REPEAT#Value=#0#127
    <END>

    <START_EFFECT_801_T_H>
    1: Show Control Panel of PC in room 49
    <END>

    We added the flipeffect 801 for hardcoded effects. Currently there is only one hardcoded effect: "1: Show Control Panel of PC in room 49"
    When lara enable this trigger we'll show our control panel but ... there is another problem to solve: it's not realistic showing the panel of pc only because lara si over the sector where is the PC object. It should be better if Lara was in front of pc and player select ACTION command.
    So we create another trigger but this time a conditional trigger:

    ;------------------- Section for Condition triggers: descrption of the trigger -------------------------------------
    <START_TRIGGERTYPE_12_T_H>
    1: Lara is correctly aligned with <#>PC animating while hit ACTION command
    <END>

    ;type here the sections for arguments of above conditional triggers
    <START_CONDITION_1_O_H>
    #MOVEABLES#
    <END>

    This is an hardcoded way to avoid all complications about alingment with moveable. Since ours is an hardcoded effect, we can work on given position of pc and lara, knowing in advance the facing of PC animating.
    Theoratically we could anyway use newly this condition trigger but only if PC animating has same facing.


    Remembering the Z, X axis orienting in ngle, we can type a little code to give the condition true when lara is (about) in front of pc with a reasonable distance.


    Code for our Condition Trigger
    We'll type, in cbConditionMine() function, the following code:

    int cbConditionMine(WORD ConditionIndex, int ItemIndex, WORD Extra, WORD ActivationMode)
    {
              int RetValue;
              int DifValue;
              
              RetValue=CTRET_ONLY_ONCE_ON_TRUE;

              switch (ConditionIndex){
                        // type here the code for your condition trigger, inserting the code in the section
                        // beginning with "case NumberOfCondition:" and ending with row "break;"
              case 1:
                        // 1: Lara is correctly aligned with <#>PC animating while hit ACTION command
                        // update retvalue with info about that the conditon is working on a movebale and to
                        // perform conditon always until lara is over this sector
                        RetValue = enumCTRET.ON_MOVEABLE | enumCTRET.PERFORM_ALWAYS;

                        Get(enumGET.LARA,0,0);
                        // lara has to be still and in stand up position
                        if (GET.pLara->StateIdCurrent != 2) break;
                        // we need of ACTION key
                        Get(enumGET.INPUT,0,0);
                        if ((GET.Input.GameCommandsRead & enumCMD.ACTION) ==0) break;
                        // lara needs of free hands
                        Get(enumGET.INFO_LARA,0,0);
                        if (GET.LaraInfo.TestFreeHands == false) break;

                        // lara facing has to be about the same of PC animating
                        Get(enumGET.ITEM, ItemIndex, 0);
                        DifValue = GET.pLara->OrientationH - GET.pItem->OrientationH;
                        if (abs(DifValue) > 1024) break;

                        // distance between (x,z) coordinate of lara and (x,z) coordinate of PC should be little
                        // (note: the pivot of PC Animating is at center of sector)

                        // note: we change a bit the Z coordinate of PC item, because PC is only on left side and
                        // and we want an alignment with PC zone and not Joystick zone (the "-100" is for this reason)
                        if (GetDistanceXZ(GET.pItem->CordX, GET.pItem->CordZ-100, GET.pLara->CordX, GET.pLara->CordZ) > 128) break;
                        // all conditions are true!
                        RetValue |= enumCTRET.IS_TRUE;

                        break;
              default:
                        SendToLog("WARNING: condition trigger number %d has not been handled in cbConditionMine() function", ConditionIndex);
                        break;
              }
              return RetValue;
              
    }


    Code for 801 flipeffect trigger
    We'll place in same sector of PC animating, the condition trigger above, and the flipeffect 801 to perform hardcoded effect 1.


    Now we start to type a little code only to verify that our pair of condition trigger / flipeffect trigger worked.
    So we type in cbFlipEffectMine() function this code for flipeffect 801:

              case 801:
                        // 801:HardCoded. Perform <&>hardcoded effect
                        // analyse type of hardcoded effect
                        switch (Timer) {
                        case 1:
                                  // 1: Show Control Panel of PC in room 49
                                  SendToLog("Perform Control Panel");
                                  break;
                        }
                        break;

    Now we can build the project and launch tomb4 and also tomb4_log.exe to verify if the "Perform Control Panel" text, it will be showed when Lara is aligned with pc and we hit ACTION (ctrl) key.

    Once we verified it works, we have to replace the:

                                  SendToLog("Perform Control Panel");

    row with one to call our new function to manage all control panel process:

                                  PerformControlPanelPc(49);

    We named "PerformControlPanelPc()" the function to manage control panel and we passed the room where is the pc in the case we wished use newly this function for other PC animating in the level.
    Really we will not use this chance, anyway when you create a large code is always better keeping open the door for further new usages in other situations.


    The PerformControlPanelPc() function
    We'll type this function over where it has been called, so over the cbFlipEffectMine() function:

    // function to handle PC animating in given RoomOfPC
    void PerformControlPanelPc(int RoomOfPC)
    {

    }

    Before starting to type the code we should have an idea about the working mode of this function.
    Our code will perform following operations:
    1. Catch the hDC tomb and create a temporary (memory) Device Context where creating the screen to show in a second moment
    2. Load in our TempHdc a background image (@image1.bmp) showing a PC monitor
    3. We'll have to draw over the background the following text:
      User.....:
      Password.:
    4. Require input for "user" field using the ReadInputBox() function. We'll set the position for this input at right of "User.....:" text
    5. If player gives the right input we'll reqire input at right of "Password.:" text
    6. If also password is correct, we'll go to show another "page", i.e. a different text, that will give the chance to operate changes in the level.
    7. While login input is not yet completed the code will move the contents of TempHdc in writable tomb raider hdc
    8. And then the execution will come back to point 2

    Truley this function could seem a bit complicated for beginners anyway that's here some other suggestion:
    1. Since in same function we'll have to manage different phases, i.e. when we are waiting for user name, then for password, then for control panel commands, we need to use a variable to keep what is current phase. We'll use the StepNow variable for this, setting some NOW_... constants in "constants_mine.h" source:
      #define NOW_LOGIN_USER 1 // waiting for user name
      #define NOW_LOGIN_PASSWORD 2 // waiting for password
      #define NOW_WAIT_COMMAND 3 // waiting for command while we are in menu control panel
    2. To draw the background image and the text we'll use many hDC windows functions like these:
      BitBlt() : copy a rectangle (or whole image) from a Device Context (hDC) to another
      DrawText(): write a text in given hDC, inside given rectangle
      SetBkMode(): set in a given hDC if to use transparent background for text or an opaque (and colored) background
      SelectObject(): this window function set in given hDC some object (data) to use for drawing operation, like the text Font to use.
      SetTextColor(): set the color for text
    3. For get good performances we'll use an hidden and faster Device Context (it is like a screen or a bitmap where we can draw or load images) and only when all it has been completed, we'll copy this raw copy to main visible tomb raider screen
    4. Since the operation to load image from disk could slow down the showing of our control panel, we'll load in advance the background image, when the level is loading and lost times are less visible, and then we'll use this preloaded image.
    5. In spite we'll use mainly API windows functions, working on Device Context, we have anyway need to handle the directx engine: initialise poly list, copy it and then (after our graphic operations) go to air, closing the current frame to draw, using DumpScreen() function


    AllocateImage() and FreeImage() functions

    Since loading from disk an image is a slow operation, it's always better loading (or allocating) it in memory in advance, when all level stuff (sound, objects ect) are loading, since in that case there is already a well-known slow down.
    To load an image in memory we'll use the function: AllocateImage():

    bool AllocateImage(int NImage, StrRecordImage *pRecord, int ForceSizeX, int ForceSizeY)

    Input parameteres:

    NImage: Number of image. This is the digit at right of image name and not the ImageId of "Image=" script command. For instance if you type "4" as NImage, this means you are going to allocate "trle\pix\image4.bmp".
    Note: if you type "-1" as NImage, you should supply valid values for ForceSizeX ForceSizeY parameters, and this function will create an (empty) bitmap and memory device context with given size.

    pRecord: the pointer of a StrRecordImage structure. In this structure will be allocated the bitmap, the memory device context and the infos about the size of the image.

    ForceSizeX , ForceSizeY: if you set at -1 these two parameters, the AllocateImage() function will create a device context with same size of image that it's going to load, while, when you set valid value for ForceSizeX, ForceSizeY the bitmap and device context will be resized with these given values.

    Now we allocate the image1.bmp at start of level 12 (that of PC animating).
    As first step we have to declare our structure. We could type this decalration everywhere outside function, anyway to have always easily reachable (its name) we'll declare it inside of our StrMyData structure:

    typedef struct StrMyData {
              StrSavegameData Save; // variable that it will be saved and restored to/from savegame
              int TotProgrActions;
              int LastProgrActionIndex; // used in case of overloading
              int FlareVSpeed;
              StrRecordImage ImagePC; // structure to host loaded image for PC background in Level 12
              StrProgressiveAction VetProgrActions[MAX_MYPROGR_ACTIONS];
              StrBaseGenericCustomize BaseCustomizeMine; // stored all your customize script commands for current level
              StrBaseGenericParameters BaseParametersMine; // store of all your parameters= script commands of current level
              StrBaseAssignSlotMine BaseAssignSlotMine; // stored all AssignSlot= command script commands of current level
    }MyDataFields;

    Now we can access to this structure with MyData.ImagePC
    So, in cbInitLoadNewLevel() function we add a call for AllocateImage:

              // free resources allocate in previous level
              FreeLevelResources();

              // load images used in current level
              Get(enumGET.GAME_INFO,0,0);
              if (GET.GameInfo.LevelIndex == 12) {
                        // load image to PC animating
                        // force its size to same of tomb raider screen
                        AllocateImage( 1, &MyData.ImagePC, GET.GameInfo.ScreenSizeX , GET.GameInfo.ScreenSizeY );
              }

    Please, don't put the mistake to allocate image (or other stuff) previously of FreeLevelResources() call, otherwise you could allocate an image and, immediately, you'll free it.

    It's better type now the code to free the image, to do not forget.
    So in FreeLevelResources() function we'll type the call for FreeImage():

              // free further yet allocated images
              if (MyData.ImagePC.TestUsata == true) FreeImage(&MyData.ImagePC);

    }

    In this case we have not checked for current level but we used the trick to verify if the data in ImagePC has been allocated (TestUsata==true)


    The ReadInputBox() function

    Prototype:

    int ReadInputBox(HDC hDC, RECT *pRect, char Buffer[], DWORD MaxChars, WORD RIB_Flags, int SfxSound)

    The target of this function is to read keyboard and print corresponding keys on screen.
    Really it will draw them only to hDC (handle of Device Context), in pRect position.
    You can customize it supplying one or more RIB_ flag
    Input parameters:
    hDC : handle of device context where printing the text
    Buffer[] : character buffer where store typed text
    MaxChars : max number of character that user can type
    RIB_Flags : enumRIB_ flags to set preferences for input box
    SfxSound: number of sound effect to play for each key hit (if enabled in RIB_Flags)
    returned values:
    0 = go on, waiting input
    1 = completed with ENTER
    -1 = completed with ESCAPE
    Set Trng Variables:
              On Escape (return -1) set LastInputText ="" (empty string)
                        if enumRIB.ONLY_DIGITS set LastInputNumber = -1
              On Enter (return +1) Set LastInputText with typed string
                        if enumRIB.ONLY_DIGITS set LastInputNumber with the value corresponding with typed digit text
              note: If when user chooses ENTER the buffer was empyt, LastInputNumber will be "-1" and LastInputText = "", like it was an Escape quitting
    note: Before calling this function you should have alrady set font and colors in hDC
    and update direct input (when it's necessary)
    You should also intialise the buffer to "" (Buffer[0]=0), outside and before of waiting input loop


    The Final PerformControlPanelPc() function

    Now we see the whole code to handle our control panel.


    void PerformControlPanelPc(int RoomOfPC)
    {
              StrShowImage *pBase;
              HDC OutHdc; // to have shortly the handle of device context where build temporary image
              int StepNow; // we'll use NOW_... constant to remember current step phase
              bool TestRefresh;
              int RetInputBox; // value returned by InputBox function
              StrWindowsFont MyFont;
              static char TextLogin[] = "Username:\r\nPassword:";
              static char TextCommandMenu[] = "A) Open the door\r\nB) Flood the Room\r\nC) Kill Me, please";
              RECT MyRect;
              char BufferInput[60];

              // suspend audio track currently in progress
              SuspendAudioTrack(-1,false);

              // set pointer for BaseImages (used for hDC operations with tomb raider screen)
              pBase = &Trng.pGlobTomb4->BaseImages;
              pBase->TestWideScreen =false; // correction for wide screen

              // create a cloned device context of tomb raider screen in pBase->Temp.MemHdc (it contains same image of tomb
              // raider screen)
              
              if (AllocateTombHdc(pBase, true,false) == false) {
                        // if error, failed and quiting
                        return;
              }

              // now that we got a clone device context of TR, we can release hdctomb but preserving the
              // Temp.MemHdc just created
              FreeTombHdc(pBase, true);
              // copy the handle to have faster access in the code ("OutHdc" rather "pBase->Temp.MemHdc")
              OutHdc = pBase->Temp.MemHdc;

              // now we have:
              // in MyData.ImagePC the image of PC background (from image1.bmp)
              // in pBase->Temp.MemHdc a clone device context where to draw our image

              // initialise data:

              StepNow=NOW_LOGIN_USER;
              TestRefresh=true; // we'll need to show our first frame
              RetInputBox=0;
              BufferInput[0]=0;
              // create font

              memset(&MyFont, 0, sizeof(StrWindowsFont));
              strcpy(MyFont.NomeFont, "Courier New");
              MyFont.FlagsWFF = WFF_ULTRA_BOLD;
              MyFont.SizeFont = 30;
              
              CreateWindowsFont(&MyFont, false);

              // select font in pBase->Temp hdc
              MyFont.hFontOld = (HFONT) SelectObject(OutHdc, MyFont.hFont);
              MyFont.HdcConFont = OutHdc;

              // set color for text (green)
              SetTextColor(OutHdc, RGB(138,248, 159));
              // set trasparent background for text
              SetBkMode(OutHdc, TRANSPARENT);


              // starting the loop
              while (RetInputBox ==0) {
                        // read directx input
                        ReadDxInput();
                        // start to build image
                        // 1) Copy PC background to Temp.MemHdc
                        BitBlt(OutHdc, 0,0,pBase->Temp.SizeX, pBase->Temp.SizeY ,
                                                      MyData.ImagePC.MemHdc, 0,0, SRCCOPY);

                        // 2) Type text for current step
                        switch (StepNow) {
                                  case NOW_LOGIN_USER:
                                  case NOW_LOGIN_PASSWORD:
                                            // while we are waiting for User or Password we have to draw the text "Username:\r\nPassword: :"
                                            // rectangle to host User: Password:
                                            // 514, 350, 332, 105
                                            MyRect.left = 514;
                                            MyRect.top = 350;
                                            MyRect.right = MyRect.left +332;
                                            MyRect.bottom = MyRect.top +105;
                                            ConvertMicroUnits(&MyRect);

                                            DrawText(OutHdc, TextLogin, sizeof(TextLogin)-1, &MyRect, DT_LEFT);
                                            break;
                                  case NOW_WAIT_COMMAND:
                                            // 486, 283, 382, 322
                                            MyRect.left = 486;
                                            MyRect.top = 283;
                                            MyRect.right = MyRect.left +382;
                                            MyRect.bottom = MyRect.top +322;
                                            ConvertMicroUnits(&MyRect);
                                            
                                            DrawText(OutHdc, TextCommandMenu, sizeof(TextCommandMenu)-1, &MyRect, DT_LEFT);
                                            break;

                        }

                        // input text in according with current step
                        switch (StepNow) {
                                  case NOW_LOGIN_USER:
                                            // compute rectangle at right of "User.....:" text
                                            MyRect.left = 514+140;
                                            MyRect.top = 350;
                                            MyRect.right = MyRect.left + 300;
                                            MyRect.bottom = MyRect.top + 40;
                                            ConvertMicroUnits(&MyRect);
                                            RetInputBox = ReadInputBox(OutHdc, &MyRect, BufferInput, 10,
                                                                                    enumRIB.BLINK_CARET | enumRIB.ONLY_CAPS | enumRIB.SOUND_ON_KEY , 109);
                                            // verify if escape or enter
                                            if (RetInputBox == 1) {
                                                      // user completed to type username: check if it's right "CURTIS"
                                                      if (strcmpi(BufferInput, "CURTIS") == 0) {
                                                                // it's right. Now we can step to next phase
                                                                StepNow=NOW_LOGIN_PASSWORD;
                                                                // reset return value to continue control panel management
                                                                RetInputBox=0;
                                                                BufferInput[0]=0; // clear input buffer, for next phase
                                                      }
                                            }

                                            // note: if RetValue == -1 (escape) or RetValue==1 but with wrong name
                                            // at next cycle of while() this procedure will quit
                                            break;
                                  case NOW_LOGIN_PASSWORD:
                                            // here we ask for password, anyway we wish that the previous typed text (for username)
                                            // was yet visible, therefore we call ReadInputBox() in printonly mode
                                            MyRect.left = 514+140;
                                            MyRect.top = 350;
                                            MyRect.right = MyRect.left + 300;
                                            MyRect.bottom = MyRect.top + 40;
                                            ConvertMicroUnits(&MyRect);
                                            ReadInputBox(OutHdc, &MyRect, "CURTIS", 10, enumRIB.PRINT_ONLY , -1);

                                            // set input at right of "Password:" text
                                            MyRect.left = 514 + 140;
                                            MyRect.top = 350+40;
                                            MyRect.right = MyRect.left + 200;
                                            MyRect.bottom = MyRect.top + 40;
                                            ConvertMicroUnits(&MyRect);
                                            RetInputBox = ReadInputBox(OutHdc, &MyRect, BufferInput, 10,
                                                                                    enumRIB.BLINK_CARET | enumRIB.ONLY_CAPS | enumRIB.SOUND_ON_KEY , 109);
                                            if (RetInputBox == 1) {
                                                      // user completed the password: check if it is "DALAILAMA"
                                                      if (strcmpi(BufferInput, "DALAILAMA")==0) {
                                                                // it's correct: step to next phase
                                                                StepNow = NOW_WAIT_COMMAND;
                                                                // reset return value
                                                                RetInputBox=0;
                                                                BufferInput[0]=0;
                                                      }
                                            }
                                            break;
                                  case NOW_WAIT_COMMAND:
                                            // set input at bottom of menu list
                                            // 486, 400, 40, 40
                                            MyRect.left = 486;
                                            MyRect.top = 400;
                                            MyRect.right = MyRect.left + 40;
                                            MyRect.bottom = MyRect.top + 40;
                                            ConvertMicroUnits(&MyRect);
                                            // waiting for only one character

                                            RetInputBox=ReadInputBox(OutHdc, &MyRect, BufferInput, 1,
                                                                                    enumRIB.BLINK_CARET | enumRIB.SOUND_ON_KEY |
                                                                                    enumRIB.ONLY_LETTERS | enumRIB.ONLY_CAPS , 109);
                                            // discover if player choose A B or C
                                            // and perform command
                                            if (RetInputBox==1) {

                                                      switch (BufferInput[0]) {
                                                      case 'A':
                                                                // chose command: "A) Open the door"
                                                                // now we open the door in room 49
                                                                // we use the output of [Export Function] in Set Trigger Type window
                                                                // ; Set Trigger Type - ACTION 26
                                                                // ; Exporting: TRIGGER(282:0) for ACTION(234) {Tomb_NextGeneration}
                                                                // ; <#> : DOOR_TYPE2 ID 234 in sector (1,1) of Room51
                                                                // ; <&> : Trigger. (Door) (E)Open/Close <#>door
                                                                // ; (E) : Open the door                                                  
                                                                PerformActionTrigger(NULL, 26, 234 | NGLE_INDEX, 1);
                                                                break;
                                                      case 'B':
                                                                // chosen command: B)Flood the Room
                                                                // enable flipmap 0 to have a water room
                                                                // ; Set Trigger Type - FLIPEFFECT 124
                                                                // ; Exporting: TRIGGER(15872:0) for FLIPEFFECT(124) {Tomb_NextGeneration}
                                                                // ; <#> : FlipMap. Enable <&>flipmap with (E)buttons for activation
                                                                // ; <&> : FlipMap= 0
                                                                // ; (E) : [1] [2] [3] [4] [5] (Immediate activation)

                                                                PerformFlipeffect(NULL, 124, 0, 62);
                                                                break;
                                                      case 'C':
                                                                // chosen command: C)Kill Me, please
                                                                // ok we remove health to lara to kill her (de gustibus)
                                                                Get(enumGET.LARA,0,0);
                                                                GET.pLara->Health=0;
                                                                break;          
                                                      default:
                                                                // wrong command: clear this choice
                                                                // note: here, we could play a "bad" sound
                                                                BufferInput[0]=0;
                                                                RetInputBox=0;
                                                                break;
                                                      }
                                            }
                                            break;
                        }
                        // now we move to tomb raider hdc the (currently hidden) image built in OutHdc
                        // in spite we are using raster (hdc) operation, we need to copy the image using directx method
                        // so, we initialise the polylist array
                        S_InitialisePolyList();
                        // now we get a writable hdc of tomb raider
                        AllocateTombHdc(pBase,false, true);
                        // now we copy whole temp hdc to tomb raider hdc:
                        BitBlt(pBase->HdcTomb, 0,0, pBase->Temp.SizeX, pBase->Temp.SizeY, pBase->Temp.MemHdc, 0,0, SRCCOPY);
                        // now we free tomb hdc (it's better letting it locked less time was possible)
                        FreeTombHdc(pBase, true);
                        // now our screen it has been placed like it was a single mesh in polylist array
                        // now we could add other drawing operations, for sprites, objects and meshes, but in this case we don't
                        // need of them, so we send our drawing data stored in PolyList array

                        S_OutputPolyList();
                        // and now we flip two screens showing that we have just drawn
                        S_DumpScreen();
              }
              // completed control panel

              if (RetInputBox == -1) {
                        // if quits with escape, now we wait that escape command flushed off, to avoid to enter in Inventory
                        // when we come back in game
                        WaitEscapeQuits();
              }
              // remove font we created
              FreeWindowsFont(&MyFont);

              // now we release resources of temphdc (the cloned image of tomb raider screen)
              FreeImage(&pBase->Temp);
              // note: now we don't free the ImagePc record, because we'll do that at end of current level, to let
              // it available for other PC activations in game in current level

              // resume audio track
              ResumeAudioTrack();          
    }

    In spite there are already some comments in above code, now we see to explain better some side of this function.


    Suspend and Resume Audio Track

              // suspend audio track currently in progress
              SuspendAudioTrack(-1,false);

    The SuspendAudioTrack() function and the paired ResumeAudioTrack() function, should be used when you don't want listening the level audio track while player is managing the control panel.
    Really it's not sure that, in this case, was necessary suspend audio track, anyway remember to use these functions when you wish silent tracks.
    As parameters of SupendAudioTrack() you can supply (optionally) also a new audio track to play, setting if perform it in looped way or less.


    Global data used for Image operations

    pBase = &Trng.pGlobTomb4->BaseImages;

    Some functions for hdc operations require global data stored in Trng.pGlobTomb4->BaseImages structure.
    We copy in pBase the pointer of this structure and then we passed it to functions that require that structure.
    All tomb raider hdc management use that structure.
    Here we can see the content of this wide structure:

    typedef struct StrShowImage {
              StrRecordImage ImageBackGround; // 0
              StrRecordImage ImageLittle; // 1
              StrRecordImage ImageOverlap; // 2
              StrRecordImage Temp; // 3
              StrRecordImage ImageMonoScreen; // 4
              StrRecordImage ImageLoadLevel; // 5
              StrRecordImage ImageTitle; // 6
              StrRecordImage ImageBinocular;                    // 7
              StrRecordImage ImageLaserSight; // 8
              StrRecordImage ImagePageDiario; // 9
              StrRecordImage ImageBinocCompass; // 10
              StrRecordImage ImageBinocSextant; // 11
              StrRecordImage VetImages[MAX_IMAGE_RECORDS];
              bool TestTempHdc;
              RECT ZonaImageLittle;
              HDC HdcTomb;
              bool TestPopUp;
              StrPopUp PopUp;
              bool TestWideScreen;
              RECT ZonaSchermoTomb;
              bool TestFullScreen;
              bool TestTombAllocato;
              bool TestHdcBack;
              bool TestWriteHdc;
              StrEffettoImage Effetto;
    }ShowImageFields;

    Really not all above fields are really used in our control panel, anyway the stuff about tomb raider device context and the temporary (cloned of tomb raider) device context (StrRecordImage Temp; ) are necessary.


    Create a Device Context compatible with Tomb Raider screen

              if (AllocateTombHdc(pBase, true,false) == false) {
                        // if error, failed and quiting
                        return;
              }
              // now that we got a clone device context of TR, we can release hdctomb but preserving the
              // Temp.MemHdc just created
              FreeTombHdc(pBase, true);

    Other misterious (or a bit weird) code is this above: why we allocate tomb raider hdc and then we release (free) it immediately, apparently without any usage?
    The fact is own the AllocateTombHdc() function to use the tr hdc, and it used it inside of this function to create a copy of tomb raider screen in pBase->Temp.MemHdc.
    Since we set as parameters:
    TestHdcTemp == true
    TestWriteHdc == false
    We required to create a temporary hdc, reading (only read access) the tomb raider device context.
    In spite in our example of control panel is not visible, the temp hdc has same image of last frame of tomb raider 3dx screen.
    Pratically, wheter we had copied an image littler than full screen, we could see, around the old image in game.
    Once the AllocateTombHdc() performed this operation, we can release it:

              FreeTombHdc(pBase, true);

    Look the parameter:
    TestKeepTempHdc == true
    Setting to true this parameter we told to that funcion: free the tomb raider device context handle, BUT keep the temporary hdc allocated in last AllocateTombHdc() call.


    Setting Font and Folor for Text in Device Context

              memset(&MyFont, 0, sizeof(StrWindowsFont));
              strcpy(MyFont.NomeFont, "Courier New");
              MyFont.FlagsWFF = WFF_ULTRA_BOLD;
              MyFont.SizeFont = 30;
              CreateWindowsFont(&MyFont, false);
              // select font in pBase->Temp hdc
              MyFont.hFontOld = (HFONT) SelectObject(OutHdc, MyFont.hFont);
              MyFont.HdcConFont = OutHdc;
              // set color for text (green)
              SetTextColor(OutHdc, RGB(138,248, 159));
              // set trasparent background for text
              SetBkMode(OutHdc, TRANSPARENT);

    In windows you chose the kind of characters (font) the color to use for text and background mode in above way.
    We created a font giving only two settings: the size:

              MyFont.SizeFont = 30;

    And the style:

              MyFont.FlagsWFF = WFF_ULTRA_BOLD;

    Then we called the CreateWindowsFont() function to ask to windows a font with those features.
    The handle of that font has been saved (by CreateWindowsFont()) in MyFont.hFont field.
    Then we "select" that font in our output device context to say to windows to use that font everytime we write text in that device context:

              MyFont.hFontOld = (HFONT) SelectObject(OutHdc, MyFont.hFont);

    At end we set the color for text, choosing a light green and choose the setting to have trasparent background around the text, to let show the belove background of image:

              // set color for text (green)
              SetTextColor(OutHdc, RGB(138,248, 159));
              // set trasparent background for text
              SetBkMode(OutHdc, TRANSPARENT);


    Update Directx Input data in closed Loops

              // starting the loop
              while (RetInputBox ==0) {
                        // read directx input
                        ReadDxInput();

    At start of our loop we use the ReadDxInput() function to update the global variables used to store current game commands and keyboard inputs.
    In this case it's necessary because our control panel procedure stopped the remaining tomb raider code and therefor the tomb function to read dx input will be no ever called while we are in our control function.
    So we use the ReadDxInput() function to perform same compute that (first) tomb raider performed.


    Working with rectangles for Text drawing

                                            // while we are waiting for User or Password we have to draw the text "Username:\r\nPassword: :"
                                            // rectangle to host User: Password:
                                            // 514, 350, 332, 105
                                            MyRect.left = 514;
                                            MyRect.top = 350;
                                            MyRect.right = MyRect.left +332;
                                            MyRect.bottom = MyRect.top +105;
                                            ConvertMicroUnits(&MyRect);

    Please not that, all text operations, require a real rectangle, where .right and .bottom fields are own the coordinate at rigth or at bottom of the rectangle.
    While it was different with sprite and draw image, where .right and .bottom had only the size (right = width, bottom =height) of image.
    Since with drawing text we use a real rectangle we have to convert the data from [Get Screen Frames] ng_center tool, adding to top and left the values for width and height.


    Whole DirectX drawing cycle

                        S_InitialisePolyList();
                        // now we get a writable hdc of tomb raider
                        AllocateTombHdc(pBase,false, true);
                        // now we copy whole temp hdc to tomb raider hdc:
                        BitBlt(pBase->HdcTomb, 0,0, pBase->Temp.SizeX, pBase->Temp.SizeY, pBase->Temp.MemHdc, 0,0, SRCCOPY);
                        // now we free tomb hdc (it's better letting it locked less time was possible)
                        FreeTombHdc(pBase, true);
                        // now our screen it has been placed like it was a single mesh in polylist array
                        // now we could add other drawing operations, for sprites, objects and meshes, but in this case we don't
                        // need of them, so we send our drawing data stored in PolyList array

                        S_OutputPolyList();
                        // and now we flip two screens showing that we have just drawn
                        S_DumpScreen();

    Above code is very important.
    It shows how tomb raider (or our code) should handle a full management of drawing operation under directx.
    We start drawing operation clearing the polylist array:

    S_InitialisePolyList();

    This poly list array will host all drawing of mesh, textures and setting of light, like a sequence of operations to perform.
    Once we started the poly list array, every drawing operation like DrawMesh(), DrawObject() or DrawImage() will be stored in this array.
    Also our BitBlt() function will work like a draw face operation and it will be stored in poly list array.
    When we wish execute these drawin operations, we'll have to send to directx engine the poly list array, usinn the function:

    S_OutputPolyList();

    And, at end, well get on air these data with the S_DumpScreen() function:

    S_DumpScreen();

    Note: this is first time we handle whole drawing cycle. Indeed, other times, like with callbacks in inventory or title level, we had simply used DrawSprite2D() or DrawObject2D() functions because the operations to start poly list and (then) to ouput polylist and perform the dump of screen, were handled by the calling tomb raider code.


    Quit process freeing and restoring allocated resources

              // remove font we created
              FreeWindowsFont(&MyFont);

              // now we release resources of temphdc (the cloned image of tomb raider screen)
              FreeImage(&pBase->Temp);
              // note: now we don't free the ImagePc record, because we'll do that at end of current level, to let
              // it available for other PC activations in game in current level

              // resume audio track
              ResumeAudioTrack();          

    It's very important remembering always to free allocated resources, like the temporary device context we created, and restoring all changed data (like the suspended audio track) before quiting the control process.
    Note: remember that you have always to call FreeWindowsFont() before of FreeImage() where that font had been used (selected), otherwise it will be no possible free the font, if you destroy the device context in advance.


    Try in game our Control Panel for PC Animating

    Once built the project we can verify how it works in game


    It works fine but probably we could improve something...


    Homeworks for Control Panel of PC
    We could improve sound management adding a "bad" sound when user choses a wrong command letter, outside of range "A-C".
    Another improvement could be to handle a "login already performed" variable, to avoid to enter everytime username and password, after first valid login.
    Technically it's enough easy to realize: just using a global variable for this pc, like TestLoginPerformed. It will set to "false" at start of the game, while after first correct login, we'll set

    TestLoginPerformed=true;

    Then, in the code for control panel, it will be enough change this code:

              // initialise data:
              StepNow=NOW_LOGIN_USER;

    With this:

              // initialise data:
              StepNow=NOW_LOGIN_USER;
              if (TestLoginPerformed==true) StepNow=NOW_WAIT_COMMAND;

    And, in this way, the control panel will start from command menu, skipping the login screen.
    Note: if you wish realize this change, remember to declare the TestLoginPerformed variable, inside of

    typedef struct StrSavegameLocalData {

    structure, so to see saved and restored its value when there are loading/saving game operations.


    How to Create Patches

    In this document we had already described some matters about patches.
    I suggest you to give a look to those chapters, if you've not yet done:
    Menu Trng Patcher: Assembly->Convert from Olly assembly to in-line assembly for Visual C
    Menu Trng Patcher: Assembly->Create dynamic patch generator
    Menu TrngPatcher: Debugging->Analyse db_patches.bin report
    How to avoid conflicts
    Menu TrngPatcher: Tools->Check for further conflicts with given offset zone
    Menu TrngPatcher: Tools->Get assignment of free memory range

    Dynamic Patches under TRNG engine

    Your plugin, like same trng engine, should create only dynamic patches.
    For "dynamic" we mean a patch that it will be created at-fly, in run-time. This means that, before starting tomb4.exe, your patch is not yet present, but when your plugin will be loaded, your code of CreateMyCodePatches() function, it will be executed and all your patches will be created.
    In CreateMyCodePatches() function, indeed, you'll call little functions, generated by TrngPatcher program, having own the target to modify tomb4 executable to create your patches.
    This dynamic method has some advantage respect that to modify permanently the tomb4.exe file:


    Flat Patches

    Now we perform a first easy example of dynamic patch.
    We start with a "flat" patch.
    For "flat patch" I mean a very easy patch, where we change only some code row of tomb4 exectuable, without other complications.


    Example of flat patch
    Following the description of an old TREP patch, we try to change following code from Olly debugger:


    Replacing that "jnz" with "jmp" we should get to let visible very far objects in game.
    So now we perform this change:
    1. Select that row at 44f018 offset
    2. Hit [space] to enter in assembly mode but without losing current instruction
    3. And type our change: using "jmp" instead "jnz"


    Now, keeping selected that row, we choose (right mouse button) the menu command: [Copy->To Clipboard]
    Now we paste the text in TrngPatcher (it had to be empty the text editor
    And finally we choose, from trng patcher, the menu command: [Assembly->Create Dynamic Patch Generator]
    TrngPatcher will prompt you for the name to assign to your patcher function, let's say to name it "PatchForFarObjects"
    Now we get a report for this patch.
    We'll use the C++ code at bottom of the report:

    // ---------- Code to copy in C++ Plugin Sources (over and outside of CreateMyCodePatches() function) -------------------

    // Date creation: 21/09/2016 11.19.49
    int PatchForFarObjects(void)
    {
              static BYTE VetBytes[]={0xEB, 0xC};

              return ApplyCodePatch(0x44F018, VetBytes, 2);
    }

    So now we copy above function and paste to in plugin_trng.cpp, a bit over the CreateMyCodePatches() function.
    Then, we'll type inside of CreateMyCodePatches() function the call to set that patch:

    bool CreateMyCodePatches(void)
    {
              // the call of the code patch to TYPE_HERE:
              // example:
              // SET_PATCH(Path_RedirCollision)
              // to call the function Patch_RedirCollision() created with TrngPatcher program (command Assmembly->Create Dynamic Patch Generator)
              SET_PATCH(Patch_ForConstants)
              SET_PATCH(PatchForFarObjects)          
              return true;
    }

    Above example is almost the same we already did for "Patch_ForConstants" patch in chapter Menu Trng Patcher: Assembly->Create dynamic patch generator


    Patches with calls of Plugin Code: the Tomb4 Patcher Address

    Now we see how to work with non-flat patches, i.e. with those patches where we need to call code inside of our plugin source.
    This situation is very common, since we'll need very often to add many row of codes and we cann't create a space in tomb4 code, but we can add all code we wish in our plugin source.
    The problem in this case is how to call a function in plugin.dll from tomb4, since we cann't know in advance the specific offset address to call.
    The trick to solve this problem is to ask own to plugin to give us the right offset and save this value in a fixed, always known, tomb raider offset.
    This tomb4 offset will be our "Tomb4 Patcher Address" and we'll use always this tomb4 offset to call, with indirect adressing, our plugin code.


    How to choose own Tomb4 Patcher Address
    First step, if you mean create patches, is own to choose the tomb4 offset where store your patcher address.
    It's very important that your offset was different than other tomb4 offset, chosen by other plugin builders.
    To reduce this risk you should use Menu TrngPatcher: Tools->Get assignment of free memory range command of TrngPatcher.
    You give as input the name you mean assign to your plugin (it's not important if you have already renamed plugin.dll with this name, or less) and you'll get a range of free tomb4 offset for your plugin.
    Now, for our example, we'll set as name own "Plugin_trng.dll" but you'll choose another (your) name, of course.
    In this case we'll get this range:

    Free range for "plugin_trng.dll" is: $628278 - $6282F7

    Since, to host our tomb4 patcher, we need just only 4 bytes (a DWORD variable) we'll use (for instance) the first 4 bytes, so our tomb4 patcher will be located ad $628278 offset, letting free following zone from $62827C to $6282F7 offsets.


    How to set Tomb4 Patcher Address
    Now we have to insert this info in our plugin sources.
    We find (about) at top of plugin_trng.cpp source the zone to modify:

    DWORD MyTomb4PatcherAddress = 0x0; // <- TYPE_HERE: the new address you chose                                        

    So we'll change above row in following way:

    DWORD MyTomb4PatcherAddress = 0x628278; // <- TYPE_HERE: the new address you chose


    How to access to Tomb4 Patcher Address
    Once we set our patcher address, we'll be able to call our plugin code from tomb4 in this way:

    call dword ptr [628278h]

    With above indirect addressing, it will be executed the code whom address is stored in 628278 offest.


    Give a mnemonic name in Olly to our Tomb4 Patcher Address
    A little trick to simply our patches working with Olly is to add our patcher address in known symbols.
    From TrngPatcher program you choose the [Debugging->Edit Known Symbols] menu
    Click on [Add New Label] button and type as name "MyPatcher" (or that you prefer) while as Offset the offset of your patcher, in our case it should be "628278"
    Then you click on [Save and Quit] and enable the updating of olly symbols.
    In this way, when you'll use Olly debugger, you'll be able to type your patch using name of tomb patcher rather its offset:

    call dword ptr [MyPatcher]


    What plugin procedure will be executed whereby Tomb4 Patcher Address?
    We saw that we'll call the plugin code from tomb4 executable with a code like this:

              call dword ptr [628278h]
              or
              call dword ptr [MyPatcher] ;once we have set the name of our offset in known symbol database

    But what is the procedure that will be executed in our plugin?
    Since we could have many patches and many different plugin procedures to perform we'll use same trick used by trng: in plugin code there will be a a generic procedure with the target to sort execution for different procedures, in according with value in AX register.
    In this way we can, with a single tomb4 patcher address, call upto 65536 different procedures.

    The MainPatcher plugin procedure

    Everytime tomb4 code will call our tomb4 patcher address, the execution will pass to following procedure in plugin_trng.cpp source:

    BEGIN_ASM_PROC(MainPatcher)
              and eax, 0ffffh
              mov eax, dword ptr [SubPatchArray+eax*4];
              jmp eax
    END_ASM_PROC

    The only target of this sorting code is to jump to some asm procedure in according with AX value.
    The address of these (your) procedures, will be taken by an array named SubPatchArray:

    void *SubPatchArray[] = {
              
    // TYPE_HERE your asm procedure names to call from tomb4 code
              NULL
    };

    Above code seems meaningless only because it is yet empty, but now we'll see how to "fill" it with some example...


    Example of our first Numerical Patch

    Now we'll see the method to get working a numerical patch. The code to patch or its target will change, in other circustances but the method is always the same.
    Looking the code Tomb4SourceCode.txt we want change something in rollingball management:

    414E50: ControlSlot_130_ROLLINGBALL:
    414E50:                    MOVSX EAX,WORD PTR [ESP+4h]
    414E55:                    SUB ESP,24h
    414E58:                    LEA ECX,DWORD PTR [EAX+EAX*2]
    414E5B:                    PUSH ESI
    414E5C:                    LEA ECX,DWORD PTR [EAX+ECX*4]
    414E5F:                    LEA EDX,DWORD PTR [ECX+ECX*8]
    414E62:                    MOV ECX,DWORD PTR [pVetItems]
    414E68:                    LEA EAX,DWORD PTR [EAX+EDX*8]
    414E6B:                    LEA EAX,DWORD PTR [EAX+EAX*2]
    414E6E:                    LEA ESI,DWORD PTR [ECX+EAX*2]
    414E71:                    PUSH ESI
    414E72:                    CALL TriggerActive
    414E77:                    ADD ESP,4h
    414E7A:                    TEST EAX,EAX
    414E7C:                    JE LOC_415524
    414E82:                    MOVSX EDX,WORD PTR [ESI+34h]
    414E86:                    MOVSX ECX,WORD PTR [ESI+36h]
    414E8A:                    PUSH EBX
    414E8B:                    MOV EBX,DWORD PTR [ESI+40h]
    414E8E:                    PUSH EBP
    414E8F:                    ADD WORD PTR [ESI+20h],6h
    414E94:                    LEA EBP,DWORD PTR [ESI+40h]
    414E97:                    MOV AX,WORD PTR [ESI+20h]
    414E9B:                    SAR EDX,5h
    414E9E:                    ADD EBX,EDX

    Let's say that we wish create a special OCB for rollingball that will get faster the vertical falling movement.
    In this row:

    414E8F:                    ADD WORD PTR [ESI+20h],6h

    There is the computation for vertical acceleration. Pratically the vertical speed, stored in +20h field, is increased by 6 each cycle.
    We want adding higher increment when there is a given OCB in rollingball.
    Since flags upto 64 are already used by trng, we can use 128 (0x80) flag for this ultra-fast-falling setting.
    Before going on, some notes:

    1. Now we are describing numerical patches and so we'll use a numerical patch, anyway this target could be realized using an CBT_AFTER callback for control procedure of rollingball. Reading OCB value and when there is 0x80 flag, adding another value to vertical speed (+20h in asm code) field. It should be always better avoiding patches when it is possible, to get a "clean" plugin.

    2. Please note that: wheter we wanted simply increase ALWAYS the falling speed, we could use a flat patch, changing the instruction " ADD WORD PTR [ESI+20h], 6h" with, for instance: "ADD WORD PTR [ESI+20h], 0Ah". Anyway, since we wish adding this increment ONLY when there is a specific OCB value, we need of extra code to check OCB field and for this reason we cann't simply overwrite tomb4 code, we need own to add further code and to realize this, we need to call our plugin, where we'll type required extra code


    Creating an hook for our Numerical Patch
    Now we have to choose right offset where type a code like this:

              MOV AX, 0h
              CALL DWORD PTR [MyPatcher]

    Note: here and in following examples, we'll use "MyPatcher" variable, rather the numeric offset (628278h).

    Since above code require some bytes (ten bytes), it's important choosing right tomb4 zone where place it, since we'll have to overwrite some tomb4 original instuctions in this action.
    The idea is that, once execution will come in plugin code, we'll be able to type newly the "erased" original tomb4 instructions, restoring it, other that to add our new code, of course.
    Anyway in this operation we should take care of some rules:

    1. Trying (if it's possible) to do not erase tomb4 instruction where there are PUSH / POP instructions, because the stack instructions change the stack pointer and get complicated the execution of a common "call" with a valid return address.

    2. To do not erase instruction group, where, inside of this group, there is a jump (conditional or less) instruction. Because then, when we rewrite original code in our plugin, we could have the problem to jump from our plugin code, directly to some tomb4 offset, while we would like coming back to tomb4 code with a common "ret" instruction

    3. Do not erase a group instucution, inside of that some (external tomb4 code) jumps, i.e. to do not erase a tomb4 zone where, in the middle, some other code will jump, because in this case we'll have a crash when this external code will jmp to this offset where now we typed different instructions, neither aligned (probably) with jumping offset

    4. Keep care that eax register was not currently keeping a valid value that will be used in following code, because we need to change eax value for our numerical patch and an eax value to preserve is a little complication more to handle.
      Note: really in these circustances a trick is to save original eax value in some other (not used in next code) register and then remembering to restore original eax reloading from previous swapping register its value.


    Now we have to find an ideal tomb4 zone to overwrite that respects all above rules:


    Above selected code is perfect to host our call, since:
    - There is no PUSH or POP instructions
    - There is no jmp instruction
    - The eax value is not used on reading but only set in instruction:

    414E97:                    MOV AX,WORD PTR [ESI+20h]

    But this is not a problem, since the value will be set to eax the previous value has been ignored, so we can change it, in previous instructions, as we wish.
    - The size of this code zone is enough wide to host 10 bytes for our call to plugin code.

    Now we can use Olly debugger to type our code in that zone.
    When we work with non-flat patches the new code we typed is not necessarily well aligned with old code, this means that, at end of our adding, it may be that there was residual bytes (of old original code) that generates, randomly, bad instructions.
    To avoid this risk the better solution is to start in our job setting at "nop" all zone that will host our code.
    Once we selected the wished zone we can use right mouse button and choose command [Binary->Fill with NOPs]:


    Now we'll type our code in this "NOP" zone, including in the patch also further extra "NOP" to avoid the above problem, about residual bytes in code.
    Since this is our first numerical patch we'll start with AX = 0, since it's the first, the second patch will have AX =1, ect.
    So we type our code, select whole set zone, and copy to clipboard:


    Now using TrngPatcher we can create a dynamic patch using Menu Trng Patcher: Assembly->Create dynamic patch generator command.
    Let's say that we name this patch: "PatchPerFastRollingBall".
    We'll get following report:

    REPORT FOR PATCH:PatchPerFastRollingBall
    OFFSET BYTES
    ---------------------------------------------------
    414E8F: 66 B8 00 00
    414E93: FF 15 78 82 62 00
    414E99: 90
    414E9A: 90
    ---------------------------------------------------
    TotBytes = 12

    /* ORIGINAL CODE OF PATCH
    ------------------------------------------------------------------------------------------------------
    00414E8F 66:B8 0000 MOV AX,0
    00414E93 FF15 78826200 CALL DWORD PTR DS:[<MyPatcher>]
    00414E99 90 NOP
    00414E9A 90 NOP

    ------------------------------------------------------------------------------------------------------
    */


    // ---------- Code to copy in C++ Plugin Sources (over and outside of CreateMyCodePatches() function) -------------------

    // Date creation: 22/09/2016 2.53.30
    // Called from: 0x414E8F
    // MOV AX,0
    // CALL DWORD PTR DS:[<MyPatcher>]

    int PatchPerFastRollingBall(void)
    {
              static BYTE VetBytes[]={0x66, 0xB8, 0x0, 0x0, 0xFF, 0x15, 0x78, 0x82, 0x62, 0x0,
                                  0x90, 0x90};

              return ApplyCodePatch(0x414E8F, VetBytes, 12);
    }

    We'll use only final side, with the PatchPerFastRollingBall() function.
    We copy the function to plugin_trng.cpp source, over and outside of CreateMyCodePatches() function.
    While, inside of CreateMyCodePatches() function, we'll type the call to execute the PatchPerFastRollingBall() patch:

    // Date creation: 22/09/2016 2.53.30
    // Called from: 0x414E8F
    // MOV AX,0
    // CALL DWORD PTR DS:[<MyPatcher>]

    int PatchPerFastRollingBall(void)
    {
              static BYTE VetBytes[]={0x66, 0xB8, 0x0, 0x0, 0xFF, 0x15, 0x78, 0x82, 0x62, 0x0,
                                  0x90, 0x90};

              return ApplyCodePatch(0x414E8F, VetBytes, 12);
    }

    // FOR_YOU: In this function you insert the callings of functions used to change tomb4 code
    // You can get these functions, in the correct format, using Trng Core -> Asm Souce Editor -> Debugging menu
    // program
    // note: if there is a conflict the function will return "false"
    // and the tomb4 program will abort with an error message
    bool CreateMyCodePatches(void)
    {
              // the call of the code patch to TYPE_HERE:
              // example:
              // SET_PATCH(Path_RedirCollision)
              // to call the function Patch_RedirCollision() created with TrngPatcher program (command Assmembly->Create Dynamic Patch Generator)

              SET_PATCH(PatchPerFastRollingBall)
              
              return true;
    }

    Our job is not yet completed, of course.
    Now we have only in tomb4 the code to call our plugin but we have yet to update our MainPatcher() function to handle also this 0 numerical patch.


    Initialise a Numerical Patch in Plugin source
    Look for "SubPatchArray" text and now initialise an empty assembly procedure a bit over (and outside) SubPatchArray:

    // patch_0 to increase falling speed of rollingball when there is OCB 0x80
    BEGIN_ASM_PROC(Patch_00)
              retn
    END_ASM_PROC

    // FOR_YOU: In the SubPatchArray you'll type all procedure names of your code in the dll you
    // wish were called from tomb4 code.
    // type them in the order of ax value. So first asm proc in the list, will be called
    // with ax=0, while the second in the list will be called with ax=1 ect.

    void *SubPatchArray[] = {
              
    // TYPE_HERE your asm procedure names to call from tomb4 code
              NULL
    };

    Now we'll fill our empty procedure Patch_00, anyway before continuing it's better link immediately this procedure to our SubPatchArray.
    Pratically we type the name of our new numerical procedure "Patch_00" inside of this array:

    void *SubPatchArray[] = {
              
    // TYPE_HERE your asm procedure names to call from tomb4 code
              &Patch_00,
              NULL
    };

    Please look fine what we did: we added the name of new numerical procedure just a row before final NULL value, to let the NULL always at end of sequence.
    We used the "&" operator to remember that we want let in SubPatchArray[] array the pointer, i.e.the address of our function. Really it's not necessary in this case, since it is a procedure, it should work also omitting the "&" operator.
    Then we typed a comma "," because inside this initialised data we'll have many items, each of them divided with a comma from the following.
    For instance when we'll have created many other numerical patches, the SubPatchArray[] array, will have this look:

    void *SubPatchArray[] = {
              
    // TYPE_HERE your asm procedure names to call from tomb4 code
              &Patch_00,
              &Patch_01,
              &Patch_02,
              &Patch_03,
              NULL
    };

    Note: we gave to our patch a basic name like "Patch_00"...
    You could give to your patches any name, also MikeyMouse, of course, anyway it's easier handle these numerical patches if they have their number in the name.
    For instance when you, after many time, want locate the plugin code for a patch, you found in tomb4, with these instructions:

              MOV AX, 28h
              CALL DWORD PTR [MyPatcher]

    You know immediately to have to look for "Patch_28", without other complications.
    Now that we "linked" the patch in tomb4 to our code in plugin source we have to type the code for this Patch_00 procedure.


    Restoring original Tomb4 code in our Numerical Patch
    It's better, to avoid to forget this operation, to start typing the original tomb4 code we had overwritten.
    In our example it was this code:

    00414E8F 66:8346 20 06 ADD WORD PTR DS:[ESI+20],6
    00414E94 8D6E 40 LEA EBP,DWORD PTR DS:[ESI+40]
    00414E97 66:8B46 20 MOV AX,WORD PTR DS:[ESI+20]

    When the code to restore are only few lines (like it happens now) we can simply copy manually them, anyway when the code is longer remember you can use the Menu Trng Patcher: Assembly->Convert from Olly assembly to in-line assembly for Visual C command of TrngPatcher program
    So we copy that tomb4 code inside of our Patch_00 procedure:

    // patch_0 to increase falling speed of rollingball when there is OCB 0x80
    BEGIN_ASM_PROC(Patch_00)
              // code removed from tomb4:
              ADD WORD PTR DS:[ESI+20h],6
              LEA EBP,DWORD PTR DS:[ESI+40h]
              MOV AX,WORD PTR DS:[ESI+20h]
              // end of removed code from tomb4
              retn
    END_ASM_PROC

    Note: please take care if you copy manually Olly code since olly uses always hexadecimal values as constants but it doesn't mark them with "h" suffix.
    Differently, Visual C10 if it doesn't find the "h" suffix, it will see those numbers are they were in decimal format. This situation could create big troubles, of course.

    After all this job we got... nothing.
    The tomb4 execution will be absolutely the same, first of our numerical patch.
    Really the difference is that now we can add and modify all code we wish about this matter (rollingball speed) in very easy way.
    Now it's easy realize our target: check if there is the 0x80 bit set in OCB field and, when it's present, incresing the vertical speed:

    // patch_0 to increase falling speed of rollingball when there is OCB 0x80
    BEGIN_ASM_PROC(Patch_00)
              ADD WORD PTR DS:[ESI+20h],6
              test word ptr [esi+ItemFields.OcbCode], 080h
              jz MissingOcb
              // add more acceleration:
              add word ptr [esi+20h], 4
    MissingOcb:
              LEA EBP,DWORD PTR DS:[ESI+40h]
              MOV AX,WORD PTR DS:[ESI+20h]
              retn
    END_ASM_PROC


    Testing our rollingball OCB in game


    Looking above image we see that the rollingball with OCB = 128 (that at right) felt fastly than other.
    Our first numerical patch worked fine.

    Patches with rilocation of whole procedures

    Now we describe an (not advisedable) operation that, anyway, could be useful in some particular case.
    We saw how to create flat patch or numerical patches. This operation, in particular way for numerical patches, is enough long.
    When we are working intensively on same tomb4 procedure and this job requires a lot of little patches, it could born the idea to replace this multi-patches job with a single patch that moves whole tomb4 procedure inside of our plugin, where we'll modify many tomb4 instrutions easily, avoiding the multi-patching phase.
    I said that is not advisable this operation because, wether it used too often, there will be a lot of tomb4 procedures inside different plugins, with problems, in the future, to interact with those "hidden" code zones. Anyway it's also true that it's better a single patch with a given (published) relocation of whole procedure, rather a plenty of little patches concentrated in some procedure, where the chances, for other plugins to act, could remain very very low.

    Now we'll do an example about how to relocate a tomb4 procedure, moving its code inside of plugin, to change then it easily in many different zones.


    Relocation of LaraBurn tomb4 procedure
    Really, since I've not any idea how to change this tomb4 procedure, we'll show only how to move LaraBurn procedure inside of our plugin, then, about how to change that code, I'll let to your immagination how to realize that target.
    Looking Tomb4 code (from TrngPatcher utility) we see this:

    414D90: LaraBurn:
    414D90:                    TEST BYTE PTR [FlagsLara],8h
    414D97:                    JNZ LOC_414DD4
    414D99:                    MOV EAX,DWORD PTR [FlagsLara]
    414D9E:                    TEST AH,2h
    414DA1:                    JNZ LOC_414DD4
    414DA3:                    MOV EAX,DWORD PTR [Ptr_Lara]
    414DA8:                    MOV CX,WORD PTR [EAX+18h]
    414DAC:                    PUSH ECX
    414DAD:                    CALL LOC_453DD0
    414DB2:                    ADD ESP,4h
    414DB5:                    CMP AX,0FFFFh
    414DB9:                    JE LOC_414DD4
    414DBB:                    MOVSX EAX,AX
    414DBE:                    LEA EDX,DWORD PTR [EAX+EAX*4]
    414DC1:                    MOV EAX,DWORD PTR [ZonaFootPrint_Fine]
    414DC6:                    MOV WORD PTR [EAX+EDX*8+14h],8Eh
    414DCD:                    OR BYTE PTR [FlagsLara],8h
    414DD4: LOC_414DD4:
    414DD4:                    RETN
    414DD5:                    NOP

    Above proceudre is little but this speech could work also for wider procedures.
    In the case we require a quantity of patches, for a given tomb4 procedure, that is about 50 % or higher of whole code, it becomes better performing only one patch, that it will be used to move whole tomb4 procedure inside plugin code.
    Then, when the code to execute it will be in our source, we'll be able to add (inserting) new instructions, or removing or changing other instructions, with simple text editing , since we are working in source format, avoding the tiring and messing multi-patches job.


    Numerical patch with JMP to plugin code
    When we relocate a tomb4 procedure, it should be better using a JMP instruction (rather a CALL instruction) to jump to our plugin code.
    The reason is that, if that tomb4 procedure got arguments from stack, a further "call [MyPatcher]" should change the esp references we saw in original tomb4 code.
    Excepting this difference, our fist phase of this job is the same already saw about Example of our first Numerical Patch
    So now we'll show quickly these operations:
    We create an hook in following offset range:

    414D90: LaraBurn:
    414D90:                    TEST BYTE PTR [FlagsLara],8h
    414D97:                    JNZ LOC_414DD4
    414D99:                    MOV EAX,DWORD PTR [FlagsLara]

    Replacing above code with the patch:

    00414D90 <LaraBurn> 66:B8 0100 MOV AX,1
    00414D94 FF25 78826200 JMP DWORD PTR DS:[<MyPatcher>]
    00414D9A 90 NOP
    00414D9B 90 NOP
    00414D9C 90 NOP
    00414D9D 90 NOP

    Then we copy above olly changed code to TrngPatcher to get the patcher function to generate above patch:

    // Date creation: 22/09/2016 21.15.48
    // Called from: 0x414D90
    // MOV AX,1
    // JMP DWORD PTR DS:[<MyPatcher>]

    int PatchRelocateLaraBurn(void)
    {
              static BYTE VetBytes[]={0x66, 0xB8, 0x1, 0x0, 0xFF, 0x25, 0x78, 0x82, 0x62, 0x0,
                                  0x90, 0x90, 0x90, 0x90};

              return ApplyCodePatch(0x414D90, VetBytes, 14);
    }

    Above there is the code returned by TrngPatcher. Usually you should only copy the function, without changing anything, but in this case we should modify a bit above function.


    Inform to have Relocated a Tomb4 Procedure: the ApplyRelocatorPatch() function
    When your patch relocated a whole procedure (like it happens in our case) it's necessary changing a bit the code returned by TrngPatcher, replacing the "ApplyCodePatch()" function with the "ApplyRelocatorPatch()" function.
    First three input parameters are the same for both function, but the ApplyRelocatorPatch() function requires two more arguments: the ProcStart and the ProcEnd (offsets of tomb4 code) where the relocated procedure was enclosed.
    So in our case, since the LaraBurn procedure was enclosed between offsets: 0x414D90 and 0x414DD5 we should edit the patcher function in following way:

    // Date creation: 22/09/2016 21.15.48
    // Called from: 0x414D90
    // MOV AX,1
    // JMP DWORD PTR DS:[<MyPatcher>]

    int PatchRelocateLaraBurn(void)
    {
              static BYTE VetBytes[]={0x66, 0xB8, 0x1, 0x0, 0xFF, 0x25, 0x78, 0x82, 0x62, 0x0,
                                  0x90, 0x90, 0x90, 0x90};

              return ApplyRelocatorPatch( 0x414D90, VetBytes, 14, 0x414D90, 0x414DD5);
    }

    Note: it's important giving this information to trng core, otherwise, the extra patch code of LaraBurn, it could appear like it was valid and patchable by other plugin while in the reality it is a dead code, since it will be never called, since execution will go always in our plugin and no ever in tomb4 LaraBurn code.

    Now we copy above PatchRelocateLaraBurn() function in plugin source and then we execute it adding (inside of CreateMyCodePatches() function) the right call :

    bool CreateMyCodePatches(void)
    {
              SET_PATCH(PatchPerFastRollingBall)
              SET_PATCH(PatchRelocateLaraBurn)
              return true;
    }

    Ok, now we'll have in tomb4, at start of LaraBurn the code:

    00414D90 <LaraBurn> 66:B8 0100 MOV AX,1
    00414D94 FF25 78826200 JMP DWORD PTR DS:[<MyPatcher>]
    00414D9A 90 NOP
    00414D9B 90 NOP
    00414D9C 90 NOP
    00414D9D 90 NOP

    But now we need to create also the Patch_01() where above code will jump.

    // relocate whole LaraBurn procedure:
    BEGIN_ASM_PROC(Patch_01)
              retn
    END_ASM_PROC

    And we add the Patch_01 in SubPatchArray[] list:

    void *SubPatchArray[] = {
              
    // TYPE_HERE your asm procedure names to call from tomb4 code
              &Patch_00,
              &Patch_01,
              NULL
    };

    Above operations are the same for all nunerical procedures but now we are going to see some difference...


    Converting Olly code to in-line assembly format
    Now we start olly but we'll not perform the program (otherwise all patches will be applied) and move to offset of LaraBurn.
    We select all original tomb4 code (no patch yet applied, do you remember?) and copy it to editor of TrngPatcher


    Finally we set the Menu Trng Patcher: Assembly->Convert from Olly assembly to in-line assembly for Visual C command menu, and we'll get following code:

    LaraBurn:
              push eax
              mov eax, 80DF04h ;FlagsLara
              TEST BYTE PTR [eax],8h
              pop eax
              JNZ Go1
              mov EAX, 80DF04h ;FlagsLara
              MOV EAX,DWORD PTR [EAX]
              TEST AH,2h
              JNZ Go1
              mov EAX, 80E01Ch ;Ptr_Lara
              MOV EAX,DWORD PTR [EAX]
              MOV CX,WORD PTR [EAX+18h]
              PUSH ECX
              mov eax, 453DD0h ;LOC_453DD0
              CALL eax
              ADD ESP,4h
              CMP AX,0FFFFh
              JE Go1
              MOVSX EAX,AX
              LEA EDX,DWORD PTR [EAX+EAX*4]
              mov EAX, 8011C0h ;ZonaFootPrint_Fine
              MOV EAX,DWORD PTR [EAX]
              MOV WORD PTR [EAX+EDX*8+14h],8Eh
              push eax
              mov eax, 80DF04h ;FlagsLara
              OR BYTE PTR [eax],8h
              pop eax
    Go1:
              RETN
              NOP

    Now we can copy simply above code inside of our Patch_01 procedure and we can try in game if it works.
    Since we have not yet made any change, for us it's enough (for now) that our code will be performed without bugs.
    I remember that the conversion Olly->In-line assembly, it's not always perfect. Sometime it will be necessary some fixing you should perform yourself.
    In this case it should work without changes, in spite some makeup could be useful.
    For instance the code like this:

              push eax
              mov eax, 80DF04h ;FlagsLara
              TEST BYTE PTR [eax],8h
              pop eax
              JNZ Go1

    It could be cleaned removing the (useless) push eax/pop eax:

              mov eax, 80DF04h ;FlagsLara
              TEST BYTE PTR [eax],8h
              JNZ Go1

    Note: this extra code to save/restore eax register, it has been generated because TrngPatcher is not so smart to understand that, in this case, it's useless preserving the value of eax register.
    After some makeup, our Patch_01 code should appear like this:

    // relocate whole LaraBurn procedure:
    BEGIN_ASM_PROC(Patch_01)
              mov eax, 80DF04h ;FlagsLara
              TEST BYTE PTR [eax],8h
              JNZ Go1
              mov EAX, 80DF04h ;FlagsLara
              MOV EAX,DWORD PTR [EAX]
              TEST AH,2h
              JNZ Go1
              mov EAX, 80E01Ch ;Ptr_Lara
              MOV EAX,DWORD PTR [EAX]
              MOV CX,WORD PTR [EAX+18h]
              PUSH ECX
              mov eax, 453DD0h ;LOC_453DD0
              CALL eax
              ADD ESP,4h
              CMP AX,0FFFFh
              JE Go1
              MOVSX EAX,AX
              LEA EDX,DWORD PTR [EAX+EAX*4]
              mov EAX, 8011C0h ;Ptr_Effects
              MOV EAX,DWORD PTR [EAX]
              MOV WORD PTR [EAX+EDX*8+14h],8Eh
              push eax
              mov eax, 80DF04h ;FlagsLara
              OR BYTE PTR [eax],8h
              pop eax
    Go1:
              RETN
    END_ASM_PROC

    Note: we have also changed the line:

              mov EAX, 8011C0h ;ZonaFootPrint_Fine

    With the line (changing only the comment):

              mov EAX, 8011C0h ;Ptr_Effects

    The mistake of TrngPatcher about mnemonic name to assign to 8011C0h offset, it's understandable if we watch the Tomb4Data.txt source at that offset:

    8011C0: ZonaFootPrint_Fine:
    8011C0: Ptr_Effects:          
    8011C0:                     DD ?

    There were two mnemonics for same offset and TrngPatcher chose that wrong. It happens..


    Testing in game the relocation of LaraBurn procedure
    Now we build the plugin and copy to trle folder, as usual.
    To test if our relocation works we need to execute tomb4 from debugger setting a breakpoint at first row of (our) LaraBurn procedure:


    Then, in game, we'll chose the level:

    Example 2: callbacks for collision procedure

    Where we find the "Magic Glasses" effect. We extract flare and move against red glass to see what happens.
    If the control pass to debugger and first row of our Patch_01 procedure, it's a good news.
    Anyway, to have a better check, we should now remove the breakpoint and let go on the execution to see if there are further problems in game.

    In this case all worked fine, this means that now we could add, inserting, change instruction in our Patch_01 procedure to realize our target.


    The Parametric Patches

    The patches we saw in previous chapters, flat or less, were all of TYPP_CONTIGUOUS_BYTES type. This is a flag to sign the kind of patch, inside of patches database handled by trng core.
    Those patches were "contiguous" because they had a start offset and a final offset, a specific range, where changing original tomb4 code.
    Surely contiguous patches are most common, anyway there is a particular situation where a contiguous patch cann't work fine.
    When you don't want change code, meant like "assembly instructions" but rather constant values, a contiguous patch is not advisable.
    To understand better this matter we can see one of parametric trng patches already created.


    Parametric Patch to change Shatter Static Range
    In original tomb4 the shatter statics were enclosed in the range: SHATTER0 - SHATTER9, i.e. 10 shatter statics.
    About static slot numbers we had:

    SHATTER0 = 50 (0x32)
    SHATTER9 = 59 (0x3B)

    When I tried to change shatter range I had to look for these constant values in tomb4 code and I found them in many different sides of the code:

    429C6D:                    MOV AX,WORD PTR [ESI+12h]
    429C71:                    CMP AX,32h
    429C75:                    JL LOC_429D11
    429C7B:                    CMP AX,3Ah
    429C7F:                    JGE LOC_429D11

    And here:

    44D011:                    CMP AX,32h
    44D015:                    JL LOC_44D070
    44D017:                    CMP AX,3Ah
    44D01B:                    JGE LOC_44D070

    And here:

    4650F0:                    CMP CX,32h
    4650F4:                    JL LOC_465296
    4650FA:                    CMP CX,3Bh
    4650FE:                    JG LOC_465296

    And here:

    467960:                    CMP AX,32h
    467964:                    JL LOC_467B19
    46796A:                    CMP AX,3Bh
    46796E:                    JG LOC_467B19

    And over in some other side...
    Anyway above code zone are already enough to understand the problem.
    Since I didn't want change the instruction but only the constant value used for comparison, I've not used many contiguous patches but only one (really two: one for Start shatter range and other for End shatter range) to modify these value in any side of tomb4 where they were.
    Pratically I used a parametric patch to change shatter range.


    The ApplyParametricPatch() function
    Prototype:

    int ApplyParametricPatch(StrParamPatch *pVetParamList, int TotParamList, int NewValue);

    To apply a parametric patch you have to use this function.
    Input parameters:
    pVetParamList : a pointer to an array of StrParamPatch structures
    TotParamList : the amount of records in pVetParamList array
    NewValue: the new constant value to assign
    Returns a enumAPPC_ constant. If APPC_OK : the patch has been successfully performed. With other value you could had a warning or a real error.
    Note: positive values are warnings while negative values are errors.


    The StrParamPatch structure
    Basic data for parametric patches are store in StrParamPatch records.

    typedef struct StrParamPatch {
              DWORD Offset;
              char SizeType; // 'D' (dword) 'W' word 'B' byte
              int Gap; // relative value to add +-
    }ParamPatchFields;

    Description of Fields:
    Offset : the tomb4 offset where the constant to replace is stored. Please note that this offset is NOT the same offset you see when you look the disassembly window, but a bigger values since the memory zone where the constant value is stored is always after the byte to code the assembly instructions. See next chapter

    SizeType: the is a single char to describe the bytes used to store the constant inside tomb4 code: it could be 'B' (one byte) ; 'W' (two bytes) ; 'D' (four bytes). You have to analyse the disassembled instruction to understand this size.

    Gap: this is an optional extra value to add to new patched value.


    How to discover real offset and size of Constant for Parametric Patch
    In Offset field you'll type the tomb4 offset where start the constant value to patch.
    Now let's look newly that code for shatter range:

    429C6D:                    MOV AX,WORD PTR [ESI+12h]
    429C71:                    CMP AX,32h
    429C75:                    JL LOC_429D11
    429C7B:                    CMP AX,3Ah
    429C7F:                    JGE LOC_429D11

    Let's say we are creating the patch for start shatter value, i.e. we want change the "32h" (50, SHATTER0) with another value.
    The value to change is that in this row:

    429C71:                    CMP AX,32h

    We have to understand that it should be a severe error using 429C71 as offset, because this offset is where the instruction begins, but the value "32h" is stored after, in other offset.
    To discover the right offset we need to look carefully the disassembly panel of Olly:

    0046795C |. 66:8B46 12 ||MOV AX,WORD PTR DS:[ESI+12]
    00467960 |. 66:3D 3200 ||CMP AX,32
    00467964 |. 0F8C AF010000 ||JL TOMB4.00467B19

    Fortunately olly place some space in hex dump bytes after the instruction, to divide different fields in byte sequence.
    In this way we can suppose that this instruction:

    00467960 |. 66:3D 3200 ||CMP AX,32

    Has "66:3D" to set the instruction type "CMP AX", while (after a space) the bytes "3200" are the constant value (32h) in usual low/high format.
    In this way we discover that:
    - The constant value start two bytes after the start of instruction, so 467960 + 2 = 467962
    - That the constants has been store in two bytes, i.e. a WORD

    Therefor the record to patch the instruction:

    00467960 |. 66:3D 3200 ||CMP AX,32

    it will be:
    Offset = 467962
    SizeType = 'W'


    How to set Gap field for Parametric Functions
    The "Gap" field of StrParamPatch structure will be very often set to 0, anyway now we consider that seldom circustance where you should use a not null value for Gap.
    Looking newly the code to patch for shatter range we discover a weirdness:

    429C7B: CMP AX,3Ah
    429C7F: JGE LOC_429D11

    Compare above code with following code:

    4650F0: CMP CX,32h
    4650F4: JL LOC_465296
    4650FA: CMP CX,3Bh
    4650FE: JG LOC_465296

    Do you see that, while in first block there was a comparison with 3Ah value (58), in second block the comparison is with 3Bh (59)?
    Above it's not a bug from eidos programmers but rather it shows different way to perform same comparison.
    We can verify if register is greater or even than N, or if it is (only) greater (without "even") than N+1.
    Indeed, while in first block the conditional jump was:

    429C7B: CMP AX,3Ah
    429C7F: JGE LOC_429D11

    I.e. "Greater or Even" than 3Ah
    In the second block it was:

    4650FA: CMP CX,3Bh
    4650FE: JG LOC_465296

    I.e. Greater than 3Bh
    Final result is the same but in tomb4 code we find different constant values.
    To fix this difference we'll use the Gap field: when the constant in tomb4, in that given instruction, is higher than usual (usually by 1), we'll set, as patch record for that instruction, a Gap = 1.


    Example of Parametric Patch
    Since I've not in this moment any good new idea about a useful parametric patch, we'll see an old parametric patch: that about shatter offset we have just analysed.
    To realize this patch we should:


    Final result should be a code like this:

    int ChangeStaticShatterRange(void)
    {
              // array with data about Start Range to modify
              static StrParamPatch VetPatchStart[] = {
                        {0x429C73, 'W' ,0},
                        {0x44D013, 'W' ,0},
                        {0x4650F3, 'B' ,0},
                        {0x467962, 'W' ,0}};          
              // array with data about End Range to modify
              static StrParamPatch VetPatchEnd[] = {
                        {0x429C7D, 'W' ,1},
                        {0x44D019, 'W' ,1},
                        {0x4650FD, 'B' ,0},
                        {0x46796C, 'W' ,0}};
              int RetValue;
              // patch for Start range:

              RetValue = ApplyParametricPatch(VetPatchStart, 4, 60);

              if (RetValue != enumAPPC.OK) return RetValue;

              // patch for End range
              return ApplyParametricPatch(VetPatchEnd, 4, 75);
    }

    In above example we forced the start range at static 60 and the final range at 75.


    Unrecoverable Patch Conflicts

    In previous chapter we described how to realize a parametric patch anyway... it's better don't trying to perform that patch!
    Indeed, adding the call to set above patch in CreateMyCodePatches():

              SET_PATCH(ChangeStaticShatterRange)

    You'll get an error message like this:


    The reason it has been already said: trng had already created that parametric patch and yours should generate a conflict.
    Anyway we could wonder: Why is not possible overwrte an older patch, created by other plugins (or trng)?
    Well, the good news it that, in most common situations, it's possible overwrite older patches.
    While, the bad news, is that there are seldom circustances where it's not possible.
    One of these situations is when you are trying to overwrite a run-time patch.


    The run-time Patches
    As default all patches will be created at start of the tomb4 program, before creating directx and other graphic stuff.
    They will be created at start and only once, of course.
    Anyway there are seldom patches that work in different way: they will be applied in the progress of the game, usually following input by some script settings.
    This means that, these patches will be performed over and over and for this reason it's not possible overwrite them, since, any your attempt will fail when that patch will be newly applied.
    The run-time patches don't work fine with plugin system and indeed they are forbidden.
    Currently there are only two (old) run-time patches created by trng: that for shatter range and another for binocular FOV.
    In the future I'll not create ever more run-time patches.


    Recoverable Patch Conflicts

    How said, in most case your plugin is able to overwrite older plugin or trng patches and when it will happen, it will be written only a warning message in "PlugIn_trng_warm_up_log.txt" (if your plugin has another name, also the name of log file will be different, of course)
    The warning don't stop the running of tomb4 and so all will work, apparently
    Anyway it's better taking care about warning messages.
    You should try to understand if the older patch you overwritten will have collateral effects.


    With Great Power comes Great Responsability - Rule
    Spiderman knew that and it's important you understood this rule, too.
    Your plugin can overwrite (almost) all previous patches (great power) but this follows that you felt a great responsability.
    If you overwrite patches and not take care about what was their target, you are getting instable all trng-plugin system (when your plugin is present).
    I say this because I know the idea: "Ok I could be a good boy and follow all rules but if I was a bad boy I could have a lot of gains"
    Really only gain is to spend less time to find a way to get your plugin compatible with trng and other plugins, while the collateral effect should be that, in short time, the story that your plugin mess up everything will be known from all and then... no one will wish using your "messed/messing" plugin on his computer.
    So, following good rules, it could be good also for you.

    When you detect a conflict warning, you should:
    1. Trying to discover what was the target of patch you are overwritting
    2. Once you understood the meaning of that patch, try to replace same target in your patch, to let unchanged (or improved) that kind of management
    3. If you are not able to follow first two points, try to move your patch in other zone to avoid the conflict

    About point 2) I remember (once again) that you can get a CBT_FIRST or CBT_AFTER callback for all numerical trng patches or trng triggers, so you can add code in that zone but preserving the job of trng.

    Note: all these rules to avoid conflicts and future problems are valid only when you are thinking to create a plugin to share with other level builders. Differently, when you are building this plugin only as support for your game and you don't think to give this plugin to other people, and neither to do work it with other plugins, in this case... you can do any foolishness, of course. It's only a problem of yours, at end...


    The Call Parametric Patches

    The Call Parametric Patch is another kind of parametric patch. In this case you'll not change a constant value but the address of a call instruction.
    This kind of patches work ONLY on call in this (flat) format:

              call Address

    Where "Address" is a tomb4 offset.
    It's not so common needing of this kind of patch, anyway it works like a mix between parametric (data) patch, where you want change single values sprinkled in wide code zones, and the relocator patch, since you'll use this patch own when you want that a call to some procedure, came redirected (like relocated) to another procedure.
    As generale rule, it should be better using the ApplyRelocatorPatch() function if you wish simply that an "Alfa" procedure was relocated in "Beta" procedure. Only exception is when you wish relocate only some Alfa calls but not alls.
    In this situation the only way is to use a Call Parametric Patch.


    The ApplyCallPatch() function
    Prototype:

    int ApplyCallPatch(DWORD *pVetOffsets, int TotOffsets, DWORD NewDestAddress);

    Input parameters:

    pVetOffsets : pointer (or array) to DWORD with offset where apply the patch

    TotOffset : Amount of offset in pVetOffsets array

    NewDestAddress: the new tomb4 offset where all CALLs will jump

    Note: The offsets stored in pVetOffsets, are not the address you see at left of "call " instruction but that value + 1.
    For instance:

    401E93:                     call 4027C0h

    40293E:                     call 4027C0h

    If you want patch above two call instructions, using as new target address the value 0x402950, you should create a patch like this:

              static DWORD VetOffset[] = {0x401E94, 0x40293F};
              
              ApplyCallPatch(VetOffset, 2, 0x402950);

    As you see, the offsets are the offset of call instruction +1.
    Once above patch has been applied, the code will be:

    401E93:                     call 402950h

    40293E:                     call 402950h

    Note: its' possible that the NewDestAddress offset was a procedure/function in your plugin.
    For instance, if you (in plugin_trng.cpp) created a procedure like this:

    BEGIN_ASM_PROC(AddNewEffect)
              ... assembly code ...
    END_ASM_PROC

    And you want that the (above) call 4027C0h will jump to your AddNewEffect procedure, you can create following patch:

              static DWORD VetOffset[] = {0x401E94, 0x40293F};
              
              ApplyCallPatch(VetOffset, 2, (DWORD) &AddNewEffect);

    Note: the "(DWORD)" casting it's necessary because the ApplyCallPatch() function waits for a DWORD value, for NewDestAddress parameter.


    Patch to Restore Original Tomb4 Code

    When you established to overwrite a patch with yours, you could wish to apply your patch on original tomb4 code, rather trying to restore, patch over patch, the previous patched code with yours.
    Theoratically you could create a very wide patch zone, of course, created starting from unpatched code you find in olly before launching tomb4.
    Anyway if your patches are short but you want to be sure that no other old patch changed original tomb4 code, you can require a restoring of original tomb4 code, for a given offset range, and only then, apply your little patch on that "virgin" (restored) tomb4 code.
    Hoping that you knew what you are doing, in above case you can use a Restore Code Patch...


    The ApplyRestoreCodePatch() function
    Prototype:

    int ApplyRestoreCodePatch(DWORD StartOffset, DWORD EndOffset);

    Input parameters:
    StartOffset - EndOffset : range tomb4 code offset, where to restore code preceding any kind of dynamic patch, from trng or older plugins.

    Note:
    Remember that this function works ONLY on tomb4 CODE, not on Data segment of tomb4 program. This means you can restore zones only inside of range: 0x401000 - 0x4A6FFF


    How to reserve Data Zone

    I hope it was clear because it's important using the above "apply patch" function supplied by trng, rather other self-made changes to tomb4 exe.
    Using trng patcher functions you give infos about zones where your plugin applied some patch, in this way the trng core is able to inform you (and other Plugin Builders) about possible conflicts. Having these warnings and detailed infos (like that in "db_patches.bin" file) it will be more easy sharing that "tomb4 resources" avoiding bugs and crash.
    Following above rules and functions to create your patches, you'll let always right information to do work fine trng core and other plugins, about the changed tomb4 code.
    There is only a problem to solve: what's happen if you mean using some free tomb4 memory zone (data rather code, in this case)?
    How will be able, other plugin builders to know you used these data zone, since you've not done any patch on these zones?
    To solve this problem you have to use a function that has own the target to get infos about non-patched but used-zone by your plugin.


    The SetReservedDataZone() function
    Prototype:

    bool SetReservedDataZone(DWORD StartOffset, DWORD NBytes);

    Input arguments:
    StartOffset : the tomb4 offset from where the zone starts

    NBytes: the amount of bytes of the length of above zone

    There is at least one situation where you'll need to use this function: when you got an assigned free memory zone from TrngPatcher.
    In that case you'll set your Tomb4 Patcher Address in that zone and then you should inform trng core that (first or then) your plugin will use that zone.
    For instance, when we got a free memory zone for our plugin (but in this case in according with "plugin_trng.dll" name, so you'll have to change it, for yours) we should have reserved data zone calling the SetReservedDataZone().
    So now we'll do it (but remember to require a different zone for your plugin and change following data)
    We got this range:

    Free range for "plugin_trng.dll" is: $628278 - $6282F7

    This means we have to inform trng core that our plugin reserved above range.
    So we'll type, in same function used to create patches, i.e. the CreateMyCodePatches() function, this code:

    bool CreateMyCodePatches(void)
    {
              // inform trng core about free data zone used by my plugin:
              SetReservedDataZone( 0x628278, 128);

    Note: remember that the TrngPatcher command, to assign free memory, returns always a block of 128 bytes. The fact that, subtracting 0x6282F7 - 0x628278, we get 127 it's only because output of TrngPatcher returns own your bytes and last your byte is that at offset 0x6282F7, anyway from byte 0 to 127 are 128 bytes.


    Conclusions

    Some words about this turorial and plugin_trng project.
    In spite two help file are very big, I suggest at least to study really row by row, first example of Plugin SDK 1 help file, If you understand the basics then it will be more easy also skipping some chapter to use only advanced code.
    About the code of plugin_trng it has been created only with an "educative" target: to learn to you how manage different resoruces of trng library and tomb4 program.
    However, in spite of this only-demonstrative target, in plugin sources there are some stuff that you could find really useful in game, like some objects (the Crane, the Star Wars and Cleaner robots or the MechWarrior).
    About the code of above object I suggest you to do NOT use "plugin_trng.dll" "as it is" in your level, because there are some code, like that of patches or about some hardcoded effects, that could be create conflicts with other plugins for no reason.
    My idea is another...
    When you wish using some stuff from plugin_trng project, you should choose one of these two chances:
    1. Extract, yourself, specific code you wish and pasting in your plugin

    2. Compiling the specific sub-projects that you find in PLUGIN_SDK_STORE folder, to use only that specific object you wish.


    About Clean Plugins (Again...)

    As said, a Clean plugin is that with no patch. A plugin that has own serie of triggers, customize script command, many callbacks about any kind of trng or tomb4 elaboration but no patch.
    I know that some, very particular changes are yet possible only whereby patches and, in this specific case, I tell you: "Use many patches and do a great job to improve trng/tomb4!"
    My only plea is to thinking very fine to verify if really it's not possible reaching same target using callbacks (or other "clean" resources) rather a patch.

    About this speech it's interesting this fact: I tried to create a very very high number of callbacks (from game's phases to trigger, script command, lara's state ids ect) own to give more chances to perform your changes with callbacks avoding the patches, anyway.,. if you have a great idea to improve the game but there is no callback to realize it... try to query me about this project. Probably I could create fastly a new callback perfect for your target.
    The reason because a callback is cleaner than a patch, it's because a plugin patch (differently by a trng patch) remove a zone of tomb4 code from other plugin or trng usage and increase the chances of conflicts. Differently code point handled by callback could be used by all plugin in clean way, simply asking for a new CBT_FIRST or CBT_AFTER callback.
    In the case I had forgotten to say, indeed, plenty of plugins can getting in some moment a callback for same trng/tomb4 feature, while only one plugin can patch same tomb4 zone.